background image

iNSTallaTiON 


Specification

14

 | DCE-S  Plus 

www.stiebel-eltron.com

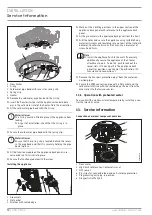
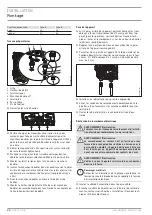
15.2.1  Cleaning the strainer, standard installation on finished 

walls


f

Isolate the appliance from the power supply.


f

Close the shut-off valve in the cold water inlet line.


f

Open all draw-off valves.


f

Remove the cold water threaded fitting.


f

Remove the strainer from the twin nipple using a flat-blade 

screwdriver. Clean the strainer. 


f

Reinsert the strainer. Screw the cold water connection pipe 

onto the twin nipple.


f

Open the shut-off valve in the cold water inlet line.


f

Vent the appliance and the cold water inlet line (see chapter 

"Commissioning / Initial start-up").


f

Switch on the power supply.

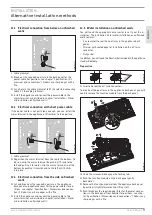
15.2.2  Cleaning the strainer, installation on unfinished walls


f

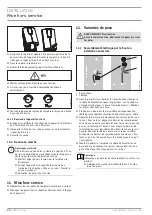
Isolate the appliance from the power supply.


f

Close the shut-off valve in the cold water inlet line.


f

Open all draw-off valves.


f

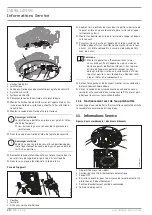
Open the appliance by undoing the screw and lifting up the 

appliance cover.


f

Unscrew the cold water connection pipe from the twin nip-

ple. Pivot the cold water connection pipe upwards.


f

Remove the strainer from the twin nipple. Clean the strainer.


f

Screw the cold water connection pipe and the strainer with 

sealed edge onto the twin nipple.


f

Open the shut-off valve in the cold water inlet line.


f

Vent the appliance and the cold water inlet line (see chapter 

"Commissioning / Initial start-up").


f

Check the cold water connection for leaks.


f

Hook the appliance cover into the appliance back panel at the 

top rear. Pivot the appliance cover downwards. Check that 

the appliance cover is securely seated both top and bottom. 

Secure the appliance cover with the screw.


f

Switch on the power supply.

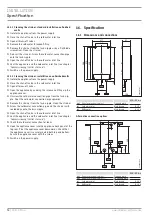
16.  Specification

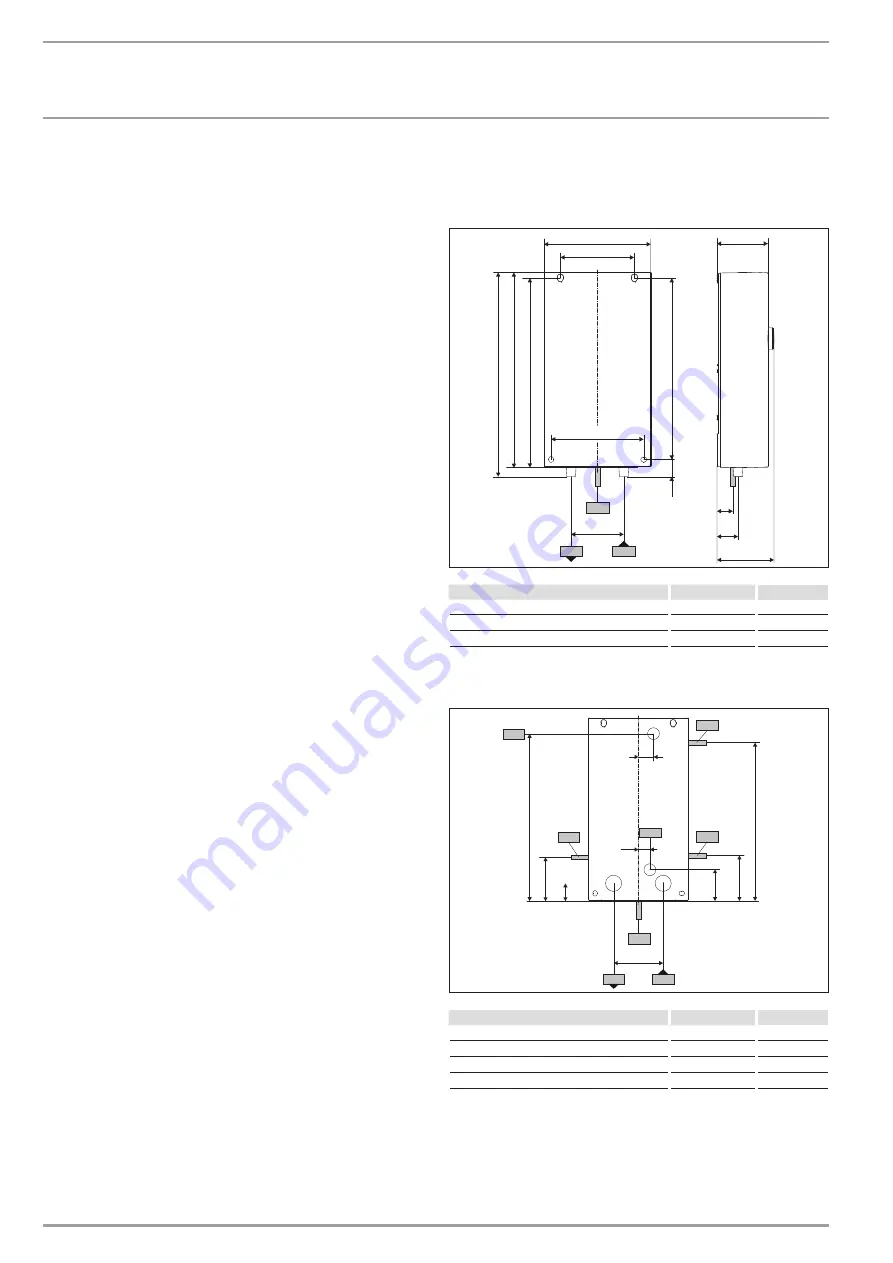
16.1  Dimensions and connections

372

358

343

14

97

217

140

175

100

c01

c06

35

32

109

b02

380

D

00000

73

69

3


DCE-S Plus

b02  Entry for electrical cables I

Finished walls


c01  Cold water inlet

Male thread

G 1/2 A

c06  DHW outlet

Male thread

G 1/2 A

Alternative connection options

100

c01

c06

b02

72

330

b02

b02

69

35

336

b02

b03

30

61

15

b03

D

00000

73

72

0


DCE-S Plus

b02  Entry for electrical cables I

Finished walls


b03  Entry for electrical cables II

Unfinished walls


c01  Cold water inlet

Male thread

G 1/2 A

c06  DHW outlet

Male thread

G 1/2 A

Summary of Contents for DCE-S 10/12 Plus

Page 1: ...RUKOVANJE I INSTALACIJA Electronically controlled compact instantaneous water heater Chauffe eau instantan compact r gulation lectronique Calentador instant neo compacto con regulaci n electr nica El...

Page 2: ...10 Commissioning 9 10 1 Internal anti scalding protection via jumper slot 9 10 2 Changing the connected load via the jumper slot 9 10 3 Initial start up 9 10 4 Recommissioning 10 11 Appliance shutdown...

Page 3: ...iance must be connected to the earth conductor The appliance must be permanently connect ed to fixed wiring Secure the appliance as described in chapter Installation Installation Observe the applicati...

Page 4: ...ature may exceed the set temperature or a set temperature limit f In this case limit the temperature with an upstream central thermostatic valve WARNING Injury The appliance may be used by children ag...

Page 5: ...tractor to 55 C or less Limiting it in this way prevents water from flowing out of the appliance at temperatures which could cause injury Recommended setting for operation with a thermostatic valve an...

Page 6: ...pplicable national and regional regulations and instructions The protection rating IP 25 hoseproof is only guaranteed with a properly fitted cable grommet and the use of counter sunk screws 4 5 mm wit...

Page 7: ...sure that the flow rate for switching on the appliance is achieved f If the required flow rate is not achieved when the draw off valve is fully open remove the flow limiter from the cold water inlet I...

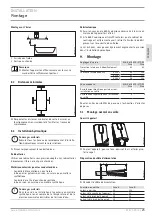
Page 8: ...ter Specification Dimensions and connections The upper two fixing holes are already open f Mark out the 4 drilling positions with reference to the appli ance back panel f Drill the holes and secure th...

Page 9: ...Pmax pin strip Jumper position Connected load DCE S 6 8 Plus DCE S 10 12 Plus 1 low 220 V 6 0 kW 10 0 kW 230 V 6 6 kW 11 0 kW 240 V 7 2 kW 12 0 kW 2 high 220 V 8 0 kW 12 0 kW Factory setting 230 V 8...

Page 10: ...start up f Switch the power back ON 11 Appliance shutdown f Isolate all poles of the appliance from the power supply f Drain the appliance see chapter Maintenance Draining the appliance 12 Alternativ...

Page 11: ...e appliance back panel and appliance cover for the power cable for po sitions see chapter Specification Dimensions and connec tions Deburr any sharp edges with a file f Install the appliance and conne...

Page 12: ...r section of the appliance back panel with reference to the appliance back panel f Fit the grommets in the appliance back panel from the front f Drill the holes and secure the appliance using suitable...

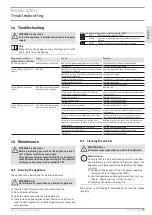
Page 13: ...n ing Activate the safety switch by firmly pressing the reset button Safety switch was triggered by high limit safety cut out Check high limit safety cut out plug in connec tion connecting cable activ...

Page 14: ...ot the cold water connection pipe upwards f Remove the strainer from the twin nipple Clean the strainer f Screw the cold water connection pipe and the strainer with sealed edge onto the twin nipple f...

Page 15: ...load in kW 50 C DHW output in l min Rated voltage Cold water inlet temperature 220 V 230 V 240 V 5 C 10 C 15 C 20 C DCE S 6 8 Plus 6 0 1 9 2 1 2 4 2 9 8 0 2 5 2 9 3 3 3 8 6 6 2 1 2 4 2 7 3 1 8 7 2 8 3...

Page 16: ...0 60 50 60 Phases 1 N PE 1 N PE Resistivity 15 cm 1100 1100 Conductivity 15 S cm 910 910 Max mains impedance at 50 Hz 0 0385 0 0368 0 0353 0 0257 0 0245 0 0235 Connections Water connection G 1 2 A G 1...

Page 17: ...by those subsidiaries Such guarantee is only grant ed if the subsidiary has issued its own terms of guarantee No other guarantee will be granted We shall not provide any guarantee for appliances acqui...

Page 18: ...Fonctionnement avec de l eau pr chauff e 28 13 Informations Service 28 14 Aide au d pannage 29 15 Maintenance 29 15 1 Vidange de l appareil 29 15 2 Nettoyer le filtre 30 16 Donn es techniques 30 16 1...

Page 19: ...allateurs Remarque Lisez attentivement cette notice avant l utilisation et conservez la soigneusement Le cas ch ant remettez cette notice tout nouvel uti lisateur 1 1 Consignes de s curit 1 1 1 Pr sen...

Page 20: ...en amont AVERTISSEMENT Blessure L appareil peut tre utilis par des enfants de 3 ans et plus ainsi que par des personnes aux facult s physiques sensorielles ou mentales r duites ou par des personnes sa...

Page 21: ...rie thermostatique et d eau pr chauff e par une installation solaire f R glez la temp rature au maximum sur l appareil 4 Nettoyage entretien et maintenance f N utilisez aucun produit de nettoyage abra...

Page 22: ...t 6 3 Prescriptions normes et r glementations Remarque Respectez toutes les prescriptions et r glementations nationales et locales en vigueur L indice de protection IP 25 prot g contre les jets d eau...

Page 23: ...te de la temp rature et de la pression maximale admissibles de l arriv e d eau D bit volumique f Assurez vous que le d bit volumique n cessaire la mise en marche de l appareil est atteint f Si le d bi...

Page 24: ...l pour les positions voir le chapitre Donn es tech niques Cotes et raccordements Les deux trous de fixation sup rieurs sont d j ouverts f Rep rez les 4 positions de trous en vous aidant de la paroi ar...

Page 25: ...alier la position souhait e sur la barrette Pmax Position cavalier Puissance de raccordement DCE S 6 8 Plus DCE S 10 12 Plus 1 low 220 V 6 0 kW 10 0 kW 230 V 6 6 kW 11 0 kW 240 V 7 2 kW 12 0 kW 2 high...

Page 26: ...branchez tous les p les de l appareil raccord s au secteur f Vidangez l appareil voir le chapitre Maintenance Vidange de l appareil 12 Variantes de pose AVERTISSEMENT lectrocution Avant toute interven...

Page 27: ...rri re et le capot sciez et rompez la travers e n cessaire pour le c ble d alimentation pour les positions voir le chapitre Donn es techniques Cotes et raccorde ments barbez les ar tes vives avec une...

Page 28: ...aidant de la paroi arri re de l appa reil comme gabarit f Montez les douilles dans la paroi arri re de l appareil depuis la face avant f Percez les trous puis fixez l appareil l aide du mat riel de fi...

Page 29: ...cer la sonde de sortie Syst me de chauffage d fectueux Remplacer le module fonctionnel Syst me lectronique d fectueux Remplacer le module fonctionnel Vert clignotant jaune teint rouge allum Pas d eau...

Page 30: ...e f Mettez l appareil hors tension f Fermez le robinet d arr t de l arriv e d eau froide f Ouvrez tous les robinets de soutirage f Ouvrez l appareil pour ce faire d vissez la vis et faites pivo ter l...

Page 31: ...3 8 9 11 3 Puissance raccord e en kW Capacit de production d eau chaude sanitaire 50 C en l min Tension nominale Temp rature d arriv e d eau froide 220 V 230 V 240 V 5 C 10 C 15 C 20 C DCE S 6 8 Plus...

Page 32: ...1 N PE 1 N PE R sistance sp cifique 15 cm 1100 1100 Conductivit sp cifique 15 S cm 910 910 Imp dance de r seau maximale 50 Hz 0 0385 0 0368 0 0353 0 0257 0 0245 0 0235 Raccordements Raccordement hydr...

Page 33: ...ran tie Une telle garantie ne pourra cependant tre accord e que si la filiale a publi ses propres conditions de garantie Il ne sera accord aucune garantie par ailleurs Nous n accordons aucune garantie...

Page 34: ...rico visto lateral 43 12 5 Instalaci n de agua oculta 43 12 6 Operaci n con agua precalentada 44 13 Informaci n de servicio 45 14 Reparaci n de aver as 45 15 Mantenimiento 46 15 1 Vaciado del aparato...

Page 35: ...las en un lugar seguro Entregue las instrucciones a otros posibles usuarios de este aparato 1 1 Instrucciones de seguridad 1 1 1 Estructura de las instrucciones de seguridad PALABRA DE ADVERTENCIA Tip...

Page 36: ...impieza y mante nimiento propias del usuario sin vigilancia Da os materiales El usuario debe proteger el aparato y las v lvulas frente a la formaci n de escarcha Nota Para cumplir con la clase de prot...

Page 37: ...medo f Revise la grifer a valvuler a peri dicamente La cal en las tomas de grifos puede eliminarse utilizando los productos antical disponibles en el mercado 5 Resoluci n de problemas Problema Causa...

Page 38: ...previamente 6 3 Reglamentos normas y disposiciones Nota Tenga en cuenta todos los reglamentos y disposiciones nacionales y regionales La clase de protecci n IP 25 protegido de salpicaduras de agua sol...

Page 39: ...presente la temperatura de admisi n m xima admisible y la pre si n m xima admisible Caudal f Aseg rese de que se alcanza el caudal necesario para que se encienda el aparato f Si no se alcanza el caud...

Page 40: ...aciones t cnicas Dimensiones y conexiones Los dos orificios de fijaci n superiores ya est n abiertos f Marque las 4 posiciones de taladrado con ayuda de la pared posterior del aparato f Taladre los or...

Page 41: ...encia conectada DCE S 6 8 Plus DCE S 10 12 Plus 1 low a 220 V 6 0 kW 10 0 kW a 230 V 6 6 kW 11 0 kW a 240 V 7 2 kW 12 0 kW 2 high a 220 V 8 0 kW 12 0 kW Configuraci n de f brica a 230 V 8 7 kW 13 1 kW...

Page 42: ...ipolarmente de la conexi n a la red el ctrica f Vac e el aparato v ase el cap tulo Mantenimiento vaciar el aparato 12 Alternativas de montaje ADVERTENCIA Electrocuci n Siempre que desee realizar cualq...

Page 43: ...esplazando hacia la izquierda hasta que encaje 12 4 Acoplamiento el ctrico visto lateral f Sierre y realice el orificio necesario para el cable de conexi n a la red el ctrica en el panel posterior del...

Page 44: ...or del aparato hasta que el grupo funcional encaje f Fije el grupo funcional con el tornillo Montaje del aparato D0000073842 3 2 1 1 Arandelas de goma 2 Junta plana 3 Filtro con borde de estanqueidad...

Page 45: ...d Comprobar los fusibles en la instalaci n dom stica Sistema electr nico defectuoso Sustituir el grupo funcional Verde intermitente amarillo apagado rojo apagado No hay agua caliente No se alcanza el...

Page 46: ...su caso ser 60 V DC durante un breve periodo 15 1 Vaciado del aparato Puede drenar el aparato para los trabajos de mantenimiento ADVERTENCIA Quemaduras Cuando vac e el aparato puede salir agua calien...

Page 47: ...rato por la parte superior trasera en la pared posterior del aparato Gire la tapa del aparato hacia abajo Compruebe que la tapa del aparato quede firmemente asentada por arriba y abajo Fije la tapa de...

Page 48: ...de conversi n Resistencia el ctrica espec fica y conductividad el ctrica espe c fica Indicaci n est ndar a 15 C 20 C 25 C Resis tencia Conductividad Resis tencia Conductividad Resis tencia Conductivi...

Page 49: ...udo Tapa y pared posterior Pl stico Pl stico Color Blanco Blanco Tipo de protecci n IP IP 25 IP 25 Dimensiones Altura mm 372 372 Ancho mm 217 217 Profundidad mm 109 109 Pesos Peso kg 2 5 2 5 Nota El a...

Page 50: ...oparotina preko utora za premosnik 57 10 2 Promjena priklju ne snage pomo u uti nog mjesta premosnika 57 10 3 Prvo pu tanje u rad 57 10 4 Ponovno pu tanje u rad 58 11 Stavljanje izvan pogona 58 12 Al...

Page 51: ...za titni vodi Ure aj mora biti trajno priklju en na fiksno o i enje Pri vrstite ure aj na na in opisan u poglavlju Instalacija Monta a Obratite pozornost na granice primjene vi djeti poglavlje Instal...

Page 52: ...na predspoje noj sredi njoj termostatskoj slavini UPOZORENJE na ozljede Ure aj mogu upotrebljavati djeca starija od 3 godina te osobe smanjenih fizi kih osjetilnih ili mentalnih sposob nosti ili osob...

Page 53: ...mje tanje pri radu s termostatskom slavinom i unaprijed solarno zagrijanom vodom f Namjestite temperaturu na ure aju na maksimalnu temperaturu 4 i enje njega i odr avanje f Ne upotrebljavajte sredstva...

Page 54: ...si norme i odredbe Napomena Obratite pozornost na sve nacionalne i regionalne propise i odredbe Vrsta za tite IP 25 za ti eno od mlaza vode zajam ena je samo kad je kabelski tuljac propisno montiran i...

Page 55: ...ode i maksimalno dopu teni tlak Volumni protok f Pobrinite se da se postigne volumni protok potreban za uklju ivanje ure aja f Ako se dok je do kraja otvoren odvodni ventil ne postigne potrebni volumn...

Page 56: ...e Tehni ki podatci Mjere i priklju ci iz pole ine ure aja Oba gornja provrta za pri vr enje ve su otvorena f Ucrtajte 4 polo aja za bu enje pomo u pole ine ure aja f Izbu ite provrte pa pri vrstite ur...

Page 57: ...vice Pmax Pozicija premosnika Priklju na snaga DCE S 6 8 Plus DCE S 10 12 Plus 1 low 220 V 6 0 kW 10 0 kW 230 V 6 6 kW 11 0 kW 240 V 7 2 kW 12 0 kW 2 high 220 V 8 0 kW 12 0 kW Tvorni ka postavka 230 V...

Page 58: ...gona f Odvojite ure aj na svim polovima od mre nog priklju ka f Ispraznite ure aj vidi poglavlje Odr avanje Pra njenje ure aja 12 Alternativna monta a UPOZORENJE strujni udar Pri izvo enju svih radova...

Page 59: ...e bo no f Izre ite i izbijte potrebnu provodnicu za mre ni priklju ni kabel iz pole ine ure aja i poklopca ure aja za polo aje vidi poglavlje Tehni ki podatci Mjere i priklju ci O tre brido ve izbrusi...

Page 60: ...om f Ucrtajte 2 polo aja za bu enje u gornjem podru ju pole ine ure aja pomo u pole ine ure aja f Montirajte tuljke s prednje strane u pole inu ure aja f Izbu ite provrte pa pri vrstite ure aj priklad...

Page 61: ...tjecanja Sustav grijanja u kvaru Zamijenite funkcijski ugradni sklop Elektronika je neispravna Zamijenite funkcijski ugradni sklop Zeleno treperi uto isklju eno crveno uklju eno Nema tople vode temper...

Page 62: ...vorite zaporni ventil u dovodnom vodu hladne vode f Otvorite sve odvodne ventile f Otvorite ure aj popu tanjem vijka i zakretanjem poklopca ure aja f Odvrnite priklju nu cijev za hladnu vodu s dvostru...

Page 63: ...2 4 7 5 3 6 2 12 0 3 8 4 3 4 9 5 7 14 3 4 5 5 1 5 8 6 8 16 4 Podru ja primjene Tablica za prera unavanje Za specifi ni elektri ni otpor i specifi nu elektri nu provodljivost Normirani podatak na 15 C...

Page 64: ...ura ulazne vode za dogrijavanje C 55 55 Podru je namje tanja temperature C 20 60 20 60 Vrijednosti Maks temperatura ulazne vode npr toplinska dezinfekcja C 70 70 Uklj l min 1 3 1 3 Volumni protok pri...

Page 65: ...dobiti jamstvo od te na e podru nice Takvo jamstvo daje se samo u slu aju ako je ta podru nica izdala vlastite jamstvene uvjete Ina e se ne daje jamstvo Za ure aje koji su kupljeni u zemljama u kojima...

Page 66: ...3 2 70 4 70 5 70 6 71 6 1 71 6 2 71 6 3 71 7 71 7 1 71 7 2 71 8 71 8 1 71 8 2 72 8 3 72 9 72 9 1 72 10 74 10 1 74 10 2 74 10 3 74 10 4 75 11 75 12 75 12 1 75 12 2 76 12 3 76 12 4 76 12 5 76 12 6 78 13...

Page 67: ...www stiebel eltron com DCE S Plus 67 3 70 C 43 C 55 C 55 C 3 mm...

Page 68: ...68 DCE S Plus www stiebel eltron com 1 1 1 1 1 1 f 1 1 2 1 1 3 1 2 f f 1 3 2 2 1...

Page 69: ...www stiebel eltron com DCE S Plus 69 2 2 70 C 43 C f 3 IP 25 2 3 3 f f f...

Page 70: ...70 DCE S Plus www stiebel eltron com 3 1 1 D0000082927 1 3 2 f 50 C 38 C 55 C 55 C f 4 f f 5 1 000000 0000 000000 Nr 000000 0000 00000 D0000073621...

Page 71: ...www stiebel eltron com DCE S Plus 71 6 6 1 60 V DC 6 2 f 55 C f 6 3 IP 25 4 5 mm 9 mm 7 7 1 2 45 2 2 7 2 200016 UP Kit EU 2 45 8 8 1 f D0000073616 1 2 1 2...

Page 72: ...el eltron com 1 2 D0000073617 1 2 f 8 2 50 50 50 100 D0000079442 f 8 3 f f f 9 DCE S 6 8 Plus DCE S 10 12 Plus C 60 60 kW 220 V 8 0 12 0 230 V 8 7 13 1 240 V 9 6 14 3 DCE S 6 8 Plus DCE S 10 12 Plus x...

Page 73: ...iebel eltron com DCE S Plus 73 B A D0000077179 f 30 120 20 90 20 90 20 80 20 90 20 80 D0000077976 4 3 2 1 5 7 6 1 2 3 4 45 5 6 7 f D0000085450 f f f f f 8 Nm f f f 175 mm f 4 f 4 5 mm 9 mm D0000073844...

Page 74: ...F 60 C 140 F 43 C 109 F f 10 2 1 2 D0000082938 f Pmax DCE S 6 8 Plus DCE S 10 12 Plus 1 low 220 V 6 0 kW 10 0 kW 230 V 6 6 kW 11 0 kW 240 V 7 2 kW 12 0 kW 2 high 220 V 8 0 kW 12 0 kW 230 V 8 7 kW 13...

Page 75: ...www stiebel eltron com DCE S Plus 75 D0000073622 f D0000082937 f D0000073642 f f f D0000053281 f f D0000084891 f 10 3 1 f f f 10 4 f f f 11 f f 12 12 1 D0000073620 2 1 1 2 f...

Page 76: ...76 DCE S Plus www stiebel eltron com f f 180 f f 12 2 D0000079465 1 1 f f f 12 3 D0000073648 1 1 f 12 4 f f 12 5 2 45...

Page 77: ...www stiebel eltron com DCE S Plus 77 44 46 D0000073660 f 45 1 4 5 2 3 D0000077971 f f f f 1 2 3 4 D0000077974 1 2 3 4 5 1 2 3 4 5 f f f f f f f...

Page 78: ...78 DCE S Plus www stiebel eltron com D0000073842 3 2 1 1 2 3 f 2 f f 4 5 mm 9 mm f 2 175 mm f f 12 6 13 D0000082950 1 2 3 4 5 6 1 2 3 NTC 4 5 6...

Page 79: ...www stiebel eltron com DCE S Plus 79 14 LED LED 1 1...

Page 80: ...80 DCE S Plus www stiebel eltron com 15 60 V DC 15 1 f f f f 15 2 f f f 15 2 1 f f f f f f f f f 15 2 2 f f f f f f f f f f f f...

Page 81: ...15 C 20 C DCE S 6 8 Plus 6 0 2 6 3 1 3 7 4 8 8 0 3 5 4 1 5 0 6 3 6 6 2 9 3 4 4 1 5 2 8 7 3 8 4 4 5 4 6 9 7 2 3 1 3 7 4 5 5 7 9 6 4 2 4 9 6 0 7 6 DCE S 10 12 Plus 10 0 4 3 5 1 6 2 7 9 12 0 5 2 6 1 7 5...

Page 82: ...cm 1100 91 910 970 103 1031 895 112 1117 16 5 10 l min MPa 0 04 0 08 MPa 0 03 0 05 MPa 0 03 0 15 0 1 MPa 16 6 80 C 1 0 MPa 16 7 812 2013 814 2013 DCE S 6 8 Plus DCE S 10 12 Plus 238153 238154 STIEBEL...

Page 83: ...50 60 1 N PE 1 N PE 15 cm 1100 1100 15 S cm 910 910 50 Hz 0 0385 0 0368 0 0353 0 0257 0 0245 0 0235 G 1 2 A G 1 2 A MPa 0 18 1 8 bar 26 psi 0 18 1 8 bar 26 psi MPa 1 10 bar 150 psi 1 10 bar 150 psi C...

Page 84: ...88 4 88 5 88 6 89 6 1 89 6 2 89 6 3 89 7 89 7 1 89 7 2 89 8 90 8 1 90 8 2 90 8 3 90 9 90 9 1 91 10 92 10 1 92 10 2 92 10 3 92 10 4 93 11 93 12 93 12 1 93 12 2 94 12 3 94 12 4 94 12 5 94 12 6 96 13 96...

Page 85: ...www stiebel eltron com DCE S Plus 85 3 70 C 43 C 55 C 55 C 3...

Page 86: ...86 DCE S Plus www stiebel eltron com 1 1 1 1 1 1 f 1 1 2 1 1 3 1 2 f f 1 3 2 2 1 2 2 70 C 43 C...

Page 87: ...www stiebel eltron com DCE S Plus 87 f 3 IP 25 2 3 004 2011 TP TC 020 2011 RU DE 46 18484 21 12 03 2021 11 03 2026 3 f f f...

Page 88: ...88 DCE S Plus www stiebel eltron com 3 1 1 D0000082927 1 3 2 f 50 C 38 C 55 C 55 C f 4 f f 5 1 000000 0000 000000 Nr 000000 0000 00000 D0000073621...

Page 89: ...www stiebel eltron com DCE S Plus 89 6 6 1 60 6 2 f 55 C f 6 3 IP 25 4 5 9 7 7 1 2 45 2 2 7 2 200016 UP Kit EU 2 45...

Page 90: ...l eltron com 8 8 1 f D0000073616 1 2 1 2 1 2 D0000073617 1 2 f 8 2 50 50 50 100 D0000079442 f 8 3 f f f 9 DCE S 6 8 Plus DCE S 10 12 Plus C 60 60 220 8 0 12 0 230 8 7 13 1 240 9 6 14 3 DCE S 6 8 Plus...

Page 91: ...eltron com DCE S Plus 91 9 1 D0000073641 f B A D0000077179 f A B 30 120 20 90 20 90 20 80 A B 20 90 20 80 D0000077976 4 3 2 1 5 7 6 1 2 3 4 45 5 6 7 f D0000085450 f f f f f 8 f f f 175 f f 4 5 9 D0000...

Page 92: ...f Tmax 43 C 109 F 50 C 122 F 55 C 131 F 60 C 140 F 43 C 109 F f 10 2 1 2 D0000082938 f Pmax DCE S 6 8 Plus DCE S 10 12 Plus 1 low 220 6 0 10 0 230 6 6 11 0 240 7 2 12 0 2 high 220 8 0 12 0 230 8 7 13...

Page 93: ...www stiebel eltron com DCE S Plus 93 D0000073622 f D0000082937 f D0000073642 f f f D0000053281 f f D0000084891 f 10 3 1 f f f 10 4 f f f 11 f f 12 12 1 D0000073620 2 1 1 2 f...

Page 94: ...94 DCE S Plus www stiebel eltron com f f 180 f f 12 2 D0000079465 1 1 f f f 12 3 D0000073648 1 1 f 12 4 f f 12 5 2 45...

Page 95: ...www stiebel eltron com DCE S Plus 95 44 46 D0000073660 f 45 1 4 5 2 3 D0000077971 f f f f 1 2 3 4 D0000077974 1 2 3 4 5 1 2 3 4 5 f f f f f f f...

Page 96: ...96 DCE S Plus www stiebel eltron com D0000073842 3 2 1 1 2 3 f 2 f f 4 5 9 f 175 f f 12 6 13 D0000082950 1 2 3 4 5 6 1 2 3 NTC 4 5 6...

Page 97: ...www stiebel eltron com DCE S Plus 97 14 LED 1 1...

Page 98: ...98 DCE S Plus www stiebel eltron com 15 60 15 1 f f f f 15 2 f f f 15 2 1 f f f f f f f f f 15 2 2 f f f f f f f f f f f f...

Page 99: ...5 C 20 C DCE S 6 8 Plus 6 0 2 6 3 1 3 7 4 8 8 0 3 5 4 1 5 0 6 3 6 6 2 9 3 4 4 1 5 2 8 7 3 8 4 4 5 4 6 9 7 2 3 1 3 7 4 5 5 7 9 6 4 2 4 9 6 0 7 6 DCE S 10 12 Plus 10 0 4 3 5 1 6 2 7 9 12 0 5 2 6 1 7 5 9...

Page 100: ...C 25 C 1100 91 910 970 103 1031 895 112 1117 16 5 10 0 04 0 08 0 03 0 05 0 03 0 15 0 1 16 6 80 C 1 0 16 7 812 2013 814 2013 DCE S 6 8 Plus DCE S 10 12 Plus 238153 238154 STIEBEL ELTRON STIEBEL ELTRON...

Page 101: ...5 47 8 57 0 50 0 59 6 A 30 40 50 60 50 60 50 60 1 N PE 1 N PE 15 1100 1100 15 910 910 50 0 0385 0 0368 0 0353 0 0257 0 0245 0 0235 G 1 2 A G 1 2 A 0 18 1 8 26 psi 0 18 1 8 26 psi 1 10 150 psi 1 10 150...

Page 102: ...tron com 6 4 6 4 25 2 94 25 2019 93 25 2018 25 4 9440 15 2019 33 37603 05531 702 0 05531 702 480 info stiebel eltron de www stiebel eltron de 4 2 129343 7 495 125 0 125 7 495 775 38 87 info stiebel el...

Page 103: ...www stiebel eltron com DCE S Plus 103...

Page 104: ...DCE S Plus www stiebel eltron com...

Page 105: ...CE S 10 12 Plus 23 53 23 54 22 23 24 22 23 24 6 0 8 0 6 6 8 7 7 2 9 6 10 0 12 0 11 0 13 1 12 0 14 3 A 27 3 36 4 28 5 38 0 30 0 40 0 45 5 54 5 47 8 57 0 50 0 59 6 A 30 40 50 60 50 60 50 60 1 N PE 1 N P...

Page 106: ...2 3 3 4 3 5 4 5 3 2 3 4 4 5 2 3 4 4 5 4 2 3 3 4 5 5 4 2 4 DCE S 10 12 Plus 4 3 5 2 2 5 2 5 5 4 5 3 5 4 2 5 2 5 5 4 3 2 3 3 5 22 23 24 5 5 2 DCE S 6 8 Plus 2 2 4 2 2 5 2 3 3 3 2 2 4 2 3 2 3 3 4 2 2 3...

Page 107: ...E S Plus 4 372 358 343 14 97 217 140 175 100 c01 c06 35 32 109 b02 380 D 3 3 DCE S Plus I b 2 c G 1 2 A c G 1 2 A 100 c01 c06 b02 72 330 b02 b02 69 35 336 b02 b03 30 61 15 b03 D 3 2 DCE S Plus I b 2 I...

Page 108: ...3 DCE S Plus www stiebel eltron com 4 LED LED 5...

Page 109: ...www stiebel eltron com DCE S Plus 2 1 2 3 4 D 4 2 3 4 5 2 3 4 5 D 3 42 3 2 2 3 4 5 5 3 D 2 5 2 3 4 5 2 3 4 5...

Page 110: ...DCE S Plus www stiebel eltron com D 4 5 D 3 4 2 45 44 46 D 3 45 1 4 5 2 3 D...

Page 111: ...www stiebel eltron com DCE S Plus D 3 42 D 532 D 4 D 3 2 2 2...

Page 112: ...n com 43 C 109 F 50 C 122 F 55 C 131 F 60 C 140 F D 3 24 Tmax 43 22 5 3 55 4 43 1 2 D 2 3 Pmax DCE S 6 8 Plus DCE S 10 12 Plus low 22 23 24 2 2 high 2 22 2 23 3 24 4 3 low 22 23 24 2 2 3 min on 15 x o...

Page 113: ...www stiebel eltron com DCE S Plus D 4 3 2 5 2 3 45 4 5 D 545 5 4 5 D 3 44 3...

Page 114: ...DCE S Plus www stiebel eltron com 50 50 50 100 D 442 DCE S 6 8 Plus DCE S 10 12 Plus 22 2 23 3 24 4 3 DCE S 6 8 Plus DCE S 10 12 Plus x x x x D 3 4 B A D A B 3 2 2 2 2 A B 2 2...

Page 115: ...www stiebel eltron com DCE S Plus 55 IP 25 4 5 45 2 2 2 UP Kit EU 2 45 D 3 2 2 2 D 3 2...

Page 116: ...5 DCE S Plus www stiebel eltron com 5 3 55 55 4 5 Nr 000000 0000 00000 D 3 2...

Page 117: ...www stiebel eltron com DCE S Plus 4 43 3 IP 25 3 D 2 2...

Page 118: ...3 DCE S Plus www stiebel eltron com 3 43 55 55 3...

Page 119: ...www stiebel eltron com DCE S Plus 2 3 3 2 3 3 4 4 2 4 2 2 4 2 3 4 3 4 3 4 3 2 5 4 5 5 5 2 3 2 2 3 2 3 4 2 2 2 2 3 2 4 2 5 2 2 3 4 3 5 3 5 3 5 2 4 4 4 2 5 3 5 4 5 5 5 5...

Page 120: ...bel eltron fi www stiebel eltron fi France STIEBEL ELTRON SAS 7 9 rue des Selliers B P 85107 57073 Metz C dex 3 Tel 0387 7438 88 Fax 0387 7468 26 info stiebel eltron fr www stiebel eltron fr Hungary S...

Reviews: