background image

EN

GL

ISH

WWW.STIEBEL-ELTRON-USA.COM 

DHC | 

11

INSTALLATION  


SPARE PARTS

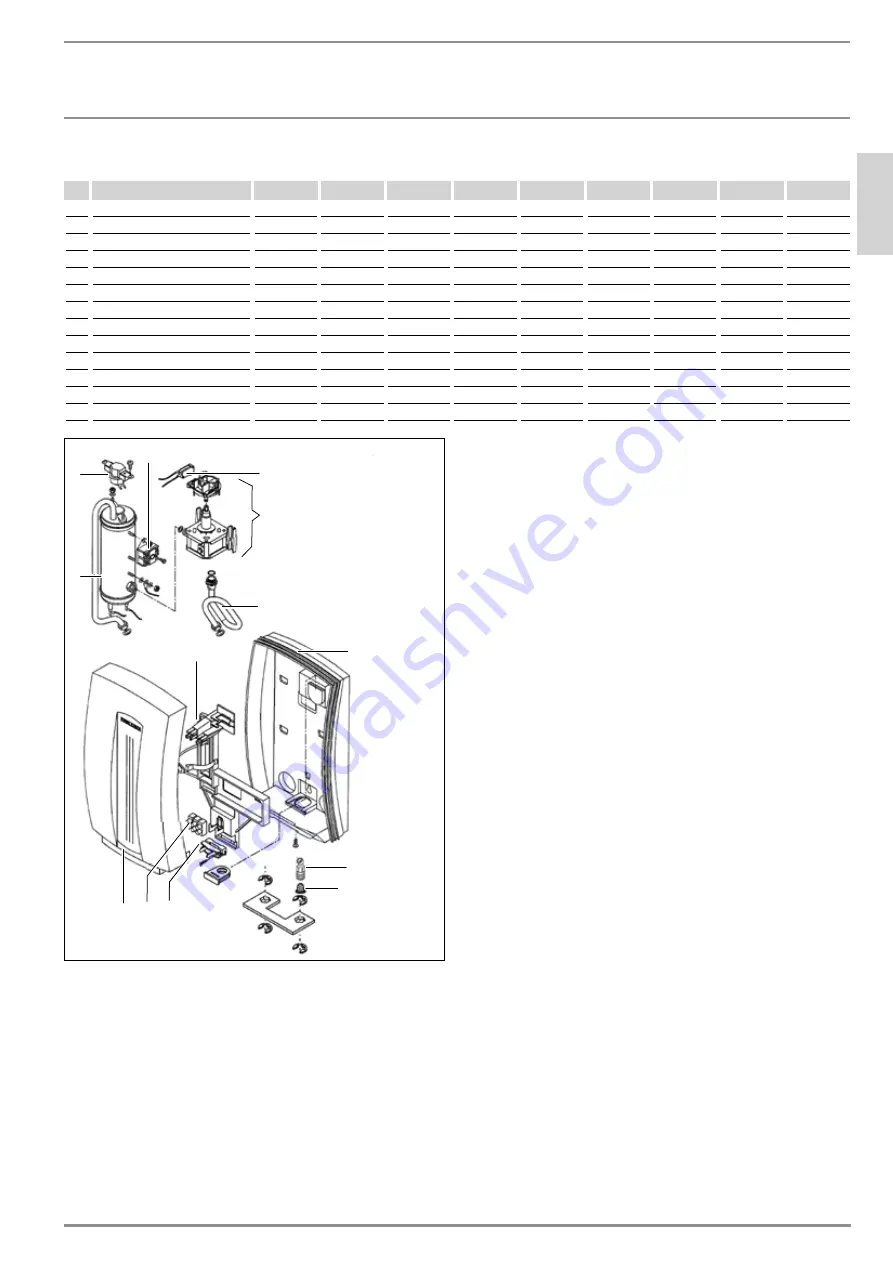
12. Spare parts

No. Spare part

DHC 3-1

DHC 3-2

DHC 4-2

DHC 4-3

DHC 5-2

DHC 6-2

DHC 8-2

DHC 9-3

DHC 10-2

1

Heating system

165889

167769

167770

165890

167771

171117

167772

296874

167773

2

Flow switch

165273

165273

162162

162162

162162

171105

162164

162465

162165

3

Thermostat

162472

162472

162472

162472

162472

162472

162472

162472

162472

4

Switch

168026

168026

168026

168026

168026

168026

168026

168026

168026

5

Housing (back)

165891

165891

165891

165891

165891

165891

165891

165891

165891

6

Plumbing connection

170789

170789

170789

170789

170789

170789

170789

170789

170789

7

Housing (front)

165892

165892

165892

165892

165892

165892

165892

165892

165892

8

Safety thermal cut out

162474

162474

162474

162474

162474

162474

162474

162474

162474

9

Wiring block

026010

026010

026010

026010

026010

026010

026010

026010

026010

10

Copper tube

162314

162314

162314

162314

162314

162314

162314

162314

162314

11

Module chassis

162462

162462

162462

162462

162462

162462

162462

162462

162462

12

Wire strain relief clamp

055754

055754

055754

055754

055754

055754

055754

055754

055754

13

Filter screen

275981

275981

275981

275981

275981

275981

275981

275981

275981

D000004

39

78

4

7

1

3

2

10

5

6

13

9 12

8

11

Summary of Contents for DHC 10-2

Page 1: ...HC 10 2 Certi ed to ANSI UL Std 499 Conforms to CAN CSA Std E335 1 E335 2 35 Certi caci n con ANSI UL Std 499 Conforme a CAN CSA Std E335 1 E335 2 35 Certi la norme ANSI UL Std 499 Conforme la norme C...

Page 2: ...rmation_____________________________________________ 3 2 3 Safety Precautions_______________________________________________ 3 2 4 Test symbols ______________________________________________________ 3...

Page 3: ...egarding the installation use or opera tion of this water heater or if you need any additional installation manuals please call our technical service line see last side 2 3 Safety Precautions DANGER I...

Page 4: ...he application In case you have questions regarding the way you plan to use the DHC please call our technical service line at 800 582 8423 USA and Canada For service outside the U S and Canada please...

Page 5: ...ct the ame away from the housing of the unit in order to avoid damage 9 When all plumbing work is completed check for leaks and take corrective action before proceeding 7 Electrical connection WARNING...

Page 6: ...water temperature If temperature is too low the water ow rate needs to be reduced In order to do this turn off the unit s circuit breaker remove the cover and turn the ow adjustment screw shown in ill...

Page 7: ...rn clockwise See section 11 3 Temperature in crease above ambient water temperature pg 9 Voltage too low Supply correct voltage to unit If you are not able to resolve a problem please contact us toll...

Page 8: ...Twist cold water supply tube counterclockwise by 90 and pull towards bottom of unit Clean screen and put the screen the cold water supply tube and the ground wire back into their original position Pl...

Page 9: ...33 31 25 16 12 4 8 77 68 65 48 44 41 33 22 16 DHC 6 2 4 5 64 61 45 41 39 31 20 15 6 0 85 82 60 55 52 41 27 20 DHC 8 2 5 4 54 49 46 37 25 18 7 2 71 65 62 49 33 25 DHC 9 3 9 0 77 58 41 31 DHC 10 2 7 2 6...

Page 10: ...ressure drop at flow rate 0 023 MPa 0 023 MPa 0 023 MPa 0 023 MPa 0 023 MPa 0 023 MPa 0 025 MPa 0 03 MPa 0 03 MPa Pressure drop at flow rate 2 88 PSI 2 88 PSI 2 88 PSI 2 88 PSI 2 88 PSI 2 88 PSI 3 13...

Page 11: ...891 165891 165891 165891 6 Plumbing connection 170789 170789 170789 170789 170789 170789 170789 170789 170789 7 Housing front 165892 165892 165892 165892 165892 165892 165892 165892 165892 8 Safety th...

Reviews: