background image

En

gl

ish

WWW.stiebel-eltron.com 

DHE  SLi | 

35

InStaLLatIOn   

Commissioning

11.  commissioning


WARNING Electrocution

Commissioning may only be carried out by an authorised 

contractor in accordance with safety regulations.

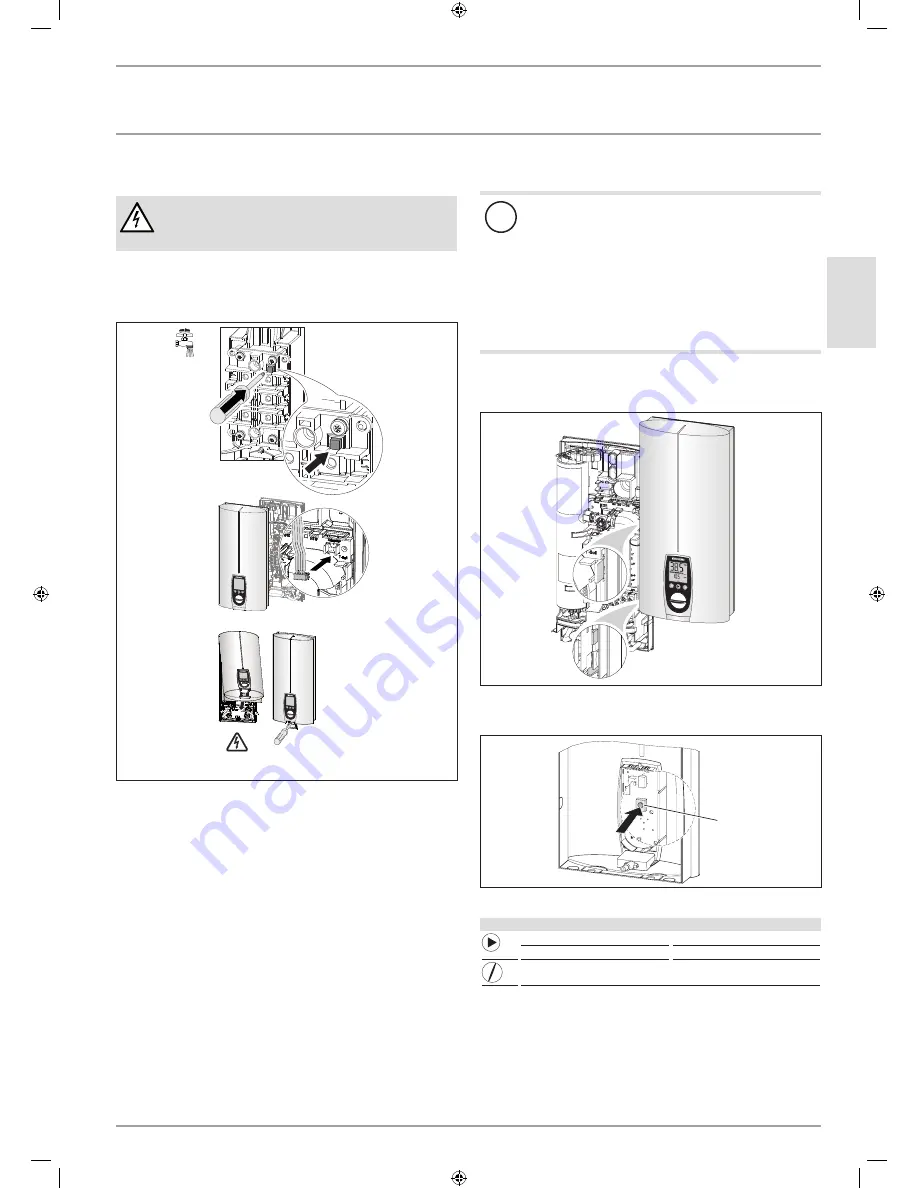
11.1  commissioning

f

f

Open the cross-piece.

on

on

26

�0

2�

02

�0

55

4

f

f

Open and close all connected draw-off valves several times, 

until all air has been vented from the pipework and the 

appliance.

f

f

Carry out a tightness check.

f

f

Activate the safety switch (AE 3) by firmly pressing in the 

reset button (the appliance is delivered with the safety switch 

deactivated).

f

f

Push the set value transducer cable plug onto the PCB.

f

f

Fit the appliance cap and secure it with a screw.

f

f

Switch the mains power ON.

f

f

Check the function of the appliance.

f

f

Remove the protective foil from the user interface.

appliance handover

f

f

Explain the appliance function to users and familiarise them 

with its operation.

f

f

Make the user aware of potential dangers, especially the risk 

of scalding.

f

f

Hand over these instructions.

11.2  recommissioning

!


Material damage

Following an interruption of the water supply the appli-

ance must be recommissioned by carrying out the follow-

ing steps, in order to prevent the destruction of the bare 

wire heating system.

f

f

Disconnect the appliance from the power supply by 

removing the fuses/tripping the MCBs.

f

f

Open the tap for one minute until the appliance and 

its upstream cold water inlet line are free of air.

f

f

Switch the mains power back ON again.

12.  Service mode

26

�02

�02

�1

32

3�

f

f

Open the appliance cover and hook it on the side of the back 

panel.

26

�0

2�

02

�0

55

6�

1

1  Service button for activating and deactivating service mode

Key to symbols

Press once

START

Press once

END

Change settings / scanning 

In service mode you are able to call up and/or change the set 

temperature using the M key (60 °C).

299680_DHE_18-27_SLi_de_en_fr_nl_pl_cs_bg_ru.indb   35

05.03.2013   08:38:26

Summary of Contents for DHE?18 SLi 25 A

Page 1: ...auferhitzer Instantaneous water heater with full electronic control Chauffe eau instantané à régulation entièrement électronique Volledig elektronisch geregelde elektrische doorstromer Caikowicie elektronicznie regulowany przepływowy ogrzewacz wody Plně elektronicky regulovaný průtokový ohřívač Изцяло електронно регулиран проточен бойлер Проточный водонагреватель с электронным управлением DHE 18 S...

Page 2: ...ation 38 16 1 Dimensions and connections 38 16 2 Wiring diagram 38 16 3 Mixed water volume outlet volume 39 16 4 Application areas 39 16 5 Pressure drop 39 16 6 Fault conditions 39 16 7 Data table 40 Guarantee Environment and recycling OPERATION 1 General information The chapter Operation is intended for appliance users and qual ified contractors The chapter Installation is intended for qualified ...

Page 3: ...s a risk of scalding at outlet temperatures in ex cess of 43 C WARNING Injury The appliance may be used by children aged 8 and up and persons with reduced physical sensory or mental capabilities or a lack of experience provided that they are supervised or they have been instructed on how to use the appliance safely and have understood the result ing risks Children must never play with the applianc...

Page 4: ...s than 80 while the ECO function is switched on Under all other operating conditions the backlighting is amber Economy monitor The appliance has an economy monitor This is activated by press ing the appropriate key It displays Energy savings Water savings CO2 savings Energy consumption Water consumption Compared to hydraulic instantaneous water heaters Calculation for a 3 person household with ind...

Page 5: ...ture selection 3 Economy monitor selection You can store a preferred temperature with memory key M f f Select the preferred temperature f f Press the M key for 2 seconds The temperature display flash es once to confirm 4 3 Economy monitor selection Example menu structure with currency in euros Eur 2 sec Reset M 2 sec Reset M 2 sec Reset M 2 sec Reset M 2 sec Reset M 1 2 3 4 5 2 sec time out 10 sec...

Page 6: ...with a cold shower this will trigger a reflex in the body to warm up 3 min WW KW B Winter pick me up An invigorating end to a winter shower with a final warm up 10 C WW WW 3 min 10 sec 10 sec 10 sec 10 sec C Summer fitness program The quick contrast shower to increase fitness with a final warm up WW KW 3 min 10 sec 10 sec 10 sec 10 sec D Circulation program Shower your arms and legs with cold wate...

Page 7: ...dashed box in the dia gram 14 Parameter This parameter is not relevant to this version of the appliance It is not possible to adjust any settings 15 Parameter This parameter is not relevant to this version of the appliance It is not possible to adjust any settings 5 Cleaning care and maintenance f f Never use abrasive or corrosive cleaning agents A damp cloth is sufficient for cleaning the applian...

Page 8: ...trol unit as extension of the FFB 1 SL FB 1 SL Hardwired remote control Control only with remote control unit suitable for self sup porting installation Taps valves MEKD kitchen pressure tap MEBD bath pressure tap Plug G A The plugs are required if you use pressure taps for finished walls other than the ones recommended in the accessories Installation set for finished walls Solder fitting copper p...

Page 9: ...the draw off valve fully opened Flexible water connection lines f f If the appliance is installed with flexible water connection lines ensure that the pipe bends do not become twisted Pipe bends have a bayonet fitting and are installed inside the appliance f f Secure the back panel at the bottom with an additional screw 9 1 Installation site Material damage Install the appliance in a room free fro...

Page 10: ...he mounting bracket with 2 screws and 2 rawl plugs screws and rawl plugs are not part of the standard delivery Note If you are installing the appliance with flexible water con nections secure the back panel with a screw f f Fit the mounting bracket 160 30 1 26_02_02_0824_ 1 Installation aid f f Prepare the power cable Making the water connection Material damage Carry out all water connection and i...

Page 11: ... the power supply WARNING Electrocution Carry out all electrical connection and installation work in accordance with relevant regulations WARNING Electrocution Connection to the power supply is only permissible in the form of a permanent connection in conjunction with the removable cable grommet Ensure that the appliance can be separated from the power supply by an isolator that disconnects all po...

Page 12: ...power cable f f Push down the locking hook that secures the mains terminal then remove the mains terminal f f Reposition the mains terminal in the appliance from the bottom to the top and secure the mains terminal by sliding it under the locking hook 26_02_02_1306_ f f Route the control wires below the wire guide Power cable for finished walls f f Cut or break out the required entries in the back ...

Page 13: ... part of the back panel under the connection pipes of the tap and click the lower part of the back panel into place f f Secure the connection pipes to the appliance Note Observe the tap manufacturer s instructions Water installation for finished walls fitting the appliance cover 26_02_02_0552_ 4 3 2 1 1 Back panel guides 2 Screw 3 Cover guides 4 Knock out f f Cleanly break out the knock outs in th...

Page 14: ... The appliance cover can be turned for undersink installation electronic comfort electronic comfort 26_02_02_0553 f f Remove the programming unit from the appliance cover by pressing the locking hooks and taking out the programming unit f f Turn the appliance cover not the appliance and refit the programming unit ensuring that all locking hooks click into place When clicking the locking hooks into...

Page 15: ...e function to users and familiarise them with its operation f f Make the user aware of potential dangers especially the risk of scalding f f Hand over these instructions 11 2 Recommissioning Material damage Following an interruption of the water supply the appli ance must be recommissioned by carrying out the follow ing steps in order to prevent the destruction of the bare wire heating system f f ...

Page 16: ...umulated runtime in days 3 Heating hours symbol accumulated heating time in hours 4 Maximum output symbol The value shown may diverge by several kW from the rated output if mains voltages other than 400 V prevail Setting the anti scalding protection Use the anti scalding protection in places such as nurseries and hospitals If anti scalding protection is selected the childproofing adjustment will b...

Page 17: ... Flashing green LED red LED illuminates Check the connection of the outlet sensor and replace if necessary A fault in the safety PCB Flashing green LED red LED only during draw off Connect the connecting cable from the safety switch and check the safety switch A loose or faulty connecting cable to the set value trans ducer Green LED flashes Connect the connecting cable from the set value transduce...

Page 18: ...n freeze and cause damage 16 Specification 16 1 Dimensions and connections 478 100 414 44 105 20 225 140 30 35 35 114 368 b02 c01 c06 D0000017971 b02 Entry electrical cables I c01 Cold water inlet Male thread G 1 2 A c06 DHW outlet Male thread G 1 2 A Alternative connection options 165 50 44 30 35 72 325 338 47 b03 b02 b04 b04 b04 b04 b04 D0000019212 b02 Entry electrical cables I b03 Entry electri...

Page 19: ... 4 5 6 7 8 3 2 1 84_02_02_0028_ X Cold water inlet temperature in C Y Mixed water volume outlet volume in l min 1 18 kW 2 21 kW 3 24 kW 16 4 Application areas Specific electrical resistance and specific electrical conductivity Standard specification at 15 C at 20 C at 25 C Resistance Ω cm 900 800 735 Conductivity mS m 111 125 136 Conductivity µs cm 1100 1250 1360 16 5 Pressure drop Taps valves Pre...

Page 20: ...c resistance 25 C Ohm cm 900 900 900 Specific resistance 55 C Ohm cm 900 900 900 Connections Water connection G 1 2 A G 1 2 A G 1 2 A Application limits Max permissible pressure MPa 1 1 1 Max inlet temperature for reheating C 55 55 55 Values Max permissible inlet temperature C 65 65 65 On l min 2 5 2 5 2 5 Flow rate for pressure drop l min 5 2 5 2 6 0 6 9 7 7 Pressure drop at flow rate MPa 0 04 0 ...

Page 21: ... Such warranties are only granted if the subsidiary has issued its own terms of warranty No other warranty will be granted We shall not provide any warranty for appliances acquired in countries where we have no subsidiary to sell our products This will not affect warranties issued by any importers Environment and recycling We would ask you to help protect the environment After use dispose of the v...

Page 22: ...nfo stiebel eltron fi www stiebel eltron fi France STIEBEL ELTRON SAS 7 9 rue des Selliers B P 85107 57073 Metz Cédex 3 Tel 0387 7438 88 Fax 0387 7468 26 info stiebel eltron fr www stiebel eltron fr Hungary STIEBEL ELTRON Kft Gyár u 2 2040 Budaörs Tel 01 250 6055 Fax 01 368 8097 info stiebel eltron hu www stiebel eltron hu Japan NIHON STIEBEL Co Ltd Kowa Kawasaki Nishiguchi Building 8F 66 2 Horika...

Reviews: