oPErATIoN
operation
EN
GL
ISH
www.stiebel-eltron.com
ETW 120-480 Plus |
33
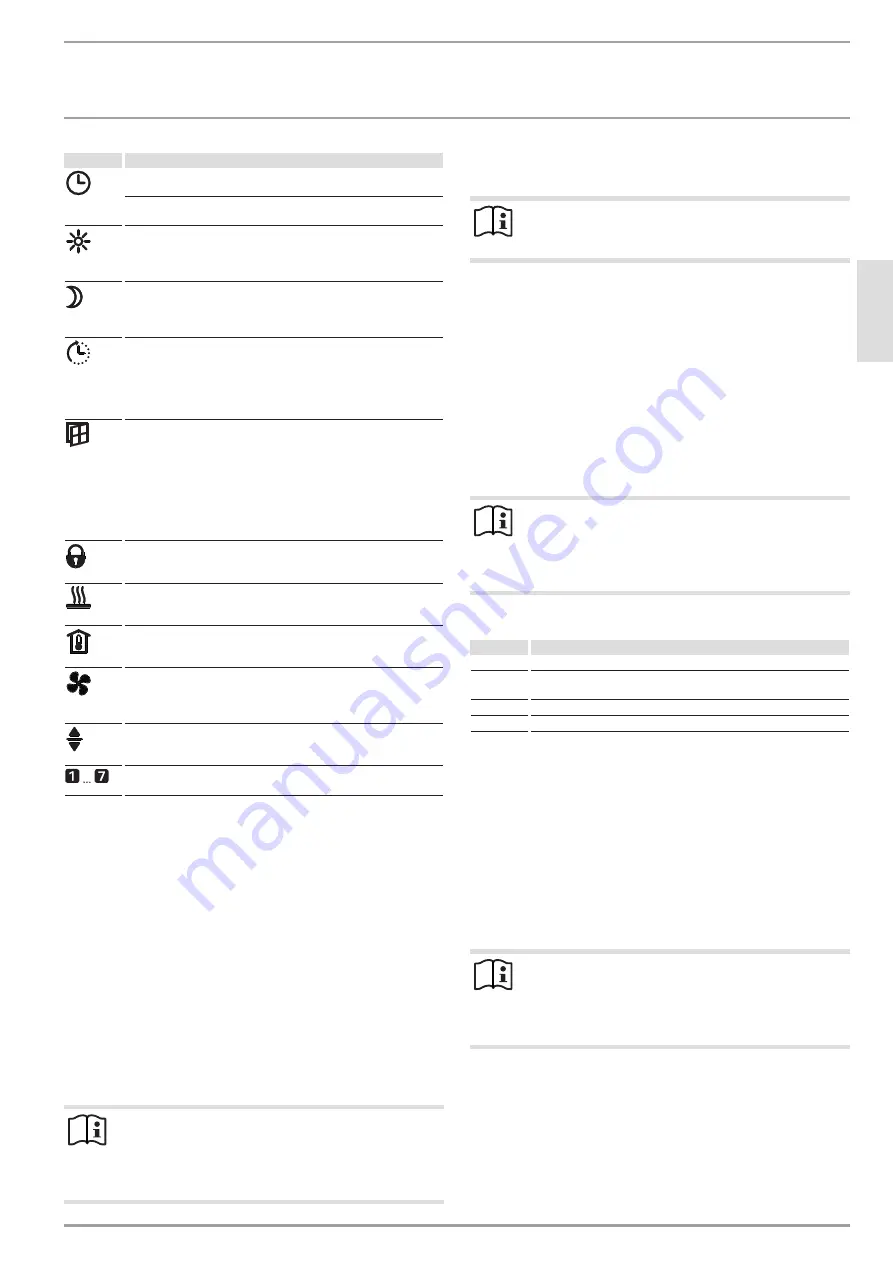
symbol
description
Time display:
Indication of the current time or a programmed start time
Timer mode:
The appliance heats in accordance with the enabled time program.
Comfort mode:
The appliance maintains the set comfort temperature.
Standard setting: 21.0 °C. Use this setting for comfortable room
temperatures when someone is present.
Setback mode:
The appliance maintains the selected setback temperature.
Standard setting: 18.0 °C. Use this setting e.g. at night or when
absent for several hours.
Adaptive start:
In timer mode, the heating appliance switching times are adjust-
ed to ensure that, at the programmed start time, the respective
set room temperature is already reached.
Conditions: The "Adaptive start" function is enabled (see chapter
"Settings / Standard menu").
Window open detection:
To avoid unnecessary energy consumption while ventilating the
room, the appliance automatically reduces the set room temper-
ature to 7.0 °C for one hour if a window is open. The "Window
open detection" symbol flashes. After ventilation, window open
detection can be terminated manually by pressing "+" or "OK". The
appliance then heats to the set room temperature again.
Conditions: Window open detection is enabled (see chapter "Set-
tings / Standard menu").
Operating lock:
To lock or unlock the user interface, press and hold "+" and "–"
simultaneously for 5 seconds.
Enable the booster heater (accessory):
If storage heating is insufficient to heat a room, the booster heat-
er will provide additional heat.
Room temperature display
Fan enabled:
If the room temperature falls below the set room temperature, the
fan switches on and delivers heated air to the room until the set
temperature has been reached.
Editable parameter:
The parameter shown can be changed using "+" and "–".
Days of the week:
1 = Monday, 2 = Tuesday … 7 = Sunday
4.2 Heat storage
The degree of heat storage (charge) is set via the charge controller.
The settings you have to make via the charge controller depend
on whether you use an appliance with or without a central weath-
er-compensated charge control system.
The weather-compensated charge control system is located in
the control panel.
4.2.1 Appliances with a weather-compensated charge control
system
f
f
Call up the standard menu with the "Menu" button and then
press "OK".
f
f
Once the "Editable parameter" symbol appears, set the
charge level reducer to 100 % with the "+" and "–" buttons.
Note
If heat transfer (discharge) is controlled by a wall mount-
ed room temperature controller, adjust the charge level
reducer on the standard display with the "+" and "–" but-
tons.
The weather-compensated charge control system ensures the
correct charge level.
Note
Observe the instructions of the charge control system or
group control unit.
For separate control of individual appliances, you can also manu-
ally adjust the charge volume via the charge level reducer.
If you set the charge level reducer to 0 %, no charging takes place.
4.2.2 Appliances without a weather-compensated charge
control system
The charge volume is set by means of the charge level reducer.
f
f
Call up the standard menu with the "Menu" button and then
press "OK".
f
f
Once the "Editable parameter" symbol appears, adjust the
charge level reducer with the "+" and "–" buttons.
Note
If heat transfer (discharge) is controlled by a wall mount-
ed room temperature controller, adjust the charge level
reducer on the standard display with the "+" and "–" but-
tons.
In this respect, the following standard values apply:
Value
Charge volume
0 %
No charge (in summer)
30 %
Approx. 1/3 of full charge during shoulder seasons (spring or
autumn)
70 %
Approx. 2/3 of full charge on mild winter days
100 %
Full charge on cold winter days
Once you have familiarised yourself with the appliance, you will
be able to find the correct setting as appropriate.
4.3 Heat transfer
Heat transfer (discharge) is controlled either by the room tem-
perature controller built into the appliance or by a wall mounted
2-point room temperature controller (see chapter "Accessories").
The room temperature controller automatically regulates heat
transfer via the fan so that the set room temperature is maintained.
Fan enabling must be switched on for the fan to run.
Note
If you are away for several days during the heating sea-
son, it makes sense to set a reduced room temperature,
e.g. 10 °C. This setting prevents the room temperature
from falling too low (frost protection).
4.3.1 Switching fan enabling on and off
f
f
To switch fan enabling on or off, press the "Fan" button. If
fan enabling is switched on, the fan symbol appears on the
display.


