background image

EN - 2

2.  SAFETY REGULATIONS

 2.1  TRAINING


Become familiar with the controls 

and the proper use of the machine. Learn 

how to stop the machine quickly. Failure 

to follow the warnings and instructions 

may result in fire and/or serious injury.  

• 

National legislation may restrict 

the use of the machine.

• 

Never allow the machine to be used by 

children or individuals who are not familiar 

with the instructions. Local laws may 

establish a minimum age for users.

• 

Never use the machine if the user is 

tired or unwell, or has taken medication, 

drugs, alcohol or substances that 

impair reflexes and concentration.

• 

Remember that the operator or user is 

responsible for accidents and unexpected 

events that can occur to other people or 

property. It is the user’s responsibility 

to assess the potential risk of the area 

where work is to be carried out and 

to take all the necessary precautions 

to ensure his own safety and that of 

others, particularly on slopes or rough, 

slippery and unstable ground.

• 

If the machine is sold or lent to others, make 

sure that the operator looks over the user 

instructions contained in this manual.

 2.2  PRELIMINARY OPERATIONS

Personal Protective Equipment (PPE)

• 

Always wear slim-fitting protective clothes 

with slash-proof protection, anti-vibration 

gloves, helmet, protective goggles, half-

mask respirator, protective earplugs, cut 

resistant safety boots with non–slip soles.

• 

Never wear scarves, shirts, necklaces, 

bracelets, loose flowing clothing, laces or 

ties or any hanging or flapping accessory 

that could catch in the machine or in any 

objects or materials in the work area. 

• 

Tie your hair back if it is long.

Work / Machine Area

• 

Thoroughly inspect the entire work 

area and remove anything that could be 

thrown by the machine or damage the 

cutting means/rotating units (stones, 

branches, iron wire, bones, etc.)

.

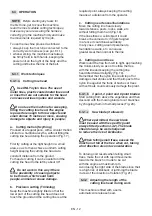
Internal combustion engine: fuel

DANGER!

  Petrol and blended fuels are 

highly flammable.


– Keep petrol and blended fuel in approved 

containers, in a safe place, away from 

any sources of heat or naked flames.


– Keep the containers out of 

the reach of children.


– Keep the containers free of residues of 

grass, leaves or excessive grease


Do not smoke while blending the 

fuel, filling up/topping up with fuel 

or whenever handling the fuel.


Use a funnel to top up with 

fuel only in the open air.


Do not inhale fuel fumes.


Never remove the tank cap or add 

fuel while the engine is running 

or when the engine is hot.


Open the fuel tank slowly to allow the 

pressure inside to decrease gradually.


Do not approach the tank opening with 

a naked flame to check its contents.


If you have spilt some fuel, do not 

attempt to start the engine but move 

the machine away from the area of 

spillage and avoid creating any source 

of ignition until the fuel has evaporated 

and fuel vapours have dissipated.


Replace caps of all fuel tanks 

and containers securely.


Immediately clean up all traces of fuel 

spilt on the machine or on the ground.


Never start the machine in the same 

place in which you refilled it with fuel;  the 

engine must be started in an area at least 

3 metres from where you refuelled.


Avoid getting any fuel or your clothing 

and, if this should happen, change your 

clothes before starting the engine.

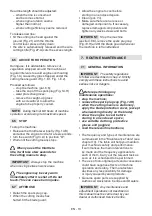
 2.3  DURING OPERATION

Work Area

• 

Do not operate the engine in confined 

spaces where dangerous carbon monoxide 

fumes can collect. The start-up operations 

must be carried out outdoors or in a 

well-ventilated area. Always remember 

that the exhaust gases are toxic. 

• 

When starting up the machine, do not direct 

the silencer and therefore the exhaust 

fumes towards flammable materials

.

• 

Do not use the machine in environments 

that pose the risk of explosion, in the 

presence of flammable liquids, gases 

or powders. Electrical contact or 

Summary of Contents for BC 536

Page 1: ...máquina leer atentamente el presente manual ET Käeskantav mootoriga võsalõikur KASUTUSJUHEND TÄHELEPANU enne masina kasutamist lugeda tähelepanelikult antud kasutusjuhendit FI Käsin kannateltava moottorikäyttöinen raivaussaha KÄYTTÖOHJEET VAROITUS lue käyttöopas huolellisesti ennen koneen käyttöä FR Débroussailleuse portative à moteur MANUEL D UTILISATION ATTENTION lire attentivement le manuel ava...

Page 2: ...луатации SK Ručne prenosný motorový krovinorez NÁVOD NA POUŽITIE UPOZORNENIE pred použitím stroja si pozorne prečítajte tento návod SL Prenosna motorna kosa PRIROČNIK ZA UPORABO POZOR preden uporabite stroj pazljivo preberite priročnik z navodili SR Ručna motorna trimer kosačica PRIRUČNIK SA UPUTSTVIMA PAŽNJA pre korišćenja mašine pažljivo pročitati ovaj priručnik SV Motordriven bärbar manuell röj...

Page 3: ... FR HRVATSKI Prijevod originalnih uputa HR MAGYAR Eredeti használati utasítás fordítása HU LIETUVIŠKAI Originalių instrukcijų vertimas LT LATVIEŠU Instrukciju tulkojums no oriģinālvalodas LV МАКЕДОНСКИ Превод на оригиналните упатства MK NEDERLANDS Vertaling van de oorspronkelijke gebruiksaanwijzing NL NORSK Oversettelse av orginal bruksanvisning NO POLSKI Tłumaczenie instrukcji oryginalnej PL PORT...

Page 4: ...G B 1 C D 1 M B 2 E 1 A F I K H D 3 D 2 L 1 L 2 K K I J E 2 1 ...

Page 5: ...3 4 dB LWA Art N Type s n 2 6 1 4 5 7 3 2 6 5 A C B I II A A 1 B C C D D A B C D E B C A III ...

Page 6: ...A B C F D E B A D F G C E 8 A B C D E F G 9 10 A B C 7 ...

Page 7: ...B B A A 11 B D E A C 12 13 A C B D E F I L I L G H G H F D ...

Page 8: ...A B A C C B H G I F E J 14 15 A A 1 A 2 A 3 A 6 A 4 A 5 B B 1 B 2 B 3 B 2 B 4 A 3 B 4 ...

Page 9: ...19 18 16 17 21 20 ...

Page 10: ...24 A 23 22 C A B B C ...

Page 11: ...25 26 A B C 27 ...

Page 12: ...B 175 mm 6 9 in B 42 52 series A A 2 x 2 0 m 79 in B 26 32 series B 28 I ...

Page 13: ...A A B C D A B C D A B 175 mm 6 9 in 175 mm 6 9 in B A B 29 31 33 30 32 II ...

Page 14: ...804530 0 II 18803940 0 I 18804530 0 II 18803940 0 I 18804530 0 II 19 Codice dispositivo di taglio 118801125 0 118801125 0 118801125 0 19 Codice dispositivo di taglio 118802009 0 118802009 0 118802009 0 19 Codice dispositivo di taglio 118802315 0 118802315 0 118802315 0 20 Codice dispositivo di taglio lama a 8 punte 118805083 0 21 Codice dispositivo di taglio lama a sega 118805084 0 22 Codice prote...

Page 15: ... 0 I 18804530 0 II 18803940 0 I 18804530 0 II 19 Codice dispositivo di taglio 118801125 0 118801125 0 118801125 0 19 Codice dispositivo di taglio 118802009 0 118802009 0 118802009 0 19 Codice dispositivo di taglio 118802315 0 118802315 0 118802315 0 20 Codice dispositivo di taglio lama a 8 punte 118805083 0 118805083 0 118805083 0 21 Codice dispositivo di taglio lama a sega 118805084 0 118805084 0...

Page 16: ...3940 0 I 18804530 0 II 18803940 0 I 18804530 0 II 19 Codice dispositivo di taglio 118801125 0 118801125 0 118801125 0 19 Codice dispositivo di taglio 118802009 0 118802009 0 118802009 0 19 Codice dispositivo di taglio 118802315 0 118802315 0 118802315 0 20 Codice dispositivo di taglio lama a 8 punte 118805083 0 118805083 0 21 Codice dispositivo di taglio lama a sega 118805084 0 118805084 0 22 Codi...

Page 17: ...reznom niti 15 Širina reza 3 kraki 4 kraki i 8 kraki nož 16 Širina reza kružno sječivo 17 Priključak za glavu s reznom niti 18 Promjer niti glave maks 19 Šifra rezne glave 20 Šifra rezne glave 8 kraki nož 21 Šifra rezne glave list pile 22 Šifra štitnika glava držača žice 3 kraki 4 kraki i 8 kraki nož 23 Šifra štitnika kružno sječivo 24 Težina 25 Prednji Stražnji rukohvat 26 Upravljač 27 Razina zvu...

Page 18: ...luss Fadenkopf 18 Durchmesser Faden Fadenkopf max 19 Code Messer 20 Code Messer 8 schneidiges Messer 21 Code Messer Sägeblatt 22 Nummer Schutzeinrichtung Fadenkopf 3 schneidiges 4 schneidiges und 8 schneidiges Messer 23 Nummer Schutzeinrichtung Sägeblatt 24 Gewicht 25 Griff vorne hinten 26 Griff 27 Schalldruckpegel 28 Messungenauigkeit 29 Gemessener Schallleistungspegel 30 Garantierter Schallleist...

Page 19: ...e 3 4 y 8 puntas 16 Ancho de corte cuchilla de sierra 17 Enganche cabezal porta hilo 18 Diámetro hilo cabezal máx 19 Código dispositivo de corte 20 Código dispositivo de corte cuchilla de 8 puntas 21 Código dispositivo de corte cuchilla de sierra 22 Código de protección cabezal porta hilo cuchilla de 3 4 y 8 puntas 23 Código de protección cuchilla de sierra 24 Peso 25 Empuñadura anterior posterior...

Page 20: ...Fixation tête à fil 18 Diamètre fil tête max 19 Code organe de coupe 20 Code organe de coupe lame à 8 pointes 21 Code organe de coupe lame à scie 22 Code protection tête à fil lame à 3 pointes 4 pointes et 8 pointes 23 Code protection lame de scie 24 Poids 25 Poignée avant arrière 26 Poignée 27 Niveau de pression sonore 28 Incertitude 29 Niveau de puissance sonore mesuré 30 Niveau de puissance son...

Page 21: ...jovimo plotis diskinis peilis 17 Pjovimo valo galvutės jungtis 18 Valo galvutės skersmuo maks 19 Pjovimo įtaiso kodas 20 Pjovimo įtaiso kodas 8 ašių peilis 21 Pjovimo įtaiso kodas pjūklelis 22 Apsaugos kodas pjovimo valo tiekimo galvutė 3 ašių 4 ašių ir 8 ašių peilis 23 Apsaugos kodas diskinis peilis 24 Svoris 25 Priekinė Galinė rankena 26 Rankena 27 Garso slėgio lygis 28 Paklaida 29 Išmatuotas ga...

Page 22: ...nijbreedte mes met 3 punten 4 punten en 8 punten 16 Snijbreedte zaagmes 17 Bevestiging draadhouder 18 Diameter draadhouder max 19 Code snij inrichting 20 Code snij inrichting mes met 8 punten 21 Code snij inrichting zaagblad 22 Code bescherming draadhouder mes met 3 punten 4 punten en 8 punten 23 Code bescherming zaagmes 24 Gewicht 25 Handvat vooraan achteraan 26 Handgreep 27 Niveau geluidsdruk 28...

Page 23: ...orte lâmina com serra 17 Engate cabeça porta fio 18 Diâmetro fio da cabeça máx 19 Código dispositivo de corte 20 Código dispositivo de corte lâmina de 8 pontas 21 Código dispositivo de corte lâmina de serra 22 Código de proteção cabeçote porta fio lâmina de 3 pontas 4 pontas e 8 pontas 23 Código de proteção lâmina com serra 24 Peso 25 Pega dianteira traseira 26 Guiador 27 Nível de pressão sonora 2...

Page 24: ...3 hrotmi 4 hrotmi a 8 hrotmi 16 Záber nôž v tvare píly 17 Úchyt strunovej hlavy 18 Priemer struny max 19 Kód kosiaceho zariadenia 20 Kód kosiaceho zariadenia nôž s 8 hrotmi 21 Kód kosiaceho zariadenia pílový nôž 22 Kód ochranného krytu strunová hlava nôž s 3 hrotmi 4 hrotmi a 8 hrotmi 23 Kód ochranného krytu nôž v tvare píly 24 Hmotnosť 25 Predná Zadná rukoväť 26 Riadidlá 27 Úroveň akustického tla...

Page 25: ...taktsolja 13 Tändstift 14 Klippbredd trimmerhuvud 15 Klippbredd 3 4 och 8 tandiga blad 16 Klippbredd sågblad 17 Fäste för trimmerhuvud 18 Trådens diameter max 19 Skärenhetens kod 20 Skärenhetens kod 8 tandiga blad 21 Skärenhetens kod sågblad 22 Skyddskod skärhuvud 3 4 och 8 tandiga blad 23 Skyddskod sågblad 24 Vikt 25 Främre Bakre handtag 26 Styret 27 Ljudtrycksnivå 28 Mätosäkerhet 29 Uppmätt ljud...

Page 26: ...r paragraphs are marked with the abbreviation chap or par and the relevant number Example chap 2 or par 2 1 WARNING READ THIS MANUAL CAREFULLY BEFORE USING THE MACHINE Keep safe for future use EN INDICE 1 GENERAL INFORMATION 1 2 SAFETY REGULATIONS 2 3 ABOUT THE MACHINE 4 3 1 Machine description and intended use 4 3 2 Safety signs 5 3 3 Product identification label 5 3 4 Main components 6 4 ASSEMBL...

Page 27: ...ns rotating units stones branches iron wire bones etc Internal combustion engine fuel DANGER Petrol and blended fuels are highly flammable Keep petrol and blended fuel in approved containers in a safe place away from any sources of heat or naked flames Keep the containers out of the reach of children Keep the containers free of residues of grass leaves or excessive grease Do not smoke while blendi...

Page 28: ...ly hold the machine with two hands and place your body and arms in a position that allows you to resist kickback Do not extend the arms too high and do not cut above waist height Only use the cutting means specified by the manufacturer Follow the manufacturer s instructions concerning cutting means maintenance Beware of injuries caused by devices used to cut the line length Attention The cutting e...

Page 29: ...e spark or strong source of heat To reduce fire risks do not leave containers with debris inside a room 2 5 ENVIRONMENTAL PROTECTION Protecting the environment must be a significant and top priority for machine use to the benefit of civil co habitation and of the environment that we live in Avoid being an element of disturbance to the surrounding area Use this machine at reasonable times of the da...

Page 30: ...bility for damage or injury to him herself or third parties on the user 3 2 SAFETY SIGNS The machine has various symbols on it fig 2 Their function is to remind the operator of the correct conduct for use with due care and caution Meanings of the symbols WARNING DANGER The failure to use this machine correctly can be hazardous for oneself and others WARNING Read the owner s manual before using the...

Page 31: ...G Rear hand grip used to handle the machine and equipped with the main on off acceleration control buttons H Leg guard a safety guard that prevents accidental contact with the cutting means during use I Handle bar ox horn shaped handle bar transversely placed to the rod and asymmetrically to it used to control the machine and equipped on the right hand side with the main on off acceleration contro...

Page 32: ...andle Fig 5 A into its seat in the transmission tube Fig 5 B making sure that the controls are on the right 2 Tighten and lock the knob Fig 5 C on the handle bar Fig 5 A 4 3 SELECTING THE CUTTING MEANS AND SPECIFIC GUARD Every cutting means must be fitted with a specific guard as indicated by the following directions in the Technical Data table Choose the most suitable cutting means for the job to...

Page 33: ...f allowed Apply the guard to the blade 1 Mount the inner locking ring Fig 9 A Fig 10 A on the shaft in the indicated direction making sure that the grooves are perfectly coupled with those on the angle transmission Fig 9 B Fig 10 B 2 Fit the blade Fig 9 C Fig 10 C and the outer locking ring Fig 9 D Fig 10 D with the flat part facing the blade 3 Insert the wrench supplied Fig 9 E Fig 10 E into the ...

Page 34: ...is set using throttle safety lever Fig 14 B to the end of its stroke 5 3 THROTTLE SAFETY LEVER The throttle safety lever Fig 14 C allows the throttle control lever to be used Fig 14 A 5 4 MANUAL STARTING GRIP Allows the engine to be started by hand Fig 14 I 5 5 CHOKE CONTROL LEVER IF AVAILABLE It is used to cold start the engine The control features two positions Fig 14 E Position A The choke is d...

Page 35: ...enly distributed on the shoulders IMPORTANT In case of danger unhook the harness using the quick release Fig 15 B 4 6 2 SAFETY CHECKS Run the following safety checks and ensure that the results correspond to those outlined in the tables Always carry out the safety checks before use 6 2 1 General check Object Result Grips Fig 1 F Fig 1 G Fig 1 I Clean dry and fixed firmly to the machine Cutting mea...

Page 36: ...an uncontrolled way 1 Make sure that the switch Fig 14 A is in position I 2 only for models with choke Engage the choke moving the lever to B position Fig 14 E 3 Press the primer control button Fig 14 F 10 times to facilitate carburettor ignition Make sure the hole is covered by your finger when you press the command 4 Hold the machine firmly on the ground with one hand on the drive unit to avoid ...

Page 37: ...does not touch the ground and the cutting line is at the required point always keeping the cutting means at a distance from the operator c Cutting near fences foundations Move the cutting line head slowly towards fences posts rocks walls etc without hitting them hard Fig 18 If the line strikes a solid object it could break or become worn if it gets tangled in a fence it could break suddenly In any...

Page 38: ...blade guard Allow the engine to cool before storing in an enclosed space Clean par 7 4 Make sure there are no loose or damaged components If necessary replace damaged components and tighten any slack screws and bolts IMPORTANT Stop the machine section 6 6 remove the spark plug cap Fig 14 H and fit the blade guard whenever the machine is left unattended 7 ROUTINE MAINTENANCE 7 1 GENERAL INFORMATION...

Page 39: ...MPORTANT The fuel blend is subject to ageing Do not prepare excessive quantities of fuel blend to prevent the formation of deposits IMPORTANT Keep containers of fuel blend and petrol separate and clearly identified to avoid swapping them at the time of use IMPORTANT Clean the petrol and fuel blend containers at regular intervals to remove any deposits 7 3 REFUELLING Before refuelling 1 vigorously ...

Page 40: ...osits with a wire brush Fig 26 Check and reset the correct gap between the electrodes Fig 26 Refit the spark plug and tighten it fully using the wrench supplied The spark plug must be replaced with one having similar characteristics if burnt electrodes or deteriorated insulation are found or after every 100 hours of operation 8 5 CUTTING MEANS MAINTENANCE When servicing the cutting means bear in m...

Page 41: ...ng careful to retain the original cutting angle 3 Refit the wire cutter blade Fig 27 A on the guard Fig 27 B 8 7 ADJUSTING IDLE SPEED If the cutting means moves with the engine idling contact your dealer for the correct motor adjustment 8 8 CARBURETTOR The carburettor is set in the factory to obtain maximum performance in every use situation with minimal emission of harmful gases in compliance wit...

Page 42: ... persons will totally invalidate the Warranty and all obligations and responsibilities of the Manufacturer Only Authorised Service Centres can carry out guaranteed repairs and maintenance The Authorised Service Centres only use genuine spare parts Genuine spare parts and attachments have been designed specifically for machines Non genuine spare parts and accessories are not approved Use of non gen...

Page 43: ... 7 4 Air filter cleaning see chap 8 3 Air filter replacement see chap 8 3 Spark plug cleaning see chap 8 4 Spark plug replacement see chap 8 4 Tightening of the muffler screws Fuel filter replacement Cylinder exhaust port and cylinder wings cleaning Before each use 15 hours 30 hours 45 hours 60 hours 75 hours 90 hours 105 hours 120 hours 135 hours 150 hours 165 hours 180 hours 195 hours 210 hours ...

Page 44: ...ctions see section 7 2 Carburation fault Contact your Authorised Service Centre 5 Engine flooding The starter knob was operated repeatedly with the starter inserted Remove the spark plug Fig 26 and gently pull the starter rope knob Fig 14 I to eliminate excess fuel then dry the spark plug electrodes and reassemble on the engine 6 The cutting means moves when the engine is idling Incorrect adjustme...

Page 45: ...alle specifiche delle direttive MD 2006 42 EC e Ente Certificatore f Esame CE del tipo OND 2000 14 EC ANNEX V D Lgs 262 2002 ANNEX V Italy e Ente Certificatore EMCD 2014 30 EU RoHS II 2011 65 EU 2015 863 EU 4 Riferimento alle Norme armonizzate EN ISO 11806 1 2011 EN ISO 14982 2009 EN 50581 2012 g Livello di potenza sonora misurato 108 67 dB A h Livello di potenza sonora garantito 113 dB A j Potenz...

Page 46: ...tive MD 2006 42 EC e Ente Certificatore f Esame CE del tipo OND 2000 14 EC ANNEX V D Lgs 262 2002 ANNEX V Italy e Ente Certificatore EMCD 2014 30 EU RoHS II 2011 65 EU 2015 863 EU 4 Riferimento alle Norme armonizzate EN ISO 11806 1 2011 EN ISO 14982 2009 EN 50581 2012 BC 546 BC 646 BC 546 D BC 646 D BC 646 DX BC 646 F g Livello di potenza sonora misurato 97 64 100 dB A h Livello di potenza sonora ...

Page 47: ...ive MD 2006 42 EC e Ente Certificatore f Esame CE del tipo OND 2000 14 EC ANNEX V D Lgs 262 2002 ANNEX V Italy e Ente Certificatore EMCD 2014 30 EU RoHS II 2011 65 EU 2015 863 EU 4 Riferimento alle Norme armonizzate EN ISO 11806 1 2011 EN ISO 14982 2009 EN 50581 2012 BC 656 BC 656 D BC 556 BC 556 D BC 656 DX g Livello di potenza sonora misurato 97 64 110 34 dB A h Livello di potenza sonora garanti...

Page 48: ...Data EL Μετάφραση του πρωτοτύπου των οδηγιών χρήσης EK Δήλωση συμμόρφωσης Οδηγία Μηχανών 2006 42 CE Παράρτημα II μέρος A 1 Η Εταιρία 2 Δηλώνει υπεύθυνα ότι η μηχανή Φορητό χειροκατευθυνόμενο θαμνοκοπτικό βενζίνης κοπή της χλόης a Τύπος Βασικό Μοντέλο b Μήνας Έτος κατασκευής c Αριθμός μητρώου d κινητήρας εσωτερικής ανάφλεξης 3 Συμμορφώνεται με τις προδιαγραφές της οδηγίας e Οργανισμός πιστοποίησης ...

Page 49: ...ltek és szerzői joggal védettek tilos a dokumentum bármely részének vagy egészének engedély nélküli sokszorosítása és módosítása LT Šio naudotojo vadovo turinys ir paveikslėliai skirti tik ST S p A ir yra saugomi autorių teisėmis dokumentą atgaminti ar modifikuoti visiškai arba iš dalies yra draudžiama LV Šīs lietotāja rokasgrāmatas saturs un attēli ir veidoti tikai ST S p A un ir aizsargāti ar au...

Page 50: ...ST S p A Via del Lavoro 6 31033 Castelfranco Veneto TV ITALY dB LWA Type s n Art N ...

Reviews: