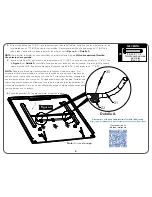
ATTENTION
: If hinge is positioned as
shown here
(
Detail B
), Rotate the hinge as
shown in
Detail C
. Do not take hinge off.
18
Hinge Assembly
with “elbow”
pointing down.
18
17
17
38
Plastic Washer goes
between Strut Tube
(#17) and Hinge (#18)
30
38
34
30
Or
Scan QR code with
your smartphone:
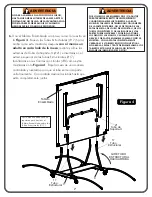
DO NOT OPEN THE TABLE TO PLAYING
POSITION UNTIL BOTH TOPS ARE
INSTALLED! DO NOT LEAVE TABLE
STANDING UNATTENDED. IT COULD BE
KNOCKED OVER CAUSING SERIOUS
BODILY INJURY OR PROPERTY DAMAGE.
8
34
HARDWARE NEEDED
30
38
1/4" Plastic
Washer
1/4-20 Locknut
(Qty. 2)
(Qty. 2)
1/4-20 X 1 1/2 Phillips
Truss Head Screw
(Qty. 2)
CAUTION
: Position hinges exactly as
shown in
Detail C
or table will not
operate correctly and could be damaged.
34
38
30
18
17
Elbow
17
Detail B
Detail C
Incorrect position
of hinge with elbow
pointing up.
In the correct position Hinge #18
will look like a “V” when attached
to Strut Tube (#17).
Hinge Assembly
with “elbow”
pointing down.
Correct position
of hinge with elbow pointing down
Elbow
If you want to see a video on how to attach hinges to Strut tube go to:
http://www.escaladesports.com/customer-service/instruction-videos
7.
Attach Hinges (#18) to Strut Tubes (#17) as shown in
Figure 5
&
Detail C
. With
hinge positioned as shown, align hole in hinge with hole in Strut Tube and attach with
¼” Screw (#30), Plastic Washer (#38) and Locknut (#34). Plastic Washer (#38) goes
between Strut Tube and Hinge. Tighten nut securely. Repeat for other Hinge.
CAUTION: Hinges must be positioned exactly as shown or table will not
operate correctly and could be damaged.
5
Figure
Note
: If hinge (#18) is positioned as shown in
Detail B
, you will have to rotate the hinge
to the position shown in
Detail C
.
DO NOT
unscrew the hinge, you can rotate the hinge
without unscrewing it from the table.


