background image

5

1.

Figura 4

Figura 5

3.

4.

5.

Figura 7

Figura 6

6.

PLAYBACK POSITION

Jale para
Azegurar

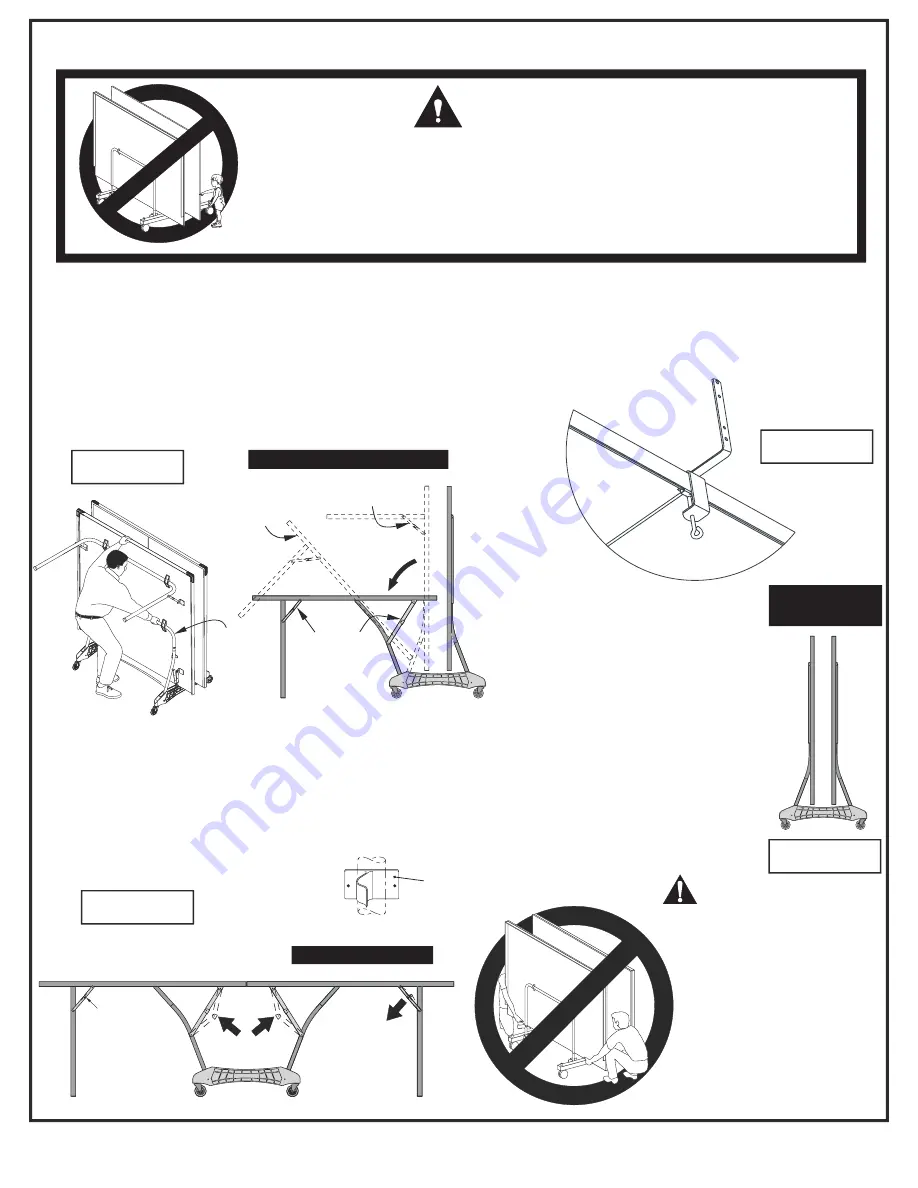
INSTRUCIONES PARA ABRIR Y CERRAR LA MESA

ADVERTENCIA!

PONGA ATENCIÓN AL ABRIR Y AL CERRAR LA MESA. MENORES DE EDAD QUE NO
SABEN EL USO APROPIADO DE LAS INSTRUCCIONES NO SE LES DEBE PERMITIR ABRIR
Y CERRAR LA MESA. EL MANEJO O USO INCORRECTO DE LA MESA

GRAVES O

Ñ S MATERIALES NO DEBEN DE PARARSE, SUBIRSE O

BRINCAR SOBRE LA MESA.

Ñ

LA MESA DEBE ESTAR EN EL INTERIOR Y EN UN LUGAR SECO.

PUEDE CAUSAR

LESIONES

DA O

.

LA HUMEDAD Y LA CONDENSACIÓN DA ARÍAN LA

SUPERFICIE DE LA MESA.

Abra Las patas de una de las mitades de la mesa y asegure las dos
patas con la bisagras.

Párese enfrente del centro de la mitad de la mesa, detenga el centro
de la parte superior con

y con la otra mano el Tubo de

Soporte-U. Suavemente jale el tubo de soporte hacia afuera hacia
usted hasta la position media. Continúe jalando del centro y de la parte

de la mesa hasta que las patas se apoyen en el piso. No deje

la mesa parcialmente abierta en posición media. Ver la figura 4.

una mano

superior

2.

Abra las patas de la otra mitad de la mesa y asegure la dos
bisagras como lo hizo con la primera mitad

Baje la Segunda mitad como está descrito en el paso 2.

Asegure las cuatro bisagras del centro. Ver la figura 5.

Asegure los postes de la red al centro de la mesa y
deslice la red hacia bajo y sobre los postes.
Ver figura 6.

NOTA: La red deberá estar bien estirada. Asegúrese que esté
bien estirada y esto asegurará la tensión apropiada de la red.

PARA CERRAR:

1.

5. Levantar la otra mitad del tablero de la

misma manera.

Retire la red y los postes de la mesa.

2. Desenganche las cuatro bisagras de

enmedio. Ver figura 5.

3. Levante una mitad del tablero al punto

medio hasta que se enganchen los clips
de seguridad. Continúe levantando
hasta cerrar.

4. Desenganche las bisagras de las patas

en la primera mitad y doble las patas
contra la mesa.

ADVERTENCIA!

¡ NO CARGUE LA MESA DE LOS DOS
TABLEROS! LA MESA NO ESTA SUJETA A
LA BASE Y SE PUEDE SALIR DE SU
LUGAR CAUSANDO LESIONES GRAVES
PERSONALES

Ñ

SI ES NECESARIO TRASPORTAR LA
MESA, EN LUGAR DE RODARLA SE
REQUIEREN DOS (2) ADULTOS. CADA
UNO TIENE QUE ESTAR EN CADA LADO
DE LA MITAD DE LA MESA PARA
DESENSAMBLARLA DE LA PARTE
INFERIOR. Y POSTERIORMENTE
REMUEVA LA OTRA MITAD DE LA MESA.
TRANSPORTE O CAMBIE LA MESA EN
TRES O CUATRO PIEZAS Y VUELVA AN
ENSAMBLARLA

O DA OS MATERIALES!

PARA ABRIR:

POSICION PARA JUGAR SOLO

POSICION PARA

GUARDAR

POSICION DE JUEGO

Clip de
Seguridad

Jale patas hacia

arriba y trabe

las bisagras

Posición a la

mitad

Tubo de

Soporte-U

Bisagra de la

pata y del Centro

aseguradas

Bisagra

Presione para

asegurar bisagra

Bisagra (de la

pata) asegurada

Summary of Contents for T8613

Page 1: ...customer service department at Phone 1 866 873 3528 Toll Free Fax 1 866 873 3533 Toll Free E mail tabletennis escaladesports com Mailing Address correspondence only Escalade Sports PO Box 889 Evansvil...

Page 2: ...AREFULLY AT LEAST TWO 2 ADULTS ARE NEEDED TO PUT THIS TABLE TOGETHER 1 Attach wood bottom board 25 to caster rails 12 as shown in figure 1 T urn caster rail as shown and attach board 25 with four thum...

Page 3: ...E TOPS ARE HEAVY DO NOT ATTEMPT TO ASSEMBLE ALONE 2 Attach table top 1 to base assembly that you just put together as shown in figure 2 Pivot strut tubes up as shown then with at least one adult on ea...

Page 4: ...hown or table will not operate correctly and could be damaged 4 With two adults put other table half onto other strut tubes following instructions in steps 2 and 3 Figure 3 28 29 30 Strut Tube 30 29 2...

Page 5: ...osition See Figure 4 Figure 4 Figure 5 3 Open legs of second table half and lock both hinges as with the first half 4 Lower second top as described in step 2 5 Lock all four center hinges See Figure 5...

Page 6: ...usions may not apply to you LEGAL REMEDIES This warranty gives you specific legal rights and you may also have other rights which may vary from state to state CARE AND MAINTENANCE You have purchased a...

Page 7: ...ment Parts List for Model Number T8613 2L 5025 00 23 11 21 19 22 4 20 3 3 20 20 4 22 19 20 21 5 9 20 28 28 20 5 9 30 30 29 29 14 14 14 14 27 18 17 15 16 13 12 7 6 1 2 8 10 33 24 25 20 20 23 1 4 20 X 1...

Page 8: ...bajo las siguientes patentes 6120397 5816957 5769744 5119741 4911085 4717157 D460140 D420563 Puede haber patentes en tr mite Una o m s patentes mencionadas y o en tr mite pueden cubrir productos espec...

Page 9: ...POR LO MENOS SE REQUIERE DE DOS 2 ADULTOS PARA ENSAMBLAR LA MESA 1 Una la Tabla Inferior 25 al Carril con Llantas 12 como se muestra en la figura 1 Voltee los Carriles como est n ilustrados y una la...

Page 10: ...Y PESADOS NO INTENTE ENSAMBLAR ARMAR LA MESA S LO NO ABRA LA MESA EN LA POSICI N DE JUEGO HASTA QUE AMBAS MITADES DE LA MESA EST N INSTALADAS NO DEJE LA MESA LEVANTADA SOLA PODR A CAERSE SOBRE ALGUIEN...

Page 11: ...los Tornillos de 20 x 2 28 los Separadores de 29 y la Manija Perilla 30 Asegurandose que la Manija Perilla est apretada y segura Repita el mismo procedimiento para la otra bisagra 4 Con dos adultos p...

Page 12: ...o bisagras del centro Ver la figura 5 Asegure los postes de la red al centro de la mesa y deslice la red hacia bajo y sobre los postes Ver figura 6 NOTA La red deber estar bien estirada Aseg rese que...

Page 13: ...garant as impl citas o da os incidentales o conexos de modo que las limitaciones que anteceden pueden no ser aplicables en su caso Esta garant a le otorga algunos derechos espec ficos adem s de otros...

Page 14: ...S SOLAMENTE TUBO ESTRUCTURAL LLANTA DE 3 SIN SEGURO LLANTA DE 3 CON SEGURO TORNILLO DE CARRUAJE 1 4 20 X 1 3 4 1 4 20 CONTRATUERCA RONDANA DE PL STICO 8 X 9 16 REMACHE 3 16 X 1 5 8 CONTRATUERCA 3 16 P...

Reviews: