background image

19

BR 500, BR 550, BR 600

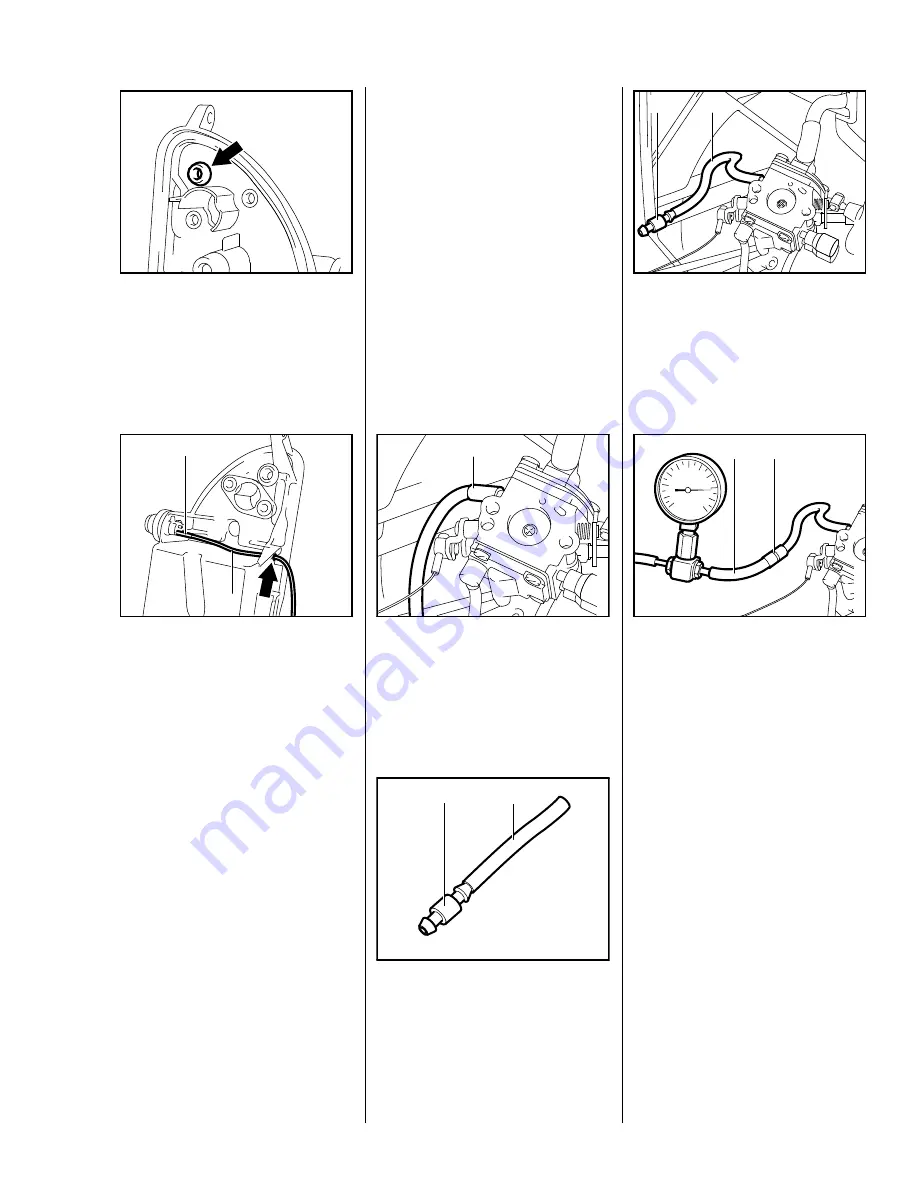
Use a new grommet.

:

Push the grommet into the filter 
housing from the rear until its 
groove (arrow) engages the 
housing.

452RA051

VA

:

Clip the fuel pump in place so that 
the longer stub (1) is at the 
bottom.

:

Pass the hose (2) that comes 
from the tank through the housing 
bore (arrow) and push it onto the 
long stub (1).

452RA036

1

VA

2

Install all other parts in the reverse 
sequence.

– Check tension of throttle cable, 

adjust if necessary, 

b

 9.3.2

– Troubleshooting, 

b

 4.3

In the event of trouble with the 
carburetor or fuel supply system, 
always check, clean or replace the 
tank vent, 

b

 6.5

The carburetor can be tested for 
leaks with the carburetor and 
crankcase tester 1106 850 2905.

– Remove the air filter, 

b

 6.1

– Open the tank filler cap to relieve 

pressure.

– Close the tank filler cap.

:

Disconnect the fuel hose (1) from 
the carburetor.

452RA037

VA

1

:

Push the hose (1) 1110 141 8600 
onto the nipple (2) 
0000 855 9200.

VA

143RA172

2

1

:

Push the hose (2) with nipple (1) 
onto the carburetor’s elbow 
connector.

452RA038

VA

2

1

:

Connect hose (1) of tester 
1106 850 2905 to the nipple (2).

452RA162

VA

2

1

6.2

Carburetor

6.2.1

Leakage Test

RA_452_00_01_02.book  Seite 19  Donnerstag, 16. Februar 2012  11:52 11

Summary of Contents for BR 550

Page 1: ...STIH STIHL BR 500 550 600 2009 05 ...

Page 2: ... Engine 29 7 1 Compression Pressure 29 7 2 Checking Adjusting Valve Clearances 30 7 3 Rocker Arms Pushrods 31 7 4 Cam Followers 32 7 5 Cam Gear 33 7 5 1 Decompression System 33 7 6 Muffler Spark Arresting Screen 34 7 7 Flywheel 35 7 8 Testing for Leaks 35 7 8 1 Preparations 36 7 8 2 Vacuum Test 36 7 8 3 Pressure Test 37 7 9 Crankshaft 38 7 9 1 Oil Seals 38 7 9 2 Crankcase Lower Half 39 7 9 3 Crank...

Page 3: ...the tools in the STIHL Special Tools manual The manual lists all special servicing tools currently available from STIHL Symbols are included in the text and pictures for greater clarity The meanings are as follows In the descriptions Action to be taken as shown in the illustration above the text Action to be taken that is not shown in the illustration above the text In the illustrations A Pointer ...

Page 4: ...bar 0 5 bar 0 5 bar under vacuum 0 5 bar 0 5 bar 0 5 bar 3 2 Ignition System Air gap between ignition module and fanwheel 0 15 0 3 mm 0 006 0 012 in 0 15 0 3 mm 0 006 0 012 in 0 15 0 3 mm 0 006 0 012 in Spark plug NGK CMR 6 H NGK CMR 6 H NGK CMR 6 H Electrode gap 0 7 mm 0 028 in 0 7 mm 0 028 in 0 7 mm 0 028 in 3 3 Fuel System Carburetor leakage test at gauge pressure 0 8 bar 0 8 bar 0 8 bar Operat...

Page 5: ...Screw IS D6x32 Fan housing inner engine pan 8 8 12 0 Screw IS D6x32 Fan housing inner cylinder 8 8 12 0 Hub IS M12x1 Fanwheel crankshaft 22 0 30 0 2 Screw IS P4x19 Handle molding outer inner 1 1 1 5 Screw IS P6x21 5 Handle moldings blower tube 3 0 4 0 Screw IS M4x9 5 Scoop muffler 3 0 4 0 Screw IS M6x30 Engine pan cylinder initial stage 3 0 4 0 3 Screw IS M6x30 Engine pan cylinder final stage 8 8 ...

Page 6: ...ure when refitting a DG or P screw in an existing thread Place the screw in the hole and rotate it counterclockwise until it drops down slightly Tighten the screw clockwise to the specified torque This procedure ensures that the screw engages properly in the existing thread and does not form a new thread and weaken the assembly Power screwdriver settings for polymer Plastoform screws max 600 rpm D...

Page 7: ...d out almost without resistance crankshaft does not turn Guide pegs on pawls or pawls themselves are worn Fit new pawls Spring clip fatigued Fit new spring clip Starter rope is difficult to pull and rewinds very slowly Starter mechanism very dirty Thoroughly clean complete starter mechanism Lubricating oil on rewind spring becomes viscous at very low outside temperatures spring windings stick toge...

Page 8: ...rong air gap between ignition coil and flywheel Reset air gap Flywheel cracked or damaged or pole shoes have turned blue Install new flywheel Ignition timing out of adjustment flywheel warped key in flywheel sheared Install new flywheel Flywheel magnetization weak pole shoes have turned blue Install new flywheel Engine does not run No spark Check operation of setting lever and ignition module No s...

Page 9: ...st inlet control lever Fit new metering diaphragm Inlet control lever too high relative to design position Set inlet control lever flush with upper face of housing Poor acceleration Idle jet too lean Turn low speed screw L counterclockwise richer no further than stop Main jet too lean Turn high speed screw H counterclockwise richer no further than stop Inlet control lever too low relative to desig...

Page 10: ... closed Set idle speed screw LA correctly Small plastic disc in valve jet does not close Clean or renew valve jet Engine speed drops quickly under load low power Air filter plugged Clean air filter Throttle shutter not opened fully Check throttle cable adjustment Tank vent faulty Clean or replace tank vent if necessary Fuel pickup body dirty Clean or replace pickup body Fuel strainers dirty Fit ne...

Page 11: ...eal between cylinder and engine pan leaking damaged cracks Seal or replace engine pan Decompression lever sticking Install new cam gear Engine does not deliver full power or runs erratically Piston rings worn or broken Install new piston rings Muffler spark arresting screen if fitted carbonized Clean muffler inlet and exhaust openings replace spark arresting screen if fitted Secondary air seepage ...

Page 12: ...l out the starter rope several times and allow it to rewind until its normal smooth action is restored If clogged with dirt or pitch the entire starter mechanism including the rewind spring must be removed and disassembled Take particular care when removing the spring Lubricate the rewind spring and starter post with STIHL special lubricant b 13 before installing Take out the screws arrows Remove ...

Page 13: ...52RA002 1 VA 2 Install in the reverse sequence Coat the bore in the rope rotor with STIHL special lubricant b 13 Fit the rope rotor on the starter post so that the driver 1 on the rotor slips behind in the inner spring loop 2 452RA003 VA 2 1 Install all other parts in the reverse sequence Fit the washer and the pawls and engage the spring clip 1 in the groove on the starter post 2 Make sure the sp...

Page 14: ...e rope with knot into the starter grip 212RA307 VA Inspect rope guide bushing in the starter cover for damage and replace if necessary b 5 6 Thread the starter rope through the bushing in the starter cover from outside 452RA006 VA Thread the rope through the rope rotor Tie a simple overhand knot in the end of the rope 452RA005 VA Pull the rope back into the rotor so that the knot locates in the re...

Page 15: ...hten down the hex nut until the bushing is firmly seated The installing tool flares the lower 452RA009 VA 1 end of the rope bushing Remove the installing tool Install all other parts in the reverse sequence Troubleshooting b 4 1 Wear face protection and gloves Remove the rope rotor b 5 4 Use a suitable tool to carefully remove the rewind spring 1 from the starter cover 2 Remove any pieces of broke...

Page 16: ...he special tool 1 with the rewind spring on the spring housing The outer spring loop must line up with the recess in the spring housing arrow 452RA013 VA 1 Install the rope rotor b 5 4 Install all other parts in the reverse sequence Remove the starter cover with rewind starter b 5 2 Make a loop in the starter rope 452RA014 VA Engage the rope in the notch arrow in the rotor Grip the rope close to t...

Page 17: ...If this is not the case tension the spring by one additional turn 452RA160 VA When the starter rope is fully extended it must still be possible to rotate the rope rotor at least another half turn before maximum spring tension is reached If this is not the case pull the rope out hold the rope rotor steady and take off one turn of the rope Do not overtension the rewind spring as this will cause it t...

Page 18: ...and pull it up until its groove arrow engages the housing 452RA157 VA 1 BR 500 only If the shroud is replaced also bond a soundproofing liner 1 in position Install all other parts in the reverse sequence 452RA095 VA 1 Dirty air filters reduce engine power increase fuel consumption and make starting more difficult The air filter must be replaced when there is a noticeable loss of engine power Loose...

Page 19: ...etor 1 If necessary remove the baffle 2 When installing always fit a new gasket between the carburetor and filter housing 452RA030 1 2 VA Carefully remove the hoses 1 Pull out the throttle cable 2 Replace damaged hoses 452RA031 1 VA 1 2 Carefully pull out the hose 1 Carefully disconnect the hose 2 and pull it out of the housing bore arrow 452RA032 1 VA 2 Squeeze the tabs arrows together and diseng...

Page 20: ...oubleshooting b 4 3 In the event of trouble with the carburetor or fuel supply system always check clean or replace the tank vent b 6 5 The carburetor can be tested for leaks with the carburetor and crankcase tester 1106 850 2905 Remove the air filter b 6 1 Open the tank filler cap to relieve pressure Close the tank filler cap Disconnect the fuel hose 1 from the carburetor 452RA037 VA 1 Push the h...

Page 21: ...nto the elbow connector Install the carburetor b 6 2 2 Install all other parts in the reverse sequence Remove the filter housing b 6 1 Disconnect the fuel hose 1 Disconnect the impulse hose 2 452RA039 VA 2 1 Disconnect nipple 1 from the slotted pin 2 on the throttle lever Check flange for damage and replace if necessary Install in the reverse sequence 452RA040 2 VA 1 Always install new gaskets Rem...

Page 22: ...the hole in the metering diaphragm 1 with the bore in the carburetor body 452RA044 VA 1 Place the end cover 1 in position Make sure the bore in the end cover lines up with the hole in the metering diaphragm arrows Fit the screws and tighten them 452RA045 VA 1 down firmly b 3 4 Install all other parts in the reverse sequence Remove the metering diaphragm b 6 3 1 Take out the screw 1 Remove the inle...

Page 23: ...er moves freely The upper edge of the inlet control lever must be flush with the top of the carburetor body Install the metering diaphragm b 6 3 1 Install all other parts in the reverse sequence Remove the carburetor b 6 2 2 Take out the screws arrows Remove the end cover 1 452RA048 1 VA Remove the spring 1 Remove the washer 2 452RA049 1 VA 2 Remove the gasket 1 with pump diaphragm 2 452RA050 VA 2...

Page 24: ...he reverse sequence 452RA054 VA 1 Fit the diaphragm 1 and gasket 2 on the carburetor body so that contours arrow match Place the end cover on the carburetor The pump diaphragm and gasket 452RA055 VA 1 2 are held in position by cast pegs on the end cover Fit the screw and tighten it down firmly b 3 4 Install all other parts in the reverse sequence Remove the carburetor b 6 2 2 Wear safety glasses T...

Page 25: ... in the reverse sequence always using a new pump piston Install the parts of the accelerator pump in the following sequence First fit the spring 2 in the pump piston 1 and insert them both in the bore arrow Slide the throttle shaft 4 with spring 3 into the carburetor body Use a suitable tool to carefully hold down the pump 452RA061 4 VA 3 1 2 piston and then push the throttle shaft fully home Chec...

Page 26: ...andard setting Do not remove the limiter caps to carry out the standard setting With this carburetor it is only possible to correct the setting of the high speed screw H and low 452RA066 VA speed screw L within fine limits Make the following adjustments Turn the high speed screw H counterclockwise as far as stop Turn the low speed screw L counterclockwise as far as stop Check the air filter and re...

Page 27: ... it is necessary to replace the high speed screw H or low speed screw L clean the carburetor or adjust it from scratch After removing the limiter caps it is necessary to carry out the basic setting Remove the shroud with rewind starter b 5 9 Push the puller 1 5910 890 4501 with the open side facing you between the limiter cap 2 and carburetor body and pry the cap off If the 452RA067 VA 2 1 limiter...

Page 28: ...used caps because they may be damaged Always install new limiter caps Place the new limiter caps on the adjusting screws 1 2 so that they are positioned against the rich stop 452RA069 VA 2 1 Push the caps onto the screws until dimension a is 5 mm Adjust engine idle speed b 6 4 1 452RA070 VA a Correct operation of the carburetor is only possible if atmospheric pressure and internal fuel tank pressu...

Page 29: ...everse sequence Use a new O ring Coat O ring and bead of tank vent with STIHL Press Fluid OH 723 before installing b 13 Press home the tank vent squarely as far as stop it must snap audibly into position Install all other parts in the reverse sequence Remove the shroud with rewind starter b 5 9 Carefully pry the connector 1 with hoses and pickup body out of its seat 452RA072 1 VA If necessary pull...

Page 30: ...076 VA 2 1 Pull off the spark plug boot Unscrew the spark plug Screw compression tester 5910 850 2000 1 into the spark plug hole 452RA077 VA 1 The ZAT 3 ignition system tester 5910 850 4520 must be fitted to discharge the ignition voltage The high voltages that occur can cause an electric shock Connect spark plug boot to terminal 1 Attach the ground terminal 2 to the muffler Set the spark gap to a...

Page 31: ...y The design specification is 7 5 8 5 bar If a much higher reading is obtained 9 10 bar check operation of the decompression system and replace if necessary b 7 5 1 Check and adjust valve clearances only when engine is cold Remove the shroud with rewind starter b 5 9 Disconnect wires 1 and 2 from the ignition module 452RA078 VA 1 2 Take the wires out of the air guide shroud arrow Take out the scre...

Page 32: ...lve 2 0 10 0 02 mm 452RA082 VA 2 3 1 Exhaust valve 3 0 10 0 02 mm Adjusting valves Valve clearance is adjusted with the locknuts arrows To increase valve clearance Loosen the nut 452RA083 VA To reduce valve clearance Tighten the nut Turn engine over several times check valve clearance again and adjust if necessary Assemble all parts in the reverse sequence Thoroughly clean the sealing faces on the...

Page 33: ...e oil before installing Make sure the pushrod is properly seated in the rocker arm and cam follower Adjust the valves b 7 2 Thoroughly clean the sealing faces on the cylinder and cover Apply thin coating of sealant to cylinder sealing face b 13 Follow maker s instructions Remove the pushrods b 7 3 Pull out the pin 1 Remove the cam followers 2 and 3 Install in the reverse sequence Coat all parts wi...

Page 34: ...r 452RA167 VA 3 2 1 4 Install the pin 1 The marks must not move out of position while the cam gear is being fitted Rotate the crankshaft until the cam lobe on the cam gear points 452RA107 VA 1 downward Install the cam followers b 7 4 Remove cam gear cover b 7 3 Check free movement and function of decompression system lever arrow Lever must project about 2 mm from the cam VA 249RA140 Push decompres...

Page 35: ...e muffler 1 452RA019 1 VA Remove the gasket 1 Clean the sealing faces Install in the reverse sequence Always install a new muffler gasket 452RA020 VA 1 Carefully fit the spark arresting screen 1 in position Guide lug on spark arresting screen must engage the scoop 452RA021 VA 1 Push the scoop 1 into place Tighten down the screws 2 firmly Install all other parts in the reverse sequence 452RA022 VA ...

Page 36: ...enated hydrocarbons b 13 Install in the reverse sequence Make sure the flywheel s key arrow engages the slot in the crankshaft Adjust gap between ignition module and flywheel b 8 4 Install all other parts in the reverse 452RA138 VA sequence Defective oil seals and gaskets or cracks in castings are the usual causes of leaks Such faults allow supplementary air to enter the engine and upset the fuel ...

Page 37: ... the piston to top dead center Perform vacuum test b 7 8 2 Perform pressure test b 7 8 3 Oil seals tend to fail when subjected to a vacuum i e the sealing lip lifts away from the crankshaft during the piston s induction stroke because there is no internal counterpressure A test can be carried out with the vacuum pump to detect this kind of fault Carry out the preparations b 7 8 1 Connect suction h...

Page 38: ... 452RA112 VA 1 Close the vent screw 1 on the rubber bulb Pump air into the crankcase with rubber bulb 2 until the gauge 3 indicates a pressure of 0 5 bar VA 249RA012 2 1 3 If this pressure remains constant for at least 20 seconds the crankcase is airtight If the pressure drops the leak must be found and the faulty part replaced To find the leak coat the suspect area with oil and pressurize the cra...

Page 39: ...ng lips of oil seal with grease b 13 Slip the oil seal 1 over the crankshaft and up against the 452RA115 VA 1 crankcase Note installed position Closed side of oil seal must face outward Use the press sleeve 2 1108 893 2405 to press home the oil seal 1 until it is flush with the crankcase Install all other parts in the reverse sequence 452RA116 VA 1 2 Fanwheel side Remove the fanwheel b 11 3 Apply ...

Page 40: ...he engine pan 1 452RA121 VA 1 Clean the sealing faces arrows on the cylinder and engine pan with standard solvent based degreasant containing no chlorinated or halogenated hydrocarbons b 13 Do not take the crankshaft out of the 452RA122 1 VA 1 bearings because this will alter cam gear timing b 7 5 Check condition of oil seals 1 and replace if damaged Install in the reverse sequence Apply thin coat...

Page 41: ...in the reverse sequence VA 249RA087 3 1 2 1 Coat piston and piston rings with oil Fit piston rings so that their gaps are offset 120 degrees Use new oil seals Lubricate sealing lips of oil seals with grease b 13 Apply thin coating of sealant to outer diameter of oil seals b 13 Carefully fit piston in the cylinder Install the crankshaft with new oil seals in the cylinder Fit lower half of crankcase...

Page 42: ... port 452RA124 VA Use the assembly drift 1108 893 4700 to push the piston pin through the piston and connecting rod VA 249RA092 Use installing tool 5910 890 2212 with sleeve 5910 893 1704 to fit the snap ring b 12 Remove the sleeve from the tool 452RA163 VA Attach the snap ring 1 to the magnet 2 so that the snap ring gap is on the flat side of the tool s shank VA 249RA145 2 1 Push the large slotte...

Page 43: ...n boss hold the piston steady center the tool shank exactly and press home until the snap ring slips into the groove VA 249RA149 Fit the snap ring so that its gap is on the piston s vertical axis it must point either up or down Install all other parts in the reverse sequence VA 249RA150 Remove the piston b 7 9 4 Remove rings from piston Use a piece of old piston ring to scrape the grooves arrows c...

Page 44: ...n cylinder head for any damage Replace cylinder if necessary Install in the reverse sequence Valve spring retainer must engage properly in groove of valve stem If the cylinder with piston has to be replaced first carry out the following operations Remove the muffler b 7 6 Remove the crankshaft b 7 9 3 Remove the rocker arms pushrods b 7 3 Remove the cam gear b 7 5 Remove the ignition module b 8 4 ...

Page 45: ...using arrow 452RA098 VA Fit the carburetor line up the flange and manifold so it is straight and then secure the clamp Carefully tighten down the clamp until the distance between the tabs is 5 6 mm Use new gaskets Install all other parts in the reverse sequence Exercise extreme caution when carrying out maintenance and repair work on the ignition system The high voltages which occur can cause seri...

Page 46: ...here is no mechanical wear in these systems ignition timing cannot get out of adjustment To test the ignition module use either the ZAT 4 ignition system tester 5910 850 4503 or the ZAT 3 ignition system tester 5910 850 4520 The ignition test refers only to a spark test not to ignition timing Using the ZAT 4 ignition tester 5910 850 4503 Before starting the test install a new spark plug in the cyl...

Page 47: ...the spark window 3 the high voltage connection 2 ground connection 5 and the ground terminal 1 The high voltages that occur can cause an electric shock Crank the engine quickly with the rewind starter min 1 000 rpm and check spark in the tester s window 3 Warning The engine may start and accelerate during the test If a spark is visible the ignition system is in order If no spark is visible in the ...

Page 48: ...een the arms of the ignition module and the flywheel Press the ignition module against the setting gauge 452RA136 VA 2 1 Tighten down the screws 2 firmly Install all other parts in the reverse sequence Remove the shroud with rewind starter b 5 2 Pull the boot off the spark plug Use suitable pliers to pull the leg spring out of the spark plug boot 452RA131 VA Unhook the leg spring from the ignition...

Page 49: ...t circuit wire Move the setting lever on the control handle to 0 and hold it there The measured resistance must be about 0 Ω If the reading is much higher there is a break in the wire and the throttle cable has to be replaced together with the wires Move the setting lever on the control handle to The measured resistance must be infinitely high If the reading is much lower there is a break in the w...

Page 50: ... spring Leg spring hook in center of ignition lead Boot damaged If necessary install new spark plug boot and or leg spring Test ignition system with ZAT 3 or ZAT 4 use ZAT 3 as main spark gap see TI 32 94 1 Check the spark plug Smeared with oil black Sooted Electrode gap correct Contacts shorted Clean the plug reset or replace ...

Page 51: ...if necessary Check ignition lead Severe chafing Spark plug boot Holes cracks Resistance spark plug boot to ground spec 1 5 12 kΩ Check resistance of ignition lead spec 10 Ω If necessary install new spark plug boot and or ignition lead Disconnect short circuit wire from ignition module 1 3 yes no 2 Powerful spark ...

Page 52: ...Look for fault in fuel system or carburetor check engine for leaks check position of flywheel on crankshaft yes Check operation of setting lever Short circuit wire chafed Contact gap contact springs If necessary install new ignition lead and or contact springs Re connect short circuit wire 2 3 Powerful spark Engine runs ...

Page 53: ...it upwards If necessary take out the grub screw arrow 452RA144 1 VA Remove the interlock lever Install in the reverse sequence Adjust the throttle cable b 9 3 2 452RA143 VA 1 Remove the interlock lever b 9 1 Remove the torsion spring 1 Take out the screw 2 and remove the cam 3 452RA145 2 VA 1 3 Remove the setting lever 1 Install in the reverse sequence 452RA146 VA 1 Make sure the teeth of the sett...

Page 54: ...talled correctly Carefully push the switch onto the fixing pins arrows Adjust the throttle cable b 9 3 2 452RA152 VA Remove the shroud with rewind starter b 5 9 The throttle lever must butt against the stop on the carburetor cover arrow when the throttle trigger is pulled as far as it will go full throttle and butt against the idle 452RA150 VA 1 speed screw 1 when the throttle trigger is in the id...

Page 55: ...home the springs and bearing plugs as far as stop arrows Install all other parts in the reverse sequence 452RA094 VA Remove the shroud with rewind starter b 5 9 Drain the fuel tank Pry out the connector with fuel hoses b 6 6 452RA084 VA Take care to ensure that no parts drop on the floor Take out the screws arrows Remove the powerhead from the backplate Remove the tank b 6 7 BR 500 only Remove sou...

Page 56: ...e locking tabs 452RA087 VA 1 1 snap into position Install all other parts in the reverse sequence Unclip the throttle cable 1 with grommet 3 from the hose clamp 2 Take out the screw arrow Remove the hose clamp 2 and pleated hose 452RA154 2 VA 3 1 Disconnect the lower half of the antistatic wire 1 from the upper half 2 Take the powerhead off the backplate b 10 2 452RA155 1 VA 2 Take out the screws ...

Page 57: ...ng check that the groove in the manifold is properly seated in the fan housing arrow Check that the throttle cable and fuel hoses are correctly positioned 452RA098 VA Install all other parts in the reverse sequence Remove outer fan housing b 11 1 Use combination wrench 4180 890 3400 to unscrew the spark plug Screw the locking screw 452RA090 VA 1 4282 890 2700 1 fully home Always use the specified ...

Page 58: ...When installing make sure the crimping arrow on the cable lug faces outwards Install all other parts in the reverse sequence 452RA092 VA The machine may be operated only with a properly installed antistatic wire Check that the hook on the antistatic wire is always connected to the eye arrow 452RA164 VA Make sure the sleeve on the antistatic wire is always clipped into the retainer arrow Install al...

Page 59: ...ignal may be used as an alternative 12 Torque wrench 5910 890 0301 0 5 to 18 Nm torque wrench 5910 890 0302 with optical acoustic signal may be used as an alternative 13 Socket 17 mm 5910 893 5610 Releasing fanwheel 14 Puller 5910 890 4400 Universal puller 15 Jaws profile 3 1 Removing oil seals 16 Installing sleeve 1118 893 4602 Installing oil seal 17 Press sleeve 1108 893 2405 Installing oil seal...

Page 60: ...Rubber elements of AV system 3 STIHL special lubricant 0781 417 1315 Bearing bore in rope rotor rewind spring in rope rotor 4 Dirko sealant 100 g tube 0783 830 2120 Crankcase sealing faces 5 Standard commercial solvent based degreasant containing no chlorinated or halogenated hydrocarbons Cleaning crankshaft stub 6 Loctite 270 50 ml bottle 0786 111 1109 High strength threadlocking adhesive ...

Page 61: ...60 BR 500 BR 550 BR 600 ...

Page 62: ...englisch english 0455 452 0123 VA0 B12 FST Printed in Germany ...

Reviews: