4.10
Cleaning, Maintenance and
Repair
WARNING
■ The gear housing can get hot during opera‐
tion. There is a risk of burn injuries.
► Do not touch a hot gear housing.
■ Harsh detergents, cleaning with a water jet or
sharp objects can damage the KombiTool. If
the KombiTool is not cleaned correctly, com‐
ponents may no longer function properly or
safety devices may be rendered inoperative.
They may cause serious injury to persons.
► Clean the KombiTool as described in this
instruction manual.
■ If the KombiTool is not serviced or repaired
correctly, components may no longer function
properly or safety devices may be rendered
inoperative. This may result in serous or fatal
injury to people.
► Do not attempt to repair the KombiTool
yourself.
► If the KombiTool needs to be repaired: Con‐
tact a STIHL servicing dealer for assis‐
tance.
► Maintain the KombiTool as described in this
instruction manual.
■ The user can be cut by the sharp cutting
edges while cleaning or maintaining the
blades. This may result in injury to the user.
► Wear work gloves made from resist‐
ant material.
5
Preparing KombiTool for
Operation
5.1
Preparing KombiTool for Oper‐
ation
Perform the following steps before starting work:
► Make sure the following components are in a
safe condition:
–
–
KombiMotor, as described in the instruction
manual.
► Clean the KombiTool, 12.1.
► Connect drive tube to the gearbox, 6.1.
► Mount the KombiTool on the KombiMotor,
► If you are using a KombiMotor with a loop han‐
dle: Mount a barrier bar as described in the
KombiMotor’s instruction manual.
► If you cannot carry out the above steps: Do
not use the KombiTool and contact your
STIHL servicing dealer for assistance.
6
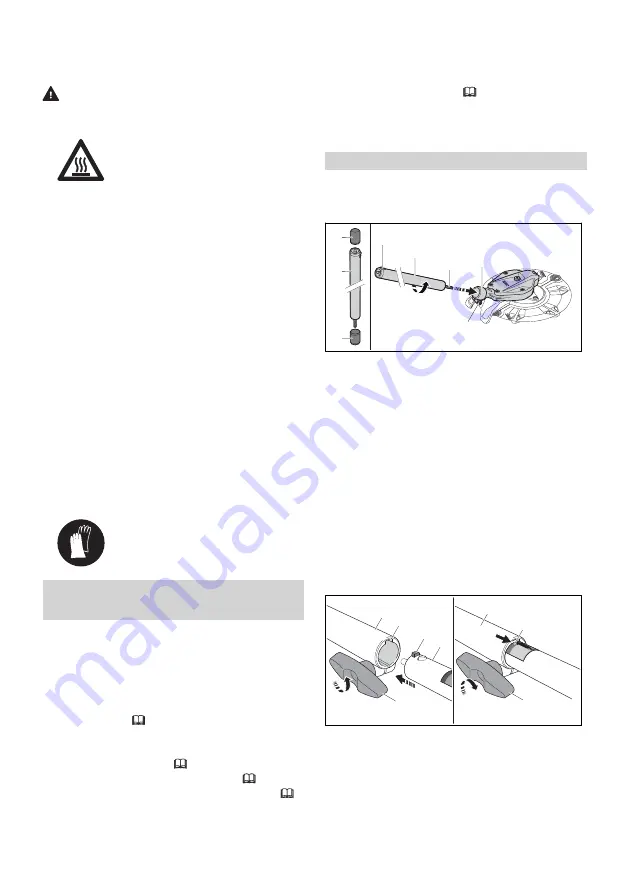
Assembling the KombiTool
6.1
Connecting Drive Tube to Gear
Housing
6
2
4
5
3
1
2
1
0000-GXX-8735-A1
► Remove protective caps (1) from both ends of
the drive tube (2).
► Loosen the screw (6).
► Push the drive tube (2) into the gear housing
(5) and rotate it until the gear shaft (4)
engages.
► Tighten the screw (6) moderately.
► Align the drive tube (2) so that the lug (3)
faces up.
► Tighten down the screw (6) firmly.
The drive tube need not be removed again.
6.2
Mounting and Removing the
KombiTool
6.2.1
Mounting the KombiTool
2
4
1
5
3
6
1
2
0000-GXX-4689-A0
► Loosen the wing screw (1).
► Line up the lug (4) and the slot (3).
► Push the drive tube (5) into the coupling
sleeve (2) as far as stop.
The red line (6) is flush with the coupling
sleeve (2).
► Tighten down the wing screw (1) firmly.
English
5 Preparing KombiTool for Operation
6
0458-811-0121-C


