background image

6.2.2

Removing the KombiTool

► Fit the transport guard.

► Loosen the wing screw on the KombiTool.

► Pull the drive tube out of the KombiTool.

7

Checking the KombiTool

7.1

Checking the Blades

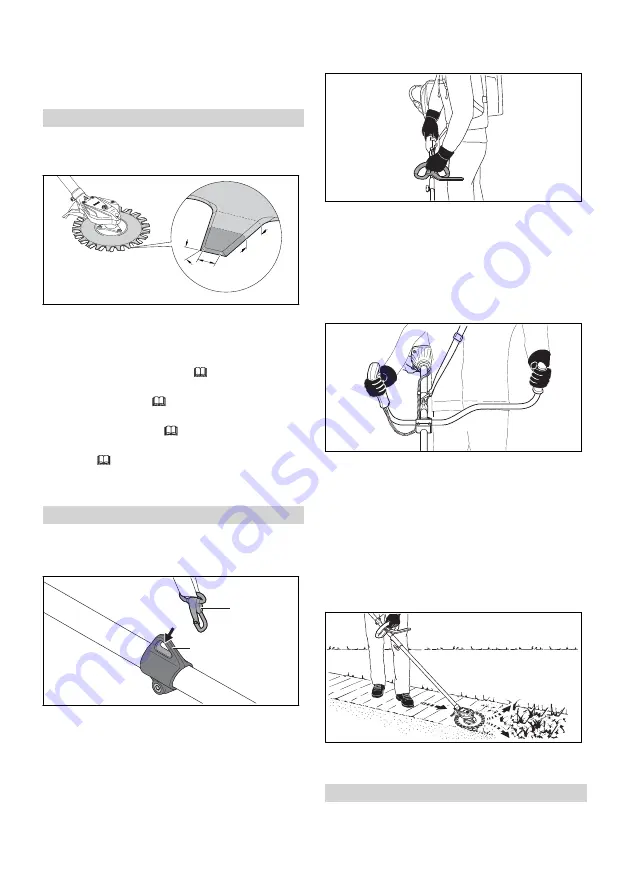
► Switch off the KombiMotor.

a

b

c

0000-GXX-8740-A0 

► Measure the following points on the blades:

Length a

Width b

Angle c

► Compare measurements,   15.2.

► If the minimum length is less than specified:

Offset the blades,   13.4.

► If the minimum width is less than specified:

Replace the blades,   13.3.

► If the filing angle is not correct: Sharpen the

blades,   13.5.

► If you have any queries: Contact a STIHL

servicing dealer for assistance.

8

Using the KombiTool

8.1

Holding and Controlling the

KombiTool

2

1

0000-GXX-7807-A0 

► Hook the KombiMotor’s carrying ring (2) to the

carrying system’s carabiner (1).

KombiMotor with loop handle.

0000-GXX-4644-A0

► Hold the KombiMotor with your right hand on

the control handle – wrap your thumb around

the control handle.

► Hold the KombiMotor with your left hand on

the loop handle – wrap your thumb around the

loop handle.

KombiMotor with bike handle

0000-GXX-7850-A0 

► Hold the KombiMotor with your right hand on

the control handle – wrap your thumb around

the control handle.

► Hold the KombiMotor with your the left hand

on the handle – wrap your thumb around the

handle.

8.2

Weeding and Mowing Grass

The cutting height is determined by the distance

of the blades from the ground.

0000-GXX-8737-A0 

► Swing the KombiTool back and forth in an arc.

► Walk slowly and steadily forwards.

9

After Finishing Work

9.1

After Finishing Work

► Switch off the KombiMotor.

7 Checking the KombiTool

English

0458-811-0121-C

7

Summary of Contents for RG-KM

Page 1: ...STIHL RG KM Instruction Manual 2 11...

Page 2: ...nfidence in us and hope you will enjoy working with your STIHL product Dr Nikolas Stihl IMPORTANT READ BEFORE USING AND KEEP IN A SAFE PLACE FOR REFERENCE 2 Guide to Using this Manual 2 1 Applicable D...

Page 3: ...ious or fatal injuries and damage to property Use the KombiTool as described in this instruction manual Use the KombiMotor as described in the instruction manual supplied with the STIHL KombiMotor 4 3...

Page 4: ...losed toed footwear with high grip soles 4 5 Work Area and Surroundings WARNING Innocent bystanders children and animals are not aware of the dangers of the KombiTool or flying debris Bystanders child...

Page 5: ...ake contact with a hard object Sparks may cause a fire in an easily combustible location This can result in serious or fatal injuries and dam age to property Do not work in an easily combustible loca...

Page 6: ...lowing steps before starting work Make sure the following components are in a safe condition KombiTool 4 6 1 KombiMotor as described in the instruction manual Clean the KombiTool 12 1 Connect drive tu...

Page 7: ...KombiMotor s carrying ring 2 to the carrying system s carabiner 1 KombiMotor with loop handle 0000 GXX 4644 A0 Hold the KombiMotor with your right hand on the control handle wrap your thumb around th...

Page 8: ...Maintenance 13 1 Maintenance Intervals The maintenance intervals are dependent on the environmental and operating conditions STIHL recommends the following maintenance inter vals After every 25 hours...

Page 9: ...des WARNING The cutting edges of the blades are sharp There is a risk of cut injuries Wear work gloves made of durable mate rial Switch off the KombiMotor Remove the blades 1 2 0000 GXX 8742 A0 Use a...

Page 10: ...ve surface according to ISO 22868 94 dB A Vibration level ahv eq measured according to ISO 22867 Control handle 4 1 m s Loop handle 4 4 m s RG KM with KMA 135 R Sound pressure level Lpeq measured on r...

Page 11: ...documents are stored at ANDREAS STIHL AG Co KG Produktzulas sung The year of manufacture is specified on the KombiTool Waiblingen 15 07 2021 ANDREAS STIHL AG Co KG pp Dr J rgen Hoffmann Director Prod...

Page 12: ...www stihl com 04588110121C 04588110121C 0458 811 0121 C 0458 811 0121 C...

Reviews: