background image

Operation

5

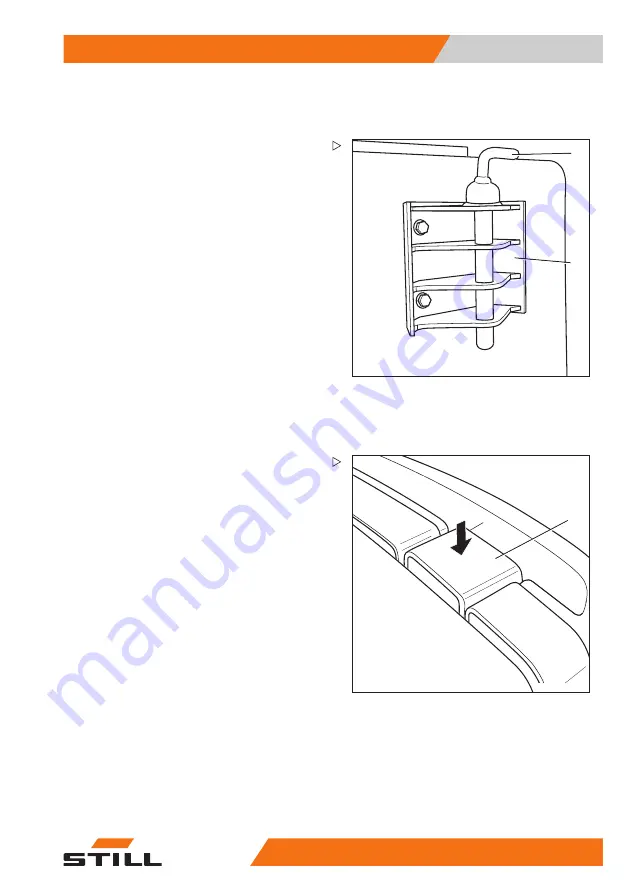
Pre-shift-checks

Check the operation and security of

the trailer coupling

1047_003-005

1

2

– Make sure that the tow pin (1) slides prop-

erly into the trailer coupling (2) and engages

securely when locked.

– Make sure that the trailer coupling (2) is

securely attached to the frame.

– The warning device (eg horn) must function

properly.

– The wheels must not be damaged or worn

and must be fastened correctly.

Connecting the battery plug (charg-

ing station)

1044_606-013

1

– Disconnect the battery socket (1) from the

charging station and insert into the plug on

the truck.

51048070007 [EN]

53

Summary of Contents for CX-T-40

Page 1: ...Original instructions Electric tow tractor CX T 40 1066 51048070007 EN 00 10 2013 ...

Page 2: ......

Page 3: ...al considerations 9 Packaging 9 Disposal of components and batteries 9 2 Introduction Use of the tow tractor 12 Intended use of the trucks 12 Approved applications 12 Unintended use 12 Place of use 13 Residual risks 14 Residual dangers residual risks 14 Special risks associated with using the truck and attachments 15 Overview of hazards and countermeasures 16 Hazards to employees 18 3 Safety Defini...

Page 4: ...7 Battery connection cables 37 4 Overviews Overview 40 Operating devices and display elements 41 View of controls 41 Tiller 42 Marking positions 43 Location of plates and labels 43 Labels 44 Chassis frame labelling 46 Data plate 46 Options and variants 47 Overview of options and models 47 Battery electrolyte level indicator LED optional 50 5 Operation Pre shift checks 52 Visual inspections 52 Chec...

Page 5: ... with throttle 65 Driving pedestrian mode with traction button 67 Steering 68 Braking 68 Emergency stop brake 70 Parking brake 70 Automatic shutdown 70 Handling trailers 71 Approved towing applications 71 Coupling trailers 73 Single position or multi position trailer coupling 74 Automatically closing trailer coupling 76 ROCKINGER trailer coupling 78 Towing a trailer 79 Digicode 80 Digicode control...

Page 6: ... 100 Staff training and qualifications for maintenance and repairs 101 Maintenance personnel for batteries 101 Services not requiring special qualifications 101 Maintenance and inspection intervals 102 Ordering spare parts and wear parts 103 Maintenance data table 104 Safety regulations for maintenance 104 Safety measures for maintenance and repair 104 Work on the electrical equipment 104 Safety dev...

Page 7: ...121 Work that must also be carried out 121 Insulation resistance check earthing 121 Maintenance every 2000 hours 123 Other tasks 123 Checking and cleaning the battery 123 Servicing the battery according to the manufacturer s instructions 123 Insulation resistance check earthing 123 Maintenance every 5000 hours 125 Other tasks 125 Servicing the gearbox 125 7 Technical data Dimensions 128 Technical ...

Page 8: ......

Page 9: ...1 Foreword ...

Page 10: ...erating instructions provide the necessary information to do this Read and observe the information provided before commissioning the truck This will prevent accidents and ensure that the warranty remains valid CE Symbol CE labelling The manufacturer uses CE labelling to indi cate that the truck complies with the standards and regulations valid at the time of marketing This is confirmed by the issue...

Page 11: ...ße 10 D 22113 Hamburg Germany We declare that the Industrial truck according to these operating instructions Model according to these operating instructions conforms to the latest version of the Machinery Directive 2006 42 EC Personnel authorised to compile the technical documents See EC compliance declaration STILL GmbH 51048070007 EN 3 ...

Page 12: ...d on the nameplate Chapter Data plate P 4 46 in the field provided Production no Year of production Please quote these numbers for all technical enquiries Operating instructions are provided with each truck These instructions must be stored carefully and must be available to the driver and operator at all times If the operating instructions are lost the oper ator must immediately request a replacem...

Page 13: ...ut documentation Thank you for reading and complying with these operating instructions If you have any questions or suggestions for improvements or if you have found any faults please contact your service centre 51048070007 EN 5 ...

Page 14: ... date and topicality of the instructions The issue date of these instructions can be found on the title page STILL is constantly working to improve its trucks These instructions are subject to change and claims cannot be validly asserted against the statements and images found in these operating instructions If you require technical support for the truck please contact your service centre Have a g...

Page 15: ...d to avoid material damage and or destruction NOTE For technical requirements that require special attention ENVIRONMENT NOTE To prevent environmental damage Explanation of the cross references Cross references are used to direct the reader to the appropriate section or chapter Examples Cross reference to a section Chap ter Explanation of the cross refer ences P 1 7 Cross reference to a chapter Ch...

Page 16: ...omponents in relation to the driver s compartment with the load positioned at the rear 1050_003 002 Sample graphics This documentation explains the cycle usu ally sequential of certain functions or opera tions Schematic diagrams of a truck are used to illustrate these cycles NOTE These schematic diagrams are not represen tative of the constructed state of the docu mented truck 8 51048070007 EN ...

Page 17: ... of properly after delivery of the truck Disposal of components and batteries The truck is composed of different materials If components or batteries need to be replaced and disposed of they must be disposed of treated or recycled in accordance with regional and national regulations NOTE The documentation provided by the battery manufacturer must be observed when dispo sing of batteries ENVIRONMEN...

Page 18: ...1 Foreword Environmental considerations 10 51048070007 EN ...

Page 19: ...2 Introduction ...

Page 20: ...d with this usage will enable him to put in place any necessary additional safety measures Approved applications The truck is suitable for carrying and transport ing loads in a way described and shown in this manual If the truck is to be used in a way other than established in the operating instructions the written approval of the manufacturer and if necessary of the responsible authorities must b...

Page 21: ...ust be observed The sites on which the truck is used must comply with the current regulations condition of the ground lighting etc The ground must have sufficient load capacity concrete asphalt The driveways work areas and working widths must correspond with the specifications in the operating manual see Chapter Before driving P 5 61 The truck can be operated on a slope in compliance with the data a...

Page 22: ...ion incident or breakdown etc WARNING All persons that are in the vicinity of the truck must be instructed regarding these risks that arise through use of the truck In addition we draw attention to the safety regulati ons in these operating instructions The risks can include Escape of consumables due to leakages rupture of lines and containers etc Risk of accident when driving over difficult ground...

Page 23: ...ises from improper use or incorrect operation cannot be excluded in extreme cases and will impact stability The risks can include loss of stability due to unstable or sliding loads etc cornering at excessive speeds moving with the load raised moving with a load that is protruding to the side e g sideshift turning and driving diagonally across slopes driving on slopes with the load on the downhill ...

Page 24: ...G 925 VDI 3313 driver permit Usage by unautho rised persons Access with key only for authorised persons O Truck not in a safe condition Recurrent testing and rectification of defects O BetrSichVO Workplace Safety Ordinance Risk of falling when using working platforms Compliance with national regulations different national laws O BetrSichVO Workplace Safety Ordinance and employer s liability insuran...

Page 25: ...lace Safety Ordinance operating instructions and VDMA German Engineering Federation rules O b LPG Observe BGV D34 operating instructions and VDMA rules O When charging the traction battery Observe BetrSichVO Workplace Safety Ordinance operating instructions and VDMA German Engineering Federation rules O VDE 0510 In particular Ensure ventilation Insulation value within permissible range When using ...

Page 26: ...mployees In accordance with the operating safety ordi nance BetrSichVO and the German law on health and safety at work ArbSchG the oper ator see Chapter Definition of terms used for responsible persons P 22 must iden tify and assess hazards during operation and establish health and safety measures at the workplace necessary to protect employees BetrSichVO The operator must therefore draw up appropr...

Page 27: ...o assist in satisfying the conditions of this regulation The overview specifies the main causes of accidents in the event of non compliance If other major operational hazards are involved these must also be taken into consideration The conditions of use for trucks are broadly similar in many plants so that the hazards can be summarised in one overview Follow the information provided by the relevant...

Page 28: ...2 Introduction Residual risks 20 51048070007 EN ...

Page 29: ...3 Safety ...

Page 30: ...nic working for the manufacturer or a person who fulfils the following requirements A completed vocational qualification that demonstrably proves their professional expertise This proof should consist of a vocational qualification or a similar document Professional experience indicating that the qualified person has gained practical experience of trucks over a proven period during their career During ...

Page 31: ...GG General Employers Liability Insurance Association Act 925 Comply with the national regulations in force in the country Driver rights duties and rules of be haviour The driver must be trained in his rights and duties The driver must be granted the required rights The operator must wear appropriate protec tive equipment protective clothing safety footwear safety helmet industrial goggles and safe...

Page 32: ... under the influence of the aforementio ned substances are not permitted to perform any work on or with an industrial truck Prohibition on use by unauthorised persons The operator is responsible for the truck during working hours He must prohibit any operation of the machine by unauthorised persons When leaving the truck the driver must secure it against any unauthorised use 24 51048070007 EN ...

Page 33: ... approved by STILL CAUTION Installation and or use of such products may there fore have a negative impact on the design features of the truck and thus impair active and or passive driving safety We recommend that you obtain approval from the manufacturer and if necessary from the relevant regulatory authorities before installing such parts The manufacturer accepts no liability for any da mage caus...

Page 34: ... are disconnected Contact your service centre If the manufacturer goes into liquidation and the company is not taken over by another legal person the operating company can make modifications to the truck To do so the operating company must fulfil the following prerequisites Design documents test documents and assembly instructions associated with the change must be archived and remain accessi ble at...

Page 35: ... Periodic safety inspections and safety inspections after unusual incidents The operating company must ensure that the truck is inspected by a qualified person at least once a year or after unusual incidents As part of this inspection the complete technical condition of the truck must be tested with regard to accident safety The truck must also be thoroughly inspected for damage which could have be...

Page 36: ...nce NOTE Nominal battery voltage test voltage 500V Measure insulation resistance using a suitable meter The insulation resistance is sufficient when it has a nominal value of at least 1000 Ohms V against the chassis Ask our service department Measuring the insulation resistance of the electrical system NOTE Nominal battery voltage test voltage 500V Before testing the circuit check that it is electr...

Page 37: ...he permissible substances that are necessary for operation see Chapter Maintenance data table P 6 104 Oils DANGER Oils are flammable Follow the statutory regulations Do not allow oils to come into contact with hot engine parts No smoking fires or naked flames DANGER Oils are toxic Avoid contact and consumption If vapour or fumes are inhaled move to fresh air immediately In the event of contact with t...

Page 38: ...e removed immediately with oil binding agents and disposed of according to the regulations ENVIRONMENT NOTE Oil is a water polluting substance Always store oil in containers that comply with the applicable regulations Avoid spilling oils Spilt oil should be removed immediately with oil binding agents and disposed of according to the regulations Dispose of old oils according to the regula tions Hyd...

Page 39: ...jury use appropriate personal protective equipment e g protective gloves industrial goggles skin protection and skin care products ENVIRONMENT NOTE Hydraulic fluid is a water polluting substance Always store hydraulic fluid in containers that comply with regulations Avoid spills Spilt hydraulic fluid should be removed immediately with oil binding agents and disposed of according to the regulations Di...

Page 40: ...ter Follow the statutory regulations ENVIRONMENT NOTE Dispose of used battery acid in line with the applicable regulations Disposal of consumables ENVIRONMENT NOTE Materials that accumulate during repair maintenance and cleaning must be collected properly and disposed of in accordance with the national regulations for the country in which the truck is being used Work must only be carried out in ar...

Page 41: ...t cy cle using an identical machine and calculated from the weighted values under driving lifting and idling conditions Time proportions Lifting 0 Idling 60 Driving 40 However the noise measurements taken near the truck cannot be used to calculate the noise level at the work places in compliance with the European Community Directive 86 188 EEC daily personal noise exposure Noise levels must be mea...

Page 42: ...ent The personal stress on the operator caused by vibrations during a day s work must be noted if necessary at the actual workplace so as to be able to consider all the other factors such as the state of the track the intensity of use etc Traction battery emissions Battery charging releases an explosive oxygen hydrogen gas mixture oxyhydrogen This gas mixture is highly explosive and must not be ig...

Page 43: ... operation 3 Platform with user detection Automatic reduction in speed when turning Ramp Stop function Ramp Stop function The Ramp Stop function enables a gentle start off when stopping on a slope without the vehicle rolling backwards at all DANGER Do not climb on the dashboard CAUTION Always exit the tractor on the side where there is no traffic 51048070007 EN 35 ...

Page 44: ...3 Safety Safety devices CAUTION Risk of crushing your feet in pedestrian mode Ensure that your feet are placed far enough away from the truck chassis 36 51048070007 EN ...

Page 45: ...aired Do not remove or deactivate safety devices and switches Fixed set values may only be changed with the approval of the manufacturer Work on the electrical system e g connecting a radio additional headlights etc is only permitted with the manufacturer s written approval All electrical system interventions must be documented Battery connection cables CAUTION Using sockets with NON ORIGINAL batt...

Page 46: ...3 Safety Battery connection cables 38 51048070007 EN ...

Page 47: ...4 Overviews ...

Page 48: ...ry connector 2 Cockpit 3 Button for driving in pedestrian mode option 4 Backrest 5 Pin coupling 6 Wheels 7 Traction controller 8 Platform 9 Traction battery 10 Steering controller 11 Steering motor 12 Traction wheel 13 Gearbox 14 Traction motor 15 Brake 16 Fuse carrier 17 Horn 40 51048070007 EN ...

Page 49: ...s View of controls 123 456 789 PRG PRG 1050_003 005 5 4 3 2 1 10 9 7 6 8 1 Tray 2 Battery compartment lock 3 Cockpit 4 Battery connector 5 Presence area 6 Tray 7 Button for driving in pedestrian mode option 8 Backrest 9 Button for driving in pedestrian mode option 10 Tray 51048070007 EN 41 ...

Page 50: ...unction 2 No function 3 Horn button 4 Tortoise button 5 PRG scrolling button 6 Numbers 123 button 7 Display 8 I ON button 9 Numbers 456 button 10 PRG input enter button 11 Numbers 789 button 12 Hare button 13 Horn button 14 No function 15 No function 16 Handle 17 Travel control 18 Emergency brake switch 19 Travel control 20 Handle 42 51048070007 EN ...

Page 51: ... attachment symbol 4 Emergency halt symbol 5 Vehicle identification plate 6 Manufacturer s logotype and model label 7 Hook symbol 8 Warning label 9 No attachment symbol 10 Warning label 11 Hook symbol 12 Manufacturer s logotype 13 Customer s logo option 14 Serial number label barcode on the chassis 51048070007 EN 43 ...

Page 52: ...acturer s logo 8 Truck identification example 9 Company decal 10 Do not fold the forks when they are holding a load 11 Do not lift a load with the initial lift in the upper position 12 Do not step under a raised load 13 Do not climb 14 Do not stand on the forks 15 Risk of crushing hands 16 Risk of crushing feet 17 Slinging point 18 Do not sling here 19 Electrical plate example 20 Gel battery 44 510...

Page 53: ...ic mode confirmation EXU H autolift only 32 Automatic mode selection indicator EXU H autolift only 33 Manual or automatic mode selection EXU H autolift only 34 Automatic lifting lowering mode selection 35 Arrows 36 Cold store 37 Traction controller label 38 Slow forward travel pedestrian mode 39 Raising lowering of forks 40 Slow forward travel pedestrian mode raising lowering of forks NOTE The labe...

Page 54: ...3 Serial no 4 Year of manufacture 5 Unladen weight without battery in kg 6 Maximum battery weight 7 Minimum battery weight 8 Additional weight ballast in kg 9 Nominal power rating in kW 10 Battery voltage V 11 Rated capacity in kg 12 EC conformity symbol Data plate NOTE Please indicate the serial no for all technical enquiries 46 51048070007 EN ...

Page 55: ...st Single position trailer coupling Variant Three position trailer coupling Standard Automatically closing single position trailer coupling Variant Automatically closing single position trailer coupling remote control Variant Trailer coupling ROCKINGER trailer coupling Variant Rubber mounted power unit Option Shock absorbers Metal mounted power unit Option Cushioned backrest Standard Backrest Driv...

Page 56: ...or 160 A DIN 43589 Variant Battery connector Anderson SBE 160 A red Standard Battery connector Anderson SBE 320 A red Option Battery connector 160 A DIN 43589 with air adapter Option Battery connector Anderson SBE 160 A red with air adapter Option Battery connector Battery connector Anderson SBE 320 A red with air adapter Option Logistical prepara tions Preparation for terminal STD EHI DHI 24 V Op...

Page 57: ...Electrolyte circulation Electrolyte circulation Option Battery charger Battery charger Option Optional battery charger Electrolyte circulation Option Battery change frame for Tray 90 97 Option 2 Battery change frame for Tray 90 97 Option Battery change frame 3 Battery change frame for Tray 90 97 Option Trays Rear tray Option 18 l Working lights adjustable Option Strobe light Option Brake light Opt...

Page 58: ...he LED indicates whether it is necessary to top up the distilled water in the battery Operation If the LED 1 or 2 is green there is a sufficient level of electrolyte in the battery The battery must not be topped up with distilled water If the LED 1 or 2 is red there is an insufficient level of electrolyte in the battery The battery must be topped up with distilled water 50 51048070007 EN ...

Page 59: ...5 Operation ...

Page 60: ...ng devices eg horn must function properly Check the area beneath the truck for leaking operating fluids Inspect the wheels 4 for strings fibres and any other objects which could hinder their free rotation The battery cover 2 must be closed The key 3 must be removed The cover 1 must be fitted Check notice and safety labels for com pleteness and intactness see Chap ter Location of plates and labels P 4...

Page 61: ...s securely when locked Make sure that the trailer coupling 2 is securely attached to the frame The warning device eg horn must function properly The wheels must not be damaged or worn and must be fastened correctly Connecting the battery plug charg ing station 1044_606 013 1 Disconnect the battery socket 1 from the charging station and insert into the plug on the truck 51048070007 EN 53 ...

Page 62: ...ould not be misused Do not tell third persons your driver code except if expressly ordered to do so Other codes can be entered Chap ter Digicode control P 5 80 123 456 789 PRG PRG 1044_505 001 1 2 3 4 5 6 7 Entering the user code Press the I key on 6 The display 4 shows the message Code 8 This message switches off after approximately one second You can then enter the 4 digit user code The digits a...

Page 63: ...gits again After the fourth digit has been entered confirm this code by pressing PRG 5 The name of the truck manufacturer is displayed It is now possible to activate the truck NOTE If an error code is displayed e g E380 10 stop the truck by pressing the key 6 and carry out the activation procedure again NOTE It is possible to show the following displays by repeatedly depressing the PRG key scroll 7...

Page 64: ...hours 1 and the hour glass symbol 2 These are the total number of hours since the commissioning of the pallet truck The meter always runs when the pallet truck is driven or a load is raised Have the maintenance carried out according to the service hours specified in the maintenance schedule NOTE The meter goes to 9999 1044_505 005 3 Battery charge Press the PRG scrolling button 4 to display the ava...

Page 65: ...e charged as deep discharging begins 123 456 789 PRG PRG 1044_505 006 4 1044_505 018 6 5 Display of time to next servicing Press the PRG scrolling button 4 to display the time remaining until the next scheduled servicing The time is shown in hours 6 and with the symbol of a spanner 5 Have the maintenance carried out according to service hours specified in the maintenance schedule NOTE The display o...

Page 66: ...8 2 Operating the horn Press the horn button 2 on the tiller 123 456 789 PRG PRG 1 1 2 1050_003 036 Check of brake and presence area Start the truck slowly with the throttle 1 Step off the presence area 2 while leaving the throttle actuated 58 51048070007 EN ...

Page 67: ...Drive the truck slowly using the traction control 4 Press the belly button 5 The truck is braked to a stop SToP appears in the display 6 NOTE After the disappearance of StoP in the display press the I ON button 7 to restart work CAUTION This brake may only be used in an emergency 51048070007 EN 59 ...

Page 68: ...nd the presence area of the platform The CX T tractor is designed for stand on and pedestrian operation Therefore Never use the truck as a climbing aid Do not lean out Always stay within the truck profile The use of a mobile phone or walkie talkie when operating the vehicle is permitted However do not use these devices while driving as this will reduce your concentration First practice driving in a...

Page 69: ... aisles The dimensions specified in the description section apply under established conditions and should ensure safe manoeuvring Check in each case whether a wider aisle is required when for example the load dimensions deviate Observe your local and national regulations The truck may only be used on roadways without too tight curves too large gradients and too narrow and too low passages Condition...

Page 70: ...r if necessary by additional warning signs 123 456 789 PRG PRG 7 8 1050_003 004 Behaviour in emergency situations In an emergency all the functions of the truck can be cut off To do so disconnect the battery connector 7 The truck will come to a halt CAUTION This safety feature may only be used in an emer gency NOTE To resume operation first reconnect the battery connector and then re enter the driv...

Page 71: ...G 1 1044_501 001 1050_003 002 Driving stand on mode Step on the platform with both feet and step on the presence area 1 NOTE The truck is turned on WARNING No objects whose weight could activate the dead man s switch under the mat are allowed on the floor of the driver s platform WARNING Wait until the truck has come to a complete stand still Only then dismount on the side not used as roadway 51048...

Page 72: ...s released the truck will be braked electrically Changing the direction of travel Release the chosen direction of travel Push the throttle in the opposite direction of travel until the desired speed is obtained 123 456 789 PRG PRG 1047_003 013 2 3 4 5 Selecting the driving mode NOTE The pallet truck has 2 selectable driving modes For regular driving depress the hare button 3 For driving with gentl...

Page 73: ...hrottle is operated for a very long time the truck will stop automatically for reasons of safety Driving can be resumed by releasing the throttle and actuating it again CAUTION Take care when operating especially if the user is not familiar with using this function DANGER Risk of crushing feet Do not use this function for turning This function is designed to maintain à straight line Proceed from t...

Page 74: ...0_003 007 1 3 2 Driving pedestrian mode with traction button NOTE The truck is provided with traction buttons 1 and 2 on both sides of the backrest These permit driving in the pedestrian mode on each side The travel speed is reduced the cockpit 3 can be used any time for steering NOTE The truck must be turned on If a traction button 4 or 5 is kept depressed over a longer period a safety switch wil...

Page 75: ...d with traction button Press traction button 5 The truck will drive forward the travel speed will be limited to 2 5 km h CAUTION Truck speed can not be controlled You must walk beside the truck To stop release traction button 5 The truck will come to a stop Reversing with traction button Press traction button 4 The truck will reverse the travel speed will be limited to 2 5 km h CAUTION Truck speed...

Page 76: ...tiller in range 1 Wa 1390 mm 123 456 789 PRG PRG 1047_003 019 1 2 Braking WARNING The stopping distance of the truck is affected by the condition of the floor surface Take this into consideration when driving Light braking Release the throttle 1 or 2 when driving 68 51048070007 EN ...

Page 77: ... 5 Driving 123 456 789 PRG PRG 3 1044_501 010 Leave the presence area 3 1044_501 007 4 5 Release the traction button 4 or 5 Moderate braking Press the throttle 1 or 2 in the opposite direction 51048070007 EN 69 ...

Page 78: ...e display press the I ON button 8 to restart work 123 456 789 PRG PRG 1047_003 019 1 2 Parking brake Release traction control 1 or 2 The truck is braked by the electromagnetic brake Automatic shutdown NOTE If you leave the truck with the control turned on it will be shut off automatically after approx 15 minutes The truck can only be operated again after the driver code is entered The delay time i...

Page 79: ...hat under difficult operating conditions for example on ramps on icy or slippery pavement it is the braking power and NOT the maximum tractive force of the tractor that determines the maximum load for the safe use of the vehicle CAUTION The admissible maximum loads applies only for the towing unbraked on level ground lower limit When towing uphill or downhill reduce the maxi mum load capacity Loadi...

Page 80: ...railing load kg How to read the diagram A tractor pulls a trailing load of 1500 kg A on a slope of max 4 B over a distance of approx 7 7 km C at a speed of 5 6 km h D without stopping On an upslope of 4 the CX T can pull a trailing load of 1500 kg at a speed of 5 6 km h over a distance of 7 7 km and also brake it on a corresponding downslope NOTE The data and the characteristics of the performance...

Page 81: ...locked to prevent any unintentional movement Reverse the tractor to the trailer so that the tow pin and the trailer draw bar are aligned as seen from the driver s position 123 456 789 PRG PRG 1 1047_003 039 Step off the presence area 1 The tractor will be braked Depending on the type of trailer coupling proceed as follows Single position or multi position trailer coupling see Chapter Single positi...

Page 82: ...nto the coupling jaw 3 on the tractor NOTE The multi position coupling provides 3 hitch heights It is recommended to choose the height at which the drawbar is horizontal Coupling height distance from the ground Position Height mm A 300 B 355 C 410 1050_003 020 2 3 Lower the tow pin 2 into the trailer coupling 3 and rotate it 90 The tow pin is now secured CAUTION Always make sure that the tow pin i...

Page 83: ...sence area 1 The tractor will be braked Secure the trailer with chocks or engage the trailer brake 1050_003 020 2 3 Turn the tow pin 2 90 and pull it out of the trailer coupling 3 Reverse the tractor slowly Insert the tow pin 2 again into the trailer coupling 3 and secure it 51048070007 EN 75 ...

Page 84: ...up a rigid drawbar trailer Reverse the tractor slowly DANGER Do not allow anyone to stand between the tractor and trailer during the coupling procedure Only drive the tractor to the trailer DANGER Risk of accident Make sure that after each coupling procedure the safety 3 fully contacts the securing sleeve A projecting safety 3 indicates improper hitching The trailer may not be driven in this state...

Page 85: ...3 456 789 PRG PRG 1 1047_003 039 Step off the presence area 1 The tractors will be braked Secure the trailer with chocks or engage the trailer brake Pull the safety lever 3 Swivel the lever 2 up Drive the tractor slowly forward 51048070007 EN 77 ...

Page 86: ...ER Do not allow anyone to stand between the tractor and trailer during the coupling procedure Only drive the tractor to the trailer DANGER Risk of accident Make sure that the tow pin is in the specified position If the locking system is blocked do not intervene Risk of crushing your fingers Please contact your service centre Remove the chocks at the trailer Unhitching 123 456 789 PRG PRG 1 1047_003 ...

Page 87: ...ure that regulation plates conform to local highway regulations Release trailer braking system and remove any chocks from the trailer wheels Check width of the widest trailer or load to ensure free passage en route Check that the direction of travel is clear slowly move the tractor forward taking up the slack in the trailer couplings before gently accelerating to the required speed When approachin...

Page 88: ...es A driver s code can be added Chapter Adding a driver s code P 5 84 or deleted Chapter Deleting a driver s code P 5 86 with the master code Master code The master code consists of four digits and is reserved for the Pool Manager The factory setting of this code is 1234 The pool manager is advised to replace this code with a new master code Chapter Deleting a master code P 5 82 or Chapter Adding ...

Page 89: ...he master code NOTE The truck is turned off the battery is connec ted 123 456 789 PRG PRG 1044_505 009 1 2 3 4 5 6 Press the I ON button 5 Enter a valid 4 digit master code with the buttons 123 1 456 2 and 789 3 7 1044_505 010 Scroll with the PRG scrolling button 6 until Pin 7 appears in the display 10 1044_505 011 Confirm with the PRG enter button 4 until Add 10 appears in the display 51048070007 ...

Page 90: ... to add a sixth master code Err will appear in the display 9 1044_505 013 Confirm with the PRG enter button 4 until the new master code 9 blinks an example is shown 10 1044_505 011 Then release the button Add 10 will appear again in the display 11 1044_505 014 Press the PRG scrolling button 6 until a normal readout 11 eg battery charge appears in the display The new master code is entered Deleting ...

Page 91: ...splay 10 1044_505 015 Confirm with the PRG enter button 4 until dEL 10 appears in the display 8 1044_505 012 Confirm with the PRG enter button 4 A flashing line cursor 8 will appear in the display Enter the 4 digit master code to be deleted with the buttons 1 2 or 3 as described above NOTE If one attempts to delete an erroneous master code Errwill appear in the display If only one master code remains...

Page 92: ...in in the display 11 1044_505 014 Press the PRG scrolling button 6 until a normal readout 11 eg battery charge appears in the display The master code is deleted Adding a driver s code NOTE The truck is turned off the battery is connec ted 123 456 789 PRG PRG 1044_505 009 1 2 3 4 5 6 Press the I ON button 5 Enter the valid 4 digit master code with the buttons 123 1 456 2 and 789 3 84 51048070007 EN...

Page 93: ...with the buttons 1 2 or 3 as described above NOTE The controller can store a maximum of 200 driver s codes If one attempts to add a 201st driver s code Err will appear in the display 9 1044_505 013 Confirm with the PRG enter button 4 until the new driver s code 9 blinks an example is shown 10 1044_505 011 Then release the button Add 10 will appear again in the display 11 1044_505 014 Press the PRG ...

Page 94: ... Scroll with the PRG scrolling button 6 until USEr 7 appears in the display 10 1044_505 015 Confirm with the PRG enter button 4 until dEL 10 appears in the display 8 1044_505 012 Confirm with the PRG enter button 4 A flashing line cursor 8 will appear in the display Enter the 4 digit driver s code to be deleted with the buttons 2 3 or 3 as described above NOTE If one attempts to delete an erroneous d...

Page 95: ...044_505 014 Press the PRG scrolling button 6 until a normal readout 11 eg battery charge appears in the display The driver s code is deleted Error codes 123 456 789 PRG PRG 1044_505 024 3 2 4 5 6 7 8 11 12 14 13 10 9 1 Error code If an error code such as E380 15 appears shut the truck off by pressing button 10 and repeat the start up Chapter Commission ing P 54 If the error code persists call your...

Page 96: ...E374 Button 1 2 3 operated at power up Release the button 1 2 3 6 E375 Button 4 5 6 operated at power up Release the button 4 5 6 7 E376 Button 7 8 9 operated at power up Release the button 7 8 9 8 E377 PROG button operated at power up Release the button PROG 9 E378 ON button operated at power up Release the ON button 10 E379 Hare button operated at power up Release the Hare button 11 E380 Right H...

Page 97: ... battery connector Chocking the truck Secure the truck against rolling and sliding with chocks 1 Lashing down the truck Attach the lashing ropes 2 to the mast Towing procedure As the electric brake is applied the truck can not be towed without functioning electrically NOTE The brake can be released Please contact your after sales service 51048070007 EN 89 ...

Page 98: ...eces of wood to prevent damage DANGER Danger to life Do not step or stand under a suspended load Handling the battery Preparation Maintenance staff Batteries may only be changed by specially trained personnel and in accordance with the instructions of the manufacturer of the battery charger and truck Follow the battery handling instructions Fire precautions WARNING Smoking and naked flames are not ...

Page 99: ...itional weights may be neither removed nor their position changed Please note the description of installable batteries in the section Battery type Notes on charging the battery are included in the workshop maintenance instructions in the section Servicing the battery Installation and connection of the charged battery is the reverse of removal Make sure all covers are properly put in place Damage t...

Page 100: ...ry 1044_001 006 1 Disconnect the female battery connector 1 1044_606 002 2 3 Insert the key 2 into the battery lock and turn it 180 Depress the battery lock The battery cover 3 is unlocked and can be opened to rear 92 51048070007 EN ...

Page 101: ...23 1 2 3 Closing WARNING Danger of crushing When closing the battery door there should be nothing between battery door and edge of the frame Reconnect the female battery connector 3 Lower the battery latch 1 Push the battery cover 4 forward until it engages in the lock 2 51048070007 EN 93 ...

Page 102: ...e 2 ways of replacing the battery 1 Vertically with a lifting tackle all trucks 2 With a lateral battery removal trolley option To avoid short circuits cover batteries with unprotected terminals or connectors with a rubber mat DANGER Danger Do not step or stand under a raised load Carefully lift the battery out of the truck 94 51048070007 EN ...

Page 103: ...slack 1050_003 010 8 7 9 10 Replacing the battery laterally on battery trolley WARNING Danger of crushing your hands Do not put your hands between the frame and battery during the removal and installation of the battery Removal Disconnect the battery connector 7 Open the battery cover 8 Unlock the battery Place a suitable trolley 10 option beside the battery Stand on the side opposite the cover an...

Page 104: ... battery cover is closed and the battery plug connected Battery servicing Keep the battery cell lid dry and clean Neu tralize spilled electrolyte immediately Termi nals and cable lugs should be clean slightly greased and secure Battery charging Switch off the truck and charger before removing the plug from the socket During charging keep the surface of the battery cells exposed in order to provide...

Page 105: ...all wheels are clear of the ground This measure will prevent a permanent deformation of the tyres Cover the truck with a cotton cover and protect against dust CAUTION We do not recommend using a plastic foil as this enhances the formation of condensate If the truck is to be taken out of service for a yet longer period contact your Service Recommissioning after taking out of service If the truck ha...

Page 106: ...5 Operation Storage 98 51048070007 EN ...

Page 107: ...6 Maintenance ...

Page 108: ...ing the maintenance procedures are located after the maintenance chart In a dusty environment and with fluctuating temperatures reduce all lubrication and maintenance intervals as required Quality and quantity of required lubri cants Only use the lubricants specified in these operating instructions The fluids and lubricants and other materials required for the periodic maintenance of the truck are li...

Page 109: ...e with the rules of technology and the basic princi ples of fork trucks Maintenance personnel for batteries Batteries may only be charged serviced and replaced by specially trained personnel and in accordance with the instructions of the battery charger Observe the battery handling and charger operating instructions Services not requiring special qualifications Simple maintenance operations such as...

Page 110: ...vice Clean the truck 3 7 Service the wheels and rollers 1 Service the battery As needed 4 Service the braking system 8 Service the gearbox 5 6 Service the electric motors 9 Service the electrical system 4 Service the braking system Every 3 months 500 2 Check the trailer coupling 9 Service the electrical system Insulation test Annually 2000 Safety inspection 5000 8 Service the gearbox 102 510480700...

Page 111: ...the parts list for the required ordering information Only use spare parts specified by the manu facturer Due to insufficient quality or incorrect assignment the use of unapproved parts can increase the risk of accidents The use of un approved parts places full responsibility for any damage and liability on the part of the user 51048070007 EN 103 ...

Page 112: ... 80 mm Wheel nuts Torque wrench 140 Nm Gearbox Gear oil 80W 90EP OG MIL L 2105 API GL4 approx 1 5 L Safety regulations for maintenance Safety measures for maintenance and repair To prevent accidents during maintenance and repair perform all necessary safety measures such as Ensure that the truck is secured against in advertent movement or starting disconnect the battery plug Work on the electrical...

Page 113: ...nd replacing hydraulic and electric components They are specified in the appropriate sections Preparatory tasks for maintenance Lifting and jacking up the truck When raising the truck components and attachments the lifting slings may only be attached at the points provided When jacking up the equipment secure it against moving or tipping with suitable means wedges wooden blocks Jacking up The truck...

Page 114: ...rame Jack up the truck until the wheels are clear of the ground Secure the truck 1044_001 003 1 3 2 Removal The bonnet must be removed before servicing Proceed as follows Remove the two screws 1 and 2 Remove the cover 3 CAUTION Do not damage the electrical wiring 106 51048070007 EN ...

Page 115: ...e inflammable fluids for cleaning Ob serve the above safety precautions for preventing sparks through shorts disconnecting the battery connector When the truck is being cleaned care fully cover all vulnerable components in particular the electric components Observe the manufactu rer s instructions for handling the cleaners Clean the truck exterior with water and cleaning agents soluble in water spon...

Page 116: ...c Clean electrical components with a non metallic brush and blow dry with a weak jet of air After washing the truck Dry the truck thoroughly eg with com pressed air Take the truck back into operation accord ing to instructions If moisture has penetrated the motors despite the precautionary measures dry them first with compressed air if not there is the risk a short circuit ONLY then the truck must ...

Page 117: ...undamaged Dimensions Traction wheel 250 x 100 mm Rear wheels 250 x 80 mm Replace damaged or worn wheels with new ones 3 1050_003 027 Tighten wheel fasteners Check the wheel fasteners 3 for tightness and retighten them if necessary Torque 140 Nm Servicing the battery CAUTION Before performing any work on the electrical in stallation remove any power from the system by disconnecting the battery conn...

Page 118: ...ry cover open Battery type Lead or gel batteries are used as traction batteries As the various types are structured differently always use the correct type of charging device without fail Before charging check if the battery charger is suitable for your battery CAUTION Gel batteries are subject to special charging mai ntenance and handling regulations Use of the wrong type of charging device can r...

Page 119: ...ted WARNING The electrolyte diluted sulphuric acid is poisonous and caustic Follow the safety precautions for handling battery electrolyte Press the PRG scrolling button 1 to display the existing battery charge 2 NOTE After the battery is connected the correct state of charge appears only after approx 1 minute Charging the gel battery Refer to instructions for this battery WARNING Disconnect the b...

Page 120: ...s released during charging are explosive Ensure that the room is well ventilated CAUTION Never squeeze the battery cables 3 1044_604 001 Fuses CAUTION Before working on the electrical system the vehicle must be de energised by disconnecting the battery connector Remove the two screws 1 and 2 Remove the cover 3 The following fuses are located on the fuse holder F1 Main fuse 400 A F3 Control fuse 24...

Page 121: ...Maintenance 6 Maintenance as required 1044_604 002 1 3 2 1050_003 028 F5 F3 F1 F4 F8 F5 Steering fuse 20 A F8 Fuse for other power circuits 3 A 51048070007 EN 113 ...

Page 122: ...6 Maintenance Maintenance as required 114 51048070007 EN ...

Page 123: ... on level ground Turn the tiller until the level plug 1 is visible Remove the level plug 1 The oil level must reach up to the edge the opening If necessary add oil OG according to the table of maintenance data Checking the gearbox for leaks Inspect the gearbox for leaks traces of oil CAUTION During lubrication services and oil changes do not allow any oil or grease to get on the brake disc 5104807...

Page 124: ... malfunctions Remove oxidation and replace cracked cables 1050_003 030 3 Replace the steering motor brushes Park the truck disconnect the battery connector Remove the front cover To access the motor brushes Steering motor Open the tensioning band 3 Lift up the brush springs withdraw the brushes The brushes 4 must have the following minimum length Minimum length x 11 mm steering motor If only one b...

Page 125: ... replaced as sets Before installation check the commu tator for pitting New brushes must ground in When reinstalling existing brushes do not in stall them in the wrong direction or interchange them Please contact your after sales service in this regard Reinstall the removed parts 51048070007 EN 117 ...

Page 126: ...ore beginning the following services park the truck and disconnect the battery connector Remove the front cover Check the fuses 1 for proper condition Check all connections 2 for security Tighten all clamping screws Check the contactor tips Check the contactor tips for pitting and have them replaced if necessary Refit and secure the cover 118 51048070007 EN ...

Page 127: ... Braking must be carried out unladen in accor dance with standard ISO DIS 6292 According to this standard industrial tractors with 1 or 2 braked wheels travelling at 12 km h must have a braking distance of less than 3 62 m WARNING Keep the braking path clear and ensure there is sufficient safety distance Drive the truck at 12 km h Apply the brake and measure the stopping distance If the distance me...

Page 128: ...6 Maintenance Maintenance every 500 hours 120 51048070007 EN ...

Page 129: ...rucks should have sufficient insulation resistance Test the truck and battery separately Testing the insulation resistance of the electrical system Have the insulation resistance of all active electrical components checked in accordance with DIN 57117 and DIN 43539 VDE 0117 and VDE 0520 Measurement voltage nominal voltage 500 V Insulation is considered correct when it is measured in relation to the...

Page 130: ...6 Maintenance Annual maintenance 122 51048070007 EN ...

Page 131: ...e P 121 1044_606 012 Checking and cleaning the battery WARNING Risk of short circuit and even explosion Do not smoke keep away from naked flames and do not place metal objects on the battery Servicing the battery according to the manufacturer s instructions WARNING Risk of personal injury due to arcing Do not reverse the battery poles or cause a short Insulation resistance check earth ing The insul...

Page 132: ...all active electrical components checked in accordance with DIN 57117 and DIN 43539 VDE 0117 and VDE 0520 Measurement voltage nominal voltage 500 V Insulation is considered correct when it is measured in relation to the chassis and is higher than 1000 ohm V of nominal voltage Please contact your Service for this test 124 51048070007 EN ...

Page 133: ...gearbox Changing gear oil CAUTION Drain the oil at operating temperature Follow the safety precautions for handling gear oil Park and secure the truck and remove the cover Turn the tiller until the filler plug 1 is accessible Remove the drain plug 2 and filler plug 1 and allow the oil to drain completely ENVIRONMENT NOTE Dispose of the used oil as specified Tighten the oil drain plug with a new seal ...

Page 134: ...6 Maintenance Maintenance every 5000 hours 126 51048070007 EN ...

Page 135: ...7 Technical data ...

Page 136: ...7 Technical data Dimensions Dimensions 1050_003 032 128 51048070007 EN ...

Page 137: ...h battery kg 1170 Axle loading without load Driver s end load end kg 572 578 Wheels and tyres CX T Wheels Rubber C Vulkollan V Superelastic SE Driver s end load end C SE Wheel size Driver s end mm 250 x 100 Wheel size Load end mm 250 x 80 Number of wheels x driven Driver s end load end 1x 2 Track width Driver s end b 10 mm 0 Track width Load end b 11 mm 684 Dimensions CX T Seat height standing hei...

Page 138: ...eed With without load km h 7 5 12 Drawbar pull With without load N Max drawbar pull With without load N Climbing ability With without load Max climbing ability With without load Acceleration time 0 10 m With without load s Service brake Electromagnetic Motors CX T Traction motor rating S2 60 min kW 3 Battery to DIN 43531 35 36 A B C no IEC 254 2 B Rated battery voltage C5 V Ah 24 450 Battery weigh...

Page 139: ...neous CX T Type of drive control Frequency converter Noise level at operator s ear dB A Trailer coupling designa tion type acc to DIN Wheels and tyres Approved types of tyres Only the specified types of wheels may be installed 51048070007 EN 131 ...

Page 140: ...7 Technical data Wheels and tyres 132 51048070007 EN ...

Page 141: ...Checking the braking power 119 Checking the emergency brake 59 Checking the gearbox oil level 115 Chocking the truck 89 Clean the truck 107 Cleaning the electrical system 108 Closing the battery compartment 91 Condition of roadways 61 Consumables 29 Disposal 32 Safety information for handling battery acid 31 Safety information for handling oils 29 Safety information for hydraulic fluid 30 Copyright...

Page 142: ...tenance data table 104 Maintenance personnel for batteries 101 Maintenance staff 90 Master code 80 Maximum towed weight 71 Measures before taking out of service 97 Measures when taking the truck out of service for a long period 97 Measuring battery insulation resistance 28 Measuring the insulation resistance of the electrical system 28 Medical equipment 27 Moderate braking 69 Modifying the truck 2...

Page 143: ...nals 7 Single position or multi position trailer coupling 74 Slow speed with throttle 65 Special risks 15 Stability 15 Staff training and qualifications for maintenance and repairs 101 Steering 68 T Technical data VDI CX T 129 Tighten wheel fasteners 109 Topicality of the instructions 6 Towing a trailer 79 Towing procedure 89 Transport 89 Turning on the truck 54 U Unintended use 12 Update of this m...

Page 144: ......

Page 145: ......

Page 146: ...STILL GmbH Berzeliusstrasse 10 D 22113 Hamburg Ident no 51048070007 EN ...

Reviews: