38 |
P a g e
STEP 7.0
ANNEX FRAME ASSEMBLY
If you did not purchase this option please skip this step
7.0 - ASSEMBLY PARTS
–
ANNEX FRAME
PART CODE QTY
DESCRIPTION
VB
2
Veranda Beam 1510x70x45mm
VBJ
1
Veranda Beam Joiner 700x70x45mm
VOB
2
Veranda Outer Beam 1510x140x35mm
VOBJ
1
Veranda Outer Beam Joiner 700x140x35mm
VR
4
Veranda Rafter 1320x70x45mm
65BS
14
65mm Batten Screw
100BS
8
100mm Batten Screw
7.0 - ASSEMBLY
–
ANNEX FRAME
It helps to find a flat, level surface to complete this process on.
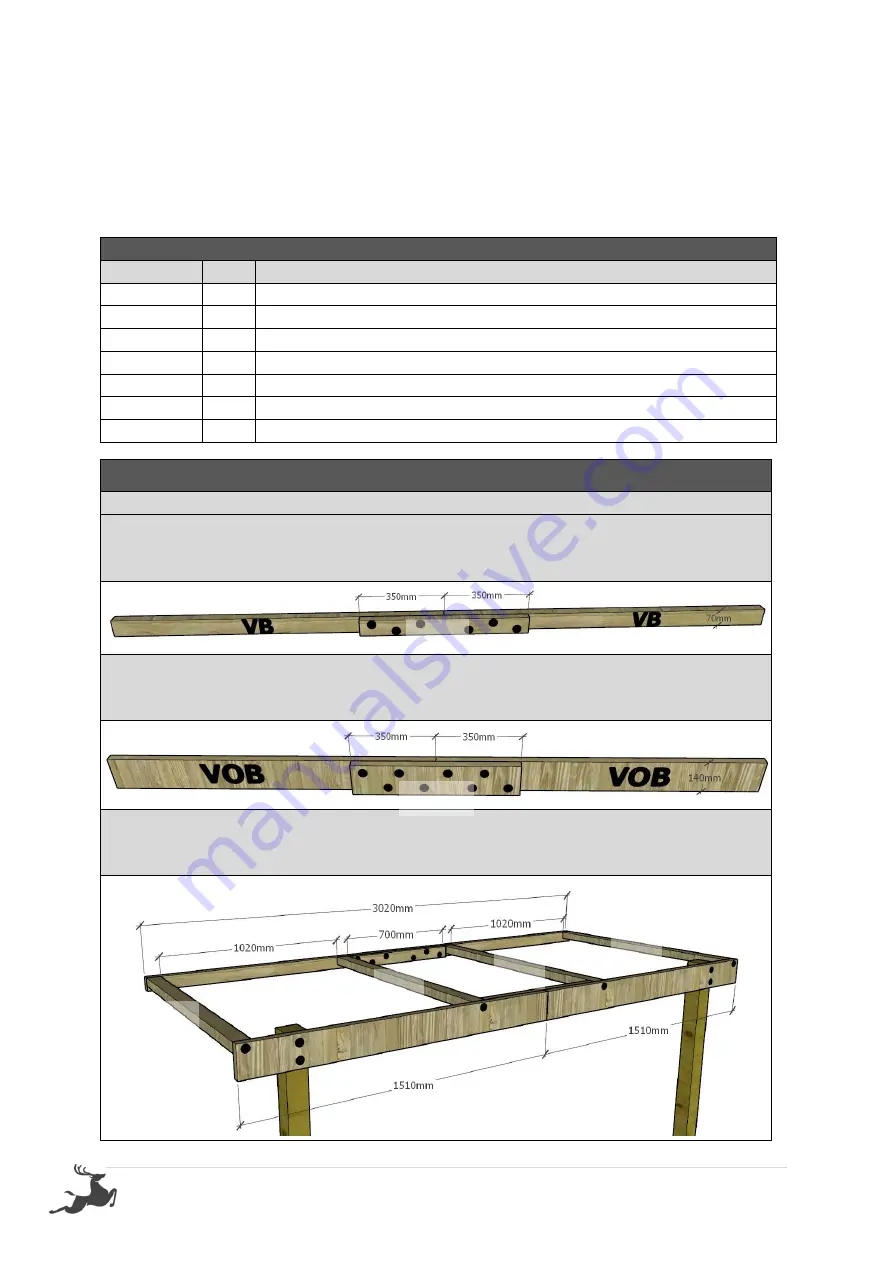
1. Join Veranda Beams (VB) together using Veranda Beam Joiner (VBJ). Mark 350mm
(middle) on VBJ and Butt Veranda Beams into each other, hold flush and fasten together
using 3x 65BS each through VBJ into VB, as seen below.
2. Join Veranda Outer Beams (VOB) together using Veranda Outer Beam Joiner (VOBJ).
Mark 350mm (middle) on VOBJ and Butt Veranda Outer Beams into each other, hold
flush and fasten together using 4x 65BS each through VOBJ into VOB, as seen below.
3. Assemble veranda frame. Place 4x Veranda Rafters (VR) in between joined VB and
VOB, as seen below. Hold VR 70mm side flush with top and screw through beams, using
1x 100BS per join.
It is advised to predrill through beams before screwing rafters.
VBJ
VOBJ
VR
VR
VR
VR
Summary of Contents for Hazel 9x6
Page 43: ...42 P a g e ...
Page 46: ...45 P a g e IMAGES TO HELP WITH INSTALLATION FLOOR ...
Page 47: ...46 P a g e ...
Page 48: ...47 P a g e ...
Page 49: ...48 P a g e ...
Page 50: ...49 P a g e ...
Page 51: ...50 P a g e ...
Page 52: ...51 P a g e ...
Page 53: ...52 P a g e ...
Page 54: ...53 P a g e ...


