3
Adjustments and Controls
After all the wiring connections are made and before the system is turned on
for the first time you must make some basic adjustments. Start by turning the HI
and LO-Pass Output Level controls most of the way down, counter-clockwise.
Now turn the HI-Pass frequency control all the way to the right and the LO-Pass
frequency control all the way to the right. Also turn the gain controls on your
amplifiers all the way down.
It is now time to power up the system. The green power LED should be lit. If
not, refer to the troubleshooting section in this manual. Turn the head unit on
and raise the volume until distortion is heard, then back the volume down slight-
ly. This is the setting where the head unit puts out the maximum output without
sounding bad. Due to the wide range on the level controls of the KX2 you may
not be able to hear the music loud enough to tell distortion yet. If this is the
case, raise both Output Level controls to the halfway point (12 o’clock position)
and try it again. Do not increase the gain settings on the amplifiers yet. The
music will sound incomplete right now because of the preliminary frequency
settings. This is normal.
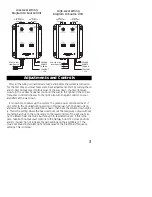
R
GROUND
REMOTE
TURN-ON
CONSTANT
+ 12V
RCA's to Low
Level Source
R
GROUND
REMOTE
TURN-ON
CONSTANT
+ 12V
RCA's to High
Level Source
L +
L -
R -
R +
RCA's to
High Frequency
Amplifier
RCA's to
Low Frequency
Amplifier
RCA's to
High Frequency
Amplifier
RCA's to
Low Frequency
Amplifier
Low-Level Wiring
Diagram to Source Unit
High-Level Wiring
Diagram to Source Unit


