background image

32

AFTER SALES SUPPORT

1300 886 649

info@tempo.org

AUS

MODEL: STR-DW12-W2  PRODUCT CODE: 10103   07/2019

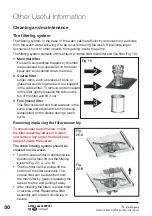
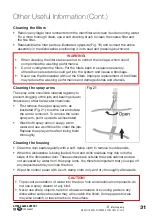
Looking after your dishwasher

• 

After every wash

, leave the door slightly ajar so moisture and odours are not 

trapped inside.

• 

Before cleaning or maintenance

, always unplug the dishwasher from the socket.

No solvents or abrasive cleaning 

• 

To clean the control panel, use a lightly dampened cloth and dry the area 
thoroughly afterwards. 

• 

To clean the exterior and rubber parts of the dishwasher, do not use solvents or 
abrasive cleaning products. Only use a cloth with warm, soapy water. Or use a 
good appliance cleaner.

• 

To remove spots or stains from the surface of the interior, use a cloth dampened 
with water and a little white vinegar, or a cleaning product made specifically for 
dishwashers.

• 

Clean the door seals periodically with a damp sponge to remove any trapped 
food remnants and prevent odours developing inside the dishwasher.

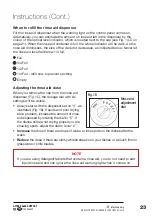
Other Useful Information (Cont.)

In special situations

Going on holidays

When your dishwasher is not going to be used for some time, we recommend you run 
a wash cycle with the dishwasher empty and then unplug the dishwasher from the 
socket, turn off the water supply and leave the door slightly ajar. This will help with 
door seal durability and odour prevention inside the appliance.

Moving the dishwasher

If you must move the dishwasher, try to keep it in a vertical position. Only put it on its 
back if absolutely necessary.

Frost protection

If your dishwasher is left in an unheated place during winter and temperatures are 
likely to drop to below zero degrees Celsius, you should take certain precautions to 
prevent water freezing in the pipes. Unplug the dishwasher from the electrical power 
supply and turn off the water supply. Then ask an authorised service technician to: 
• 

Disconnect the water inlet pipe from the water valve.

• 

Drain any water from the inlet pipe and water valve (use a pan to catch the water).

• 

Reconnect the water inlet pipe to the water valve.

• 

Remove the filter assembly from the bottom of the dishwasher and wipe up any 
water left in the sump with an absorbent sponge.

If your dishwasher does not work because of ice, contact a qualified service technician.

Summary of Contents for STR-DW12-W2

Page 1: ...Model Number STR DW12 W2 Dishwasher INSTRUCTION MANUAL AFTER SALES SUPPORT 1300 886 649 info tempo org AUS MODEL STR DW12 W2 PRODUCT CODE 10103 07 2019 E209 ...

Page 2: ...oosing to buy a STIRLING product All products brought to you by STIRLING are manufactured to the highest standards of performance and safety and as part of our philosophy of customer service and satisfaction are backed by our comprehensive 3 Year In Home Warranty We hope you will enjoy using your purchase for many years to come ...

Page 3: ...Contents 02 Welcome 04 Warranty Details 05 General Safety Instructions 08 Product Overview 10 Getting Started Quick Operation Guide 11 Getting Started Installation 14 Features 16 Instructions 26 FAQs and Troubleshooting Guide 30 Other Useful Information 35 Repair and Refurbished Goods or Parts Notice ...

Page 4: ...and remedies in respect of the product that the consumer has under the Competition and Consumer Act 2010 and similar state and territory laws Our goods come with guarantees that cannot be excluded under the Australian Consumer Law You are entitled to a replacement or refund for a major failure and to compensation for any other reasonably foreseeable loss or damage You are also entitled to have the...

Page 5: ...ult in extensive product damage or serious personal injury CAUTION means that failure to read this safety statement may result in minor or moderate personal injury property or equipment damage Electrical safety and cord handling Voltage Before connecting and turning on the appliance ensure the electrical voltage and circuit frequency correspond to those indicated on the appliance rating label WARN...

Page 6: ... disposal When removing an old dishwasher from service or discarding it remove the door to the washing compartment Hose sets Only use new hose sets when connecting this dishwasher to the water supply do not reuse old hoses Water pressure The maximum permissible inlet water pressure is 1MPa The minimum permissible inlet water pressure is 0 04MPa Flammable objects Do not install the appliance on or ...

Page 7: ... recommendations Dishwasher detergent Use only detergent and rinse additives designed for an automatic dishwasher and keep them out of reach of children Never use liquid detergent for manual washing up soap or laundry detergent in your dishwasher DANGER Some dishwasher detergents are strongly alkaline and can be extremely dangerous if swallowed Avoid contact with the skin and eyes DANGER When the ...

Page 8: ...rom the product purchased All images in this manual are for reference purposes only Parts are not necessarily pictured to scale Dishwasher front view open 1 Foldable cup cutlery rack 2 Upper basket 3 Inner pipe 4 Lower basket 5 Detergent dispenser 6 Rinse aid dispenser 7 Door 8 Cutlery basket 9 Spray arm Documentation not pictured Instruction manual Quick start guide Warranty card 1 2 9 4 8 6 5 3 ...

Page 9: ...gram for 3 6 9 or 12 hours C Delay indicators Illuminate the chosen delay time D Rinse aid indicator Illuminates when the dispenser needs to be refilled E Cycle finish indicator Illuminates when the washing program is finished F Opening handle G PROGRAM knob Rotate to select the appropriate program H START PAUSE button Press to start the selected washing program or pause the program when the machi...

Page 10: ...water already drained If this is the case the detergent dispenser must be refilled Press and hold the START PAUSE button for more than 3 seconds then you can change the program to the one you wish to run Press the START PAUSE button again and the dishwasher will start to work again Adding a forgotten dish To add a dish utensil that you forgot to load into the dishwasher press the START PAUSE butto...

Page 11: ...askets inside the dishwasher are taped to secure them during transport Remove any tape ties and foam padding from inside the dishwasher IMPORTANT Using the loading instructions on pages 17 19 for guidance make sure all parts in the upper and lower baskets are properly installed inside the dishwasher you may need to relocate the cup cutlery rack for appropriate usage Unwind the cord to its full len...

Page 12: ...ng blocked and damaging the appliance WARNING Always close the water tap after using the dishwasher Drain hose connection The drain hose must be connected to the drain hose connector at the back of the dishwasher Insert the drain hose into a drain pipe with a minimum diameter of 40mm or let it run into a sink making sure to avoid bending crimping or squashing it The top of the hose must be less th...

Page 13: ...n Earthing This appliance must be earthed In the event of a malfunction or breakdown earthing will reduce the risk of an electric shock by providing a path of least resistance for the electric current This appliance is equipped with a cord having an equipment earthing conductor and an earthing plug The plug must be plugged into an appropriate outlet that is installed and earthed in accordance with...

Page 14: ...role dishes and dishes that have been sitting with dried food on them for a while Prewash 50ºC Wash 60ºC Rinse Rinse Rinse 65ºC Drying Heavy For heavily soiled loads such as pots plates cups bowls and serving dishes Prewash 45ºC Wash 55ºC Rinse Rinse 65ºC Drying ECO For normally soiled loads such as plates glasses bowls and lightly soiled pots and pans the recommended and the most efficient daily ...

Page 15: ...12 W2 PRODUCT CODE 10103 07 2019 Detergent pre main Running Time min Energy kWh Water L 5 27 5g or all in 1 170 1 6 18 5 5 25g or all in 1 160 1 4 15 5 25g or all in 1 170 0 75 11 5 25g or all in 1 125 0 9 14 5 25g or all in 1 90 1 2 11 5 25g 30 0 6 11 5 Features Cont ...

Page 16: ...ry rack Do not overload your dishwasher it will hold a maximum of 12 standard place settings This is important for better washing results and lowers energy consumption WARNING Do not pull out the upper and lower basket at the same time which can lead to the appliance tipping forward Protecting your glass and tableware Much of today s tableware is dishwasher safe However not everything can be washe...

Page 17: ... be adjusted in order to create more space for large utensils in the upper or lower basket To adjust the height of the upper basket pull the basket out and remove it from the dishwasher cabinet then reinstall it with either the upper or lower wheels on the rails as pictured Fig 6 Place long items serving cutlery salad servers knives and similar items horizontally in the upper basket so that they d...

Page 18: ...Each row can be folded separately or both together to obtain a larger area Fig 9 A To fold down the spike rows release them from the frame using the blue clips at the back Fig 9 B Pots pans serving dishes and bowls are often the most difficult to clean and fit best into the lower basket Always place pots pans and bowls upside down into the basket or at a slant so the water can flow out Fig 8 Load ...

Page 19: ...dishwasher safe standard size cutlery in the basket making sure that Cutlery is placed with the handles down Items do not nest together use of the anti nesting grid will prevent this Knives and other potentially dangerous utensils are placed sharp point down or in a horizontal position in the upper basket or on the cup cutlery rack No item extends through the bottom of the basket Fig 12 Long utens...

Page 20: ... different brands dissolve at different speeds some cannot dissolve and develop their full cleaning power during short wash programs To ensure the complete removal of detergent residues we recommend choosing longer wash programs when using dishwasher detergent tablets Instructions Cont STIRLING RECOMMENDS Stirling recommends using Logix dishwashing tablets or powder to ensure optimal performance o...

Page 21: ...etergent tablet into the detergent dispenser If the lid is closed press the latch Fig 13 and the lid will spring open For each wash cycle fill dishwasher detergent or a detergent tablet into the detergent dispenser compartment Fig 14 A If you are washing more heavily soiled dishes or using a program with a prewash cycle also fill some detergent in compartment 14 B if using powder detergent Unless ...

Page 22: ...is could damage the appliance Filling the rinse aid dispenser The rinse aid dispenser is located inside the door next to the detergent dispenser It holds about 110mL Fig 15 Turn anticlockwise to open Fig 16 Pour in rinse aid Fig 17 Turn clockwise to lock To open the dispenser turn the cap in anticlockwise direction left and lift it out Fig 15 Carefully pour rinse aid into the dispenser until the l...

Page 23: ...n your dishes or a bluish film on glassware or knife blades Instructions Cont When to refill the rinse aid dispenser Fill the rinse aid dispenser when the warning light on the control panel comes on Alternatively you can estimate the amount of rinse aid left in the dispenser by the colour of the optical level indicator which is located next to the cap see Fig 14 C on page 21 When the rinse aid con...

Page 24: ...nd of the program press the POWER button to shut down the unit NOTE We recommend you open the door slightly to assist in drying of the dishes Instructions Cont Setting a delayed start Press the DELAY button repeatedly to select the desired delay time for the start of the selected washing program 3 hours 6 hours 9 hours 12 hours The selected delay time s indicator light will illuminate Changing a p...

Page 25: ...d open the door slightly about 5cm to assist in drying of the dishes take care when opening the door as hot steam may escape Leave the door ajar and wait at least a 15 minutes before unloading the dishwasher to avoid handling the dishes and utensils while they are still hot and more suscep tible to breakage They will also dry better When unloading the dishwasher empty the lower basket first and th...

Page 26: ... Water is not pumped out Kink in the drain hose Check the drain hose and ensure there are no kinks The filter is clogged Check and clean the coarse filter The kitchen sink is clogged Check and ensure the kitchen sink drains well If the problem is the kitchen sink not draining you may need a plumber rather than a dishwasher service technician Some audible sounds are normal such as sound from water ...

Page 27: ...ry The affected items are not corrosion resistant Cutlery must be corrosion resistant and dishwasher safe Dishes are not clean Wrong program selection Select a more intensive wash program Improper basket loading Make sure the action of the detergent dispenser and spray arms are not blocked by large tableware The filters are not clean or incorrectly fitted which may cause the spray arm jets to get ...

Page 28: ...sher immediately after washing Open the door slightly so that the steam can escape Wait at least 15 minutes before unloading Only start unloading the dishwasher when the dishes are barely warm to the touch Empty the lower basket first to prevent water from dropping off dishes in the upper basket onto the dry dishes in the lower basket Wrong program selection In shorter programs the rinse temperatu...

Page 29: ...The indicator for the Glass wash flickers Overflow Some element of the dishwasher leaks call for service Error codes When there is a malfunction some of the indicator lights on the control panel will start flickering in order to warn you that something is wrong FAQs and Troubleshooting Guide Cont WARNING If the code indicates a malfunction overflow or leakage shut down the dishwasher turn off the ...

Page 30: ...apped in the coarse filter To remove an item caught in this filter gently squeeze the tabs on the top of this filter and lift it out 3 Fine micro filter This filter holds dirt and food residues in the sump area and prevents them from being redeposited on the dishes during a wash cycle Fig 19 Fig 20 A Fig 20 B Removing replacing the filter assembly To ensure best performance check the filter assemb...

Page 31: ...ation of water into the door lock and electrical components do not use a spray cleaner of any kind Never use sharp objects harsh or abrasive cleaners or scouring pads on any dishwasher surface because they will scratch the finish Some papers towels may also scratch or leave marks on the surface Fig 21 WARNING When cleaning the filters take care not to contort their shape which could compromise the...

Page 32: ...hen your dishwasher is not going to be used for some time we recommend you run a wash cycle with the dishwasher empty and then unplug the dishwasher from the socket turn off the water supply and leave the door slightly ajar This will help with door seal durability and odour prevention inside the appliance Moving the dishwasher If you must move the dishwasher try to keep it in a vertical position O...

Page 33: ...org Air breaker assembly nut and inlet hose Base tray cover Basket assembly lower and upper Basket guide upper left and right and support holders Buttons and knob Clamp Control panel assembly Cup rack Cutlery basket Detergent dispenser Display circuit board Door lock hook and switch assembly Drain hose and pipe assembly Filters fine flat coarse Float Foot Handle cover Heating elements Hinge assemb...

Page 34: ...rding the disposal of electrical consumer goods and dispose of it appropriately for recycling Contact your local authorities for advice on recycling facilities in your area Other Useful Information Cont Technical specifications Height 845mm Width 600mm Depth with door closed 600mm with door open 1175mm Weight 37kg Voltage 220 240V 50Hz Wattage 1760 2100W Water pressure 0 04 1 00 MPa Capacity 12 pl...

Page 35: ...f your stored data may be lost We recommend you save this data elsewhere prior to sending the product for repair You should also be aware that rather than repairing goods we may replace them with refurbished goods of the same type or use refurbished parts in the repair process Please be assured though refurbished parts or replacements are only used where they meet ALDI s stringent quality specific...

Page 36: ...t or if it fails to perform to your expectations make sure to contact our After Sales Support Centre on 1300 886 649 for advice For an electronic copy of this manual go to www stirlingappliances com au and download a copy or contact our after sales support centre Instruction Manual Revision Index Version No Issue Date Description V1 0 16 March 2018 Original release V2 0 07 January 2019 2019 releas...

Reviews: