background image

After Sales Support

Telephone: 


1300 886 649

Email: 

 info@tempoaustralia.com.au

14

Other Useful Information (Cont.)

ATTENTION!

•  Only use the vacuum cleaner with all filters intact, in dry condition and 

correctly installed. 

•  Replacement filters are available from our after sales support centre. Contact 

us on the number listed at the bottom of this page.

•  Make sure that the openings of the vacuum cleaner are not clogged or 

obstructed. Otherwise the vacuum cleaner might get damaged.

•   

WARNING: 

Make sure the appliance is unplugged 

from the power supply.

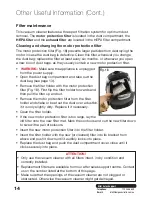
•  Open the dust bag compartment and take out the 

dust bag (see page 13).  

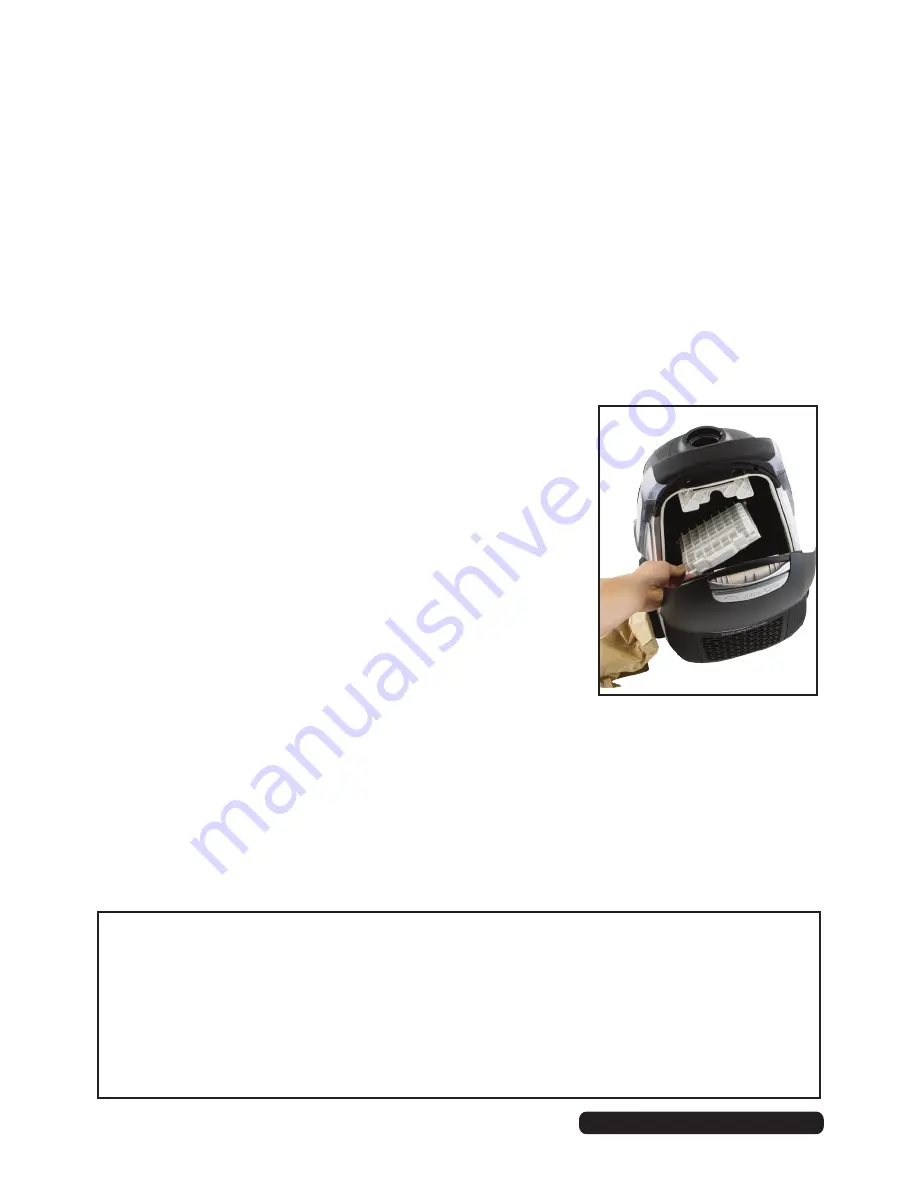
•  Remove the filter holder with the motor protection 

filter (Fig. 18). First flip the filter holder forwards and 
then pull the filter up and out.

•  Remove the motor protection filter from the filter 

holder and shake or beat out the dust over a dustbin, 
if it is only slightly dirty. Replace it if necessary.

•  Clean the filter holder.
•  If the new motor protection filter is too large, lay the 

old filter onto the new filter mat. Mark the contours and cut the new filter down 
to size with a pair of scissors.

•  Insert the new motor protection filter into the filter holder.
•  Insert the filter holder with the new (or cleaned) filter into its bracket from 

above and push it down until it audibly locks into place.

•  Replace the dust bag and push the dust compartment cover close until it 

clicks securely into place.

Fig. 18

Filter maintenance

This vacuum cleaner features a three part filtration system for optimum dust 
removal. The 

motor protection filter

 is located in the dust compartment, the 

HEPA filter

 and the 

exhaust filter

 are located in the HEPA filter compartment. 

Cleaning and changing the motor protection filter

The motor protection filter (Fig. 18) prevents larger particles from destroying the 
motor in case the dust bag is defective. Clean this filter whenever you change 
the dust bag; replace the filter at least every six months, or whenever you open  
a new box of dust bags, as they usually contain a new motor protection filter.

Summary of Contents for VC435

Page 1: ...INSTRUCTION MANUAL After Sales Support Telephone 1300 886 649 Email info tempoaustralia com au Model Number VC435 Complete Care Bagged Vacuum Cleaner N13275...

Page 2: ...port Telephone 1300 886 649 Email info tempoaustralia com au Contents 01 Warranty Details 02 Welcome 03 General Safety Instructions 06 Product Overview 08 Getting Started 10 Instructions 13 Other Usef...

Page 3: ...rge for parts and labour The benefits conferred by this warranty are in addition to all rights and remedies in respect of the product that the consumer has under the Competition and Consumer Act 2010...

Page 4: ...to buy a Stirling product All products brought to you by Stirling are manufactured to the highest standards of performance and safety and as part of our philosophy of customer service and satisfaction...

Page 5: ...ect the power cord Do not kink or damage the power cord Do not wrap it around the appliance Do not pull or carry the vacuum cleaner by the cord Do not use the cord as a handle close a door on the cord...

Page 6: ...d for use by persons including children with reduced physical sensory or mental capabilities or lack of experience and knowledge unless they have been given supervision or instructions concerning use...

Page 7: ...pen the motor base of the vacuum cleaner yourself or to replace the power cord Only have the appliance repaired by an authorised technician or contact the after sales support line for advice Storage S...

Page 8: ...handle 6 Dual use floor brush 7 Disposable dust bags 8 Turbo brush 9 Crevice tool 10 Brush tool 11 Dust bag full indicator 12 Cord retraction pedal 13 HEPA filter compartment 14 On Off pedal The asse...

Page 9: ...After Sales Support Telephone 1300 886 649 Email info tempoaustralia com au 7 Product Overview Cont 7 8 9 10 12 14 11 13...

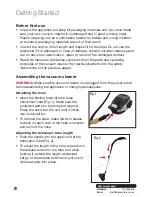
Page 10: ...sales support line for advice on examination repair or return of the damaged product Read this manual to familiarise yourself with all the parts and operating principles of the vacuum cleaner Pay part...

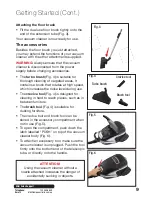
Page 11: ...It contains a brush that rotates at high speed which increases the noise level during use The crevice tool Fig 4 is designed for cleaning in hard to reach places such as in between furniture The brus...

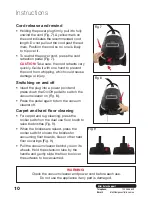
Page 12: ...on and off Insert the plug into a power point and press down the On Off pedal to switch the vacuum cleaner on Fig 8 Press the pedal again to turn the vacuum cleaner off Carpet and hard floor cleaning...

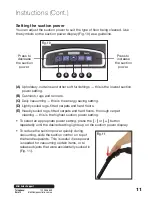
Page 13: ...ng D Lightly soiled rugs fitted carpets and hard floors E Heavily soiled rugs fitted carpets and hard floors thorough carpet cleaning this is the highest suction power setting To select an appropriate...

Page 14: ...over it Make sure to unplug it from the electrical outlet and rewind the power cord Fig 12 Fig 13 ATTENTION Your vacuum cleaner is equipped with a safety switch to prevent overheating It automaticall...

Page 15: ...ust bag up and out of the dust bag holder Fig 17 Dispose of the full dust bag and replace it with a new one Insert the bag into the holder and gently fit it into the space Close the dust compartment c...

Page 16: ...the filter holder If the new motor protection filter is too large lay the old filter onto the new filter mat Mark the contours and cut the new filter down to size with a pair of scissors Insert the n...

Page 17: ...appliance is unplugged from the power supply Open the Sealed HEPA Filtration compartment Fig 19 Remove the HEPA filter Fig 20 Grip the latch and gently lift it out of its place Replace the HEPA filte...

Page 18: ...does not carry current Test the vacuum cleaner on another wall socket that you are sure is working The power cord is damaged Call our after sales support line Do not use the appliance The cleaning re...

Page 19: ...r recycling Contact your local authorities for advice on recycling facilities in your area Replacement Dust Bags Always empty the bag when indicated on the vacuum cleaner Take care when removing the d...

Page 20: ...sending the product for repair You should also be aware that rather than repairing goods we may replace them with refurbished goods of the same type or use refurbished parts in the repair process Plea...

Reviews: