


and the appliance will be disconnected from the power supply.
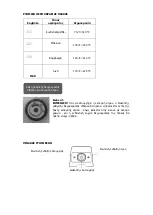
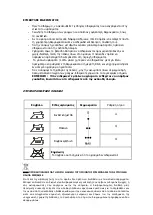
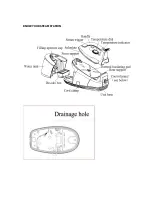
Temperature dial
Turn the dial to set ironing temperature to meet the garment changed. E.g. rotate the dial to
select the second temperature setting. See the point indicated by an arrow shown in the
figure as below.
Temperature indicator
When the iron is heating up, the temperature indicator will be illuminated. Once the iron has
reached the selected temperature, it will extinguish. At that time, the preheating is finished
and the iron is ready to use. The temperature indicator will be cycled on and off as the iron
maintains the selected temperature during ironing.
Steam indicator
Plug in the appliance, the steam indicator will not illuminate. When finish preheating, the
steam indicator will be illuminated. At that time, the steam is ready for use.
Steam trigger
When the steam indicator illuminates, the steam is ready for use. At that time, press the
steam trigger with a little force, the steam will be sprayed from the soleplate continuously.
When loosen the steam trigger, the appliance can only be used for dry ironing without steam.
De-calc box
The de-calc box has to be replaced every 2-3 months if using running water (hard water) and
twice a year if using purified water.
Read carefully the instructions of the manufacturer about water – see paragraph
Steam
Ironing.
Before replace, remember to immerse the new de-calc box into the water for
about 3 to 5 minutes. Read more on paragraph
ANTICALC FILTER REPLACEMENT
.
Cord clamp
When not in use, the steam supply hose and power cord shall be stored. Pull out the cord
clamp first, after winding the cord around the cord winding groove, push the cord clamp
back.
BEFORE FIRST USE
1. Remove any sticker, protective foil or storage cover from the soleplate.
2. Heat up the iron to maximum temperature and iron over a piece of damp cloth for several
minutes for the purpose of removing any residue on the soleplate according to the section
of
“Steam ironing”
.
3. Before first use, detach the de-calc box and then immerse it into the water for 3-5
minutes.
NOTES:
-It is normal that strange odor comes out from the unit for the first use. This
will cease after a short while.
-Some particles may come out of the soleplate when you use the iron for the
first time. This is normal; the particles are harmless and stop coming out of the
iron after a short while.
-When you switch on the appliance, the steam generator may produce a
pumping sound. This is normal; the sound tells you that water is pumped into
the steam generator.
-During the heating process of the soleplate, there will be little steam coming
out from the soleplate automatically and this phenomenon will continue for
Summary of Contents for SP 1016
Page 1: ...SP 1016...
Page 2: ...GR 1 2 3 4 5 6 7 8 9 10 11 12 13 14 15 16 17 H 8 18 19 20 21 22 23 24 25 26 27 To...
Page 3: ......
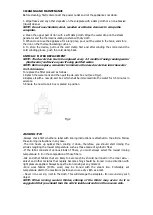
Page 4: ...70 T 120 C 100 T 160 C 140 T 210 C MAX 170 T 225 C 1 o...
Page 5: ...2 3 6 3 5...
Page 6: ...1 2 3 3 5 3 1 2 3 4 27 F 50 1 1 2 Lt MAX 2 3 4 5 6 7 8...
Page 7: ...o 1 1 2 1 9 1 2 3 4 2 3 6 3 5 1 2 2 3 5 3 2...
Page 8: ...100 To 2002 96...
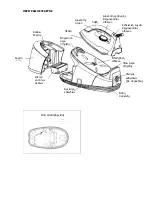
Page 10: ...KNOW YOUR STEAM STATION...
Page 16: ...www vassilias gr 8 111 45 210 8543260 Fax 210 854327...


