


about 3 seconds, This is normal.
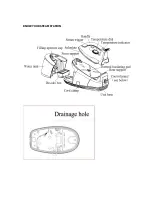
USING YOUR STEAM STATION
The appliance has two iron portions. You can use
Dry ironing
or
Steam ironing
, the details
refer to the following:
Dry ironing
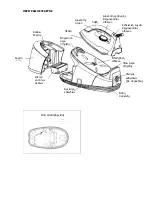
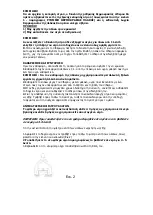
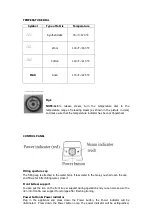
1.Put the iron on the steam generator’s thermal insulating cushion.
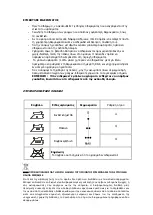
2.Turn temperature dial to your desired setting, which is depended on the fabric of garment,
and the temperature indicator will illuminate. Refer to IRONING TIPS latter. The iron starts
heating.
3. Connect the plug to wall outlet; press down the Power button, the power indicator starts to
illuminate.
4. When the temperature indicator turns off, the selected temperature is reached. You now
can start ironing.
WARNING: Never touch hot soleplate at any time before cooling down!
Steam ironing
The machine works with normal tap water. In case of very hard water (hardness
above 27
º
F) we suggest using 50% distilled water diluted with tap water.
Alternatively, we suggest using normal bottled drinking water. The use of de-
ionized water is not recommended.
1. Grasp and press the water tank’s handle to take out of the water tank, then open the filling
aperture cap and fill water into the water tank. After it, close the filling aperture cap. The
max capacity of water tank is 1.2L, the water level shall not be exceeded the MAX mark.
2. Replace the detachable water tank properly.
NOTE: The water tank must be assembled in position before operation.
3. Put the iron on the steam generator’s thermal insulating cushion.
4. Connect the plug to wall outlet, and then press down the Power button, the power
indicator starts to illuminate. The appliance starts to work.
5. Turn temperature dial to your desired setting, which is depended on the fabric of garment,
and temperature indicator will illuminate. Refer to IRONING TIPS latter.
6. After a few minutes, the temperature indicator will be extinguished, which indicates the
soleplate temperature has achieved the selected temperature.
7. When finish preheating, the steam indicator starts to illuminate.
8. At that time, the appliance is ready for use.
Note: Before release steam, turn the temperature dial to the temperature range
for releasing steam (see fig 1 – Temperature dial section) and make sure that the
temperature indicator has been extinguished.
Caution: 1) Do not touch hot soleplate at any time before cooling down!
2) Never direct the steam at people!
Note: If there is no steam sprayed out from the soleplate after pressing down the
steam trigger to release steam for 1 minute, you shall check the water in the
water tank, if there is less water left in the water tank, you shall refill the water
tank.
9.
After finish ironing, press down the Power button once, the power indicator will be
extinguished. Remove the plug from the wall socket. But the soleplate is still hot, never touch
it with hand, place it on the thermal insulating pad until it cools down completely.
Summary of Contents for SP 1016
Page 1: ...SP 1016...
Page 2: ...GR 1 2 3 4 5 6 7 8 9 10 11 12 13 14 15 16 17 H 8 18 19 20 21 22 23 24 25 26 27 To...
Page 3: ......
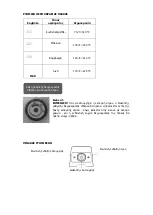
Page 4: ...70 T 120 C 100 T 160 C 140 T 210 C MAX 170 T 225 C 1 o...
Page 5: ...2 3 6 3 5...
Page 6: ...1 2 3 3 5 3 1 2 3 4 27 F 50 1 1 2 Lt MAX 2 3 4 5 6 7 8...
Page 7: ...o 1 1 2 1 9 1 2 3 4 2 3 6 3 5 1 2 2 3 5 3 2...
Page 8: ...100 To 2002 96...
Page 10: ...KNOW YOUR STEAM STATION...
Page 16: ...www vassilias gr 8 111 45 210 8543260 Fax 210 854327...


