IMPORTANT
:
To avoid assembly problems follow these instructions exactly.
Work Safely -
This assembly is done with the Stockmaster standing upright.
Step 1
-
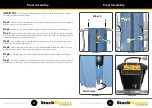
Position the Carraige Rollers of the Upper and Lower Table Brackets within the side track of the Mast.
(See illustration No. 1)
Step 2
-
Fix the Upper Table Bracket to the top hole in the Mast Carraige using the M10 x 20mm bolts and nyloc
nuts. Repeat for the other side.
Leave bolts slightly loose.
(See illustration No. 2)
Step 3
-
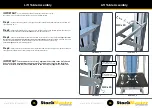
The Lower Table Brackets can be fitted to the Mast Carraige at one of 2 positions.
The Upper hole in the
Mast Carraige is for Lift-Truk models and the Lower hole is for Mezzalift
. Using the M10 x 20mm bolts and nyloc nuts,
Fix the Lower Table Brackets to the Mast Carraige at the hole position relative to your model.
Leave bolts slightly loose.
. (See illustration No. 3)
Step 4
-
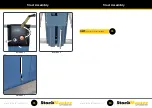
Fix the Lift Table to the Table Brackets using the M6 x 25mm bolts and nyloc nuts. Tighten the nuts and
then tighten the Table Bracket to Mast Carraige bolts. (See illustration No. 4)
IMPORTANT
:
Test the unit before use. Place a minimum load of 20kg on the Lift Table and
Raise the Lift Table up approximately half a meter. The Table must not move when the Winch
Handle is released. If the Table moves, DO NOT USE and contact your supplier for instructions.
Illustration 3
Illustration 4
M6 x 25
M10 x 20
Illustration 1
Illustration 2
M10 x 20
Lift-Truk Models
Mounting Hole Position
MezzaLift Models
Mounting Hole Position
35
36


