1
www.stockmastereurope.nl
IMPORTANT
:
To avoid assembly problems follow these instructions exactly.
Step 1
-
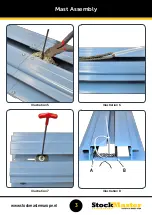
On a level surface butt the two Mast sections together. (See illustration No. 1)
Step 2
-
Fix the Large Mast Joining Plate to the two Mast sections using four of the M6 x 16 button head screws -
Finger tight only.
(See illustration No. 2)
Step 3
-
Turn the Mast over. Locate the Small Mast Joining Plates and position them inside the Mast channel and
fasten using four of the M6 x 16 button head screws. Ensure Mast sections are correctly aligned and then tighten all
screws.
(See illustration No. 3)
Step 4
-
Lift the Mast as shown cut and remove the Wire Tie then lay the Mast flat on its back again. (See illustration
No. 4)
Step 5
-
In the centre of the Mast Channel. Cut and remove the
Black Wire Ties
holding the chain bundle in position.
(See illustration No. 5)
Note:
Do
NOT
cut the
White Wire Tie
.
Step 6
-
Using the White Wire Tie. Pull the stored chain down the length of the mast untill taught. (See illustration
No. 6)
Step 7
-
Loosen the Mast Roller at the base of the Mast (See illustration No. 7)
Step 8
-
Using the 2 Black Wire Ties supplied. Tie the chain to the top of the Mast thru the holes A & B. Ensure the
White Wire Tie is located between these two tie positions. (See illustration No. 8)
Mast Assembly

