4
www.stockmastereurope.nl
IMPORTANT
:
To avoid assembly problems follow these instructions exactly.
Step 1
-
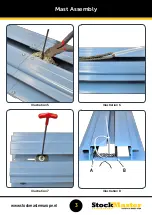
On a level surface lay the mast face-down as shown. (See illustration No. 1)
Step 2
-
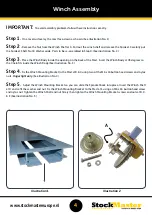
Remove the Nut from the Winch Shaft at A. Pull out the winch shaft and remove the Sproket. Carefully put
the Sproket, Shaft, Nut & Washer aside. Parts to be re-assembled in Step 4. (See illustration No. 2)
Step 3
-
Place the Winch Body inside the opening on the back of the Mast. Insert the Winch Body at 45 degrees so
the Chain fits inside the Winch Body.(See illustration No. 3)
Step 4
-
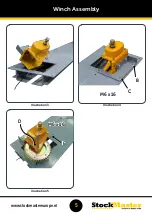
Fix the Winch Mounting Bracket to the Mast at B & C using two of the M6 x 16 button head screws and nyloc
nuts.
Finger tight only.
(See illustration No. 4)
Step 5
-
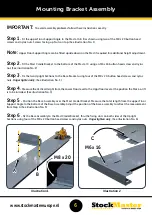
Adjust the Winch Mounting Bracket so you can slide the Sprocket back into place. Insert the Winch Shaft
at D and re fit the washer and nut. Fix the Winch Mounting Bracket to the Mast at E using an M6 x 16 button head screw
and nyloc nut. Tighten the Winch Shaft and nut firmly then tighten the Winch Mounting Bracket screws and nuts at B, C,
& E (See illustration No. 5)
Illustration 1
Illustration 2
A
Winch Assembly

