background image

Maintenance

11/12/2017 

Battery-operated suction sweeper KSE 1000 

21 

Turn the turning lever until the pick-up pin fits into the keyway of the 
sweeping rollers.  

Push the roller swing over the threaded rods. 

Make sure the sweeping rollers are fitted on both sides by the key-
way into the pick-up pins and that all star handles are firmly tight-
ened. 

Fasten the side trim panel. 

5.6 

Setting the Sweeping Rollers 

5.6.1 

Sweeping Contour Adjustment 

For best cleaning results and to ensure the highest possible device effi-
ciency, the sweeping rollers are equipped with a sweeping contour.  The 
sweeping contour should be set to approx. 30-40 mm at the rear roller. 

5.6.2 

Establishing the Sweeping Contour: 

Drive the Sweeping & Suction Machine to an area to be cleaned. Switch 
on the sweeping rollers without moving the sweeping machine. Allow 
the sweeping rollers to run for about one or two minutes without moving. 
Lift the sweeping rollers. Stop sweeping rollers operation and drive for-
ward a few meters. The sweeping track visible on the ground is the 
sweeping contour. 

5.6.3 

AdJusting the Sweeping Contour 

Park the suction sweeper as described. 

Take the key out of the key-operated switch. 

Lift the sweeping rollers and arrest the lowering lever of the sweep-
ing rollers. 

Let the lever snap in arresting position. 

Open the hood. 

Secure the hood position by the hood arresting device. 

Remove the right side trim panel facing in the direction of motion. 

Summary of Contents for KSE 1000

Page 1: ...Operating manual Translation of the original version Battery operated suction sweeper KSE 1000...

Page 2: ...2 Battery operated suction sweeper KSE 1000 11 12 2017...

Page 3: ...Parking the sweeper 12 4 4 Emptying the dustbin 13 4 4 1 Removing the dustbin 13 4 4 2 Inserting the dustbin 14 5 1 Safety Information 15 5 2 Cleaning 15 5 3 Replacing the filter 16 5 3 1 Removing th...

Page 4: ...rive 25 5 9 Battery 28 5 9 1 Charging the Batteries 28 5 10 Maintenance Chart 30 5 10 1 Daily maintenance 30 5 10 2 Charge battery 30 5 11 Malfunctions error messages and troubleshooting 31 5 12 Techn...

Page 5: ...be followed Usage conformant with intended purpose The appliance is intended exclusively for sweeping on solid surfaces for example parking areas walkways shop floors The area to be swept should not...

Page 6: ...ould impair safety 8 Do not make any changes modifications or additions to the sweeper without the approval of the manufacturer 9 Replacement parts must meet manufacturer specifications This is always...

Page 7: ...trolytic gas mix ture is generated when batteries are being charged 18 Note that the accumulator batteries are filled with battery acid 19 Batteries should always be kept clean and dry to avoid leakag...

Page 8: ...ping rollers is caught by the dust suction unit in a lamellar filter inside the machine The lamellar filter can be cleaned through a mechanically operated filter cleaning device If necessary the dust...

Page 9: ...les and remove the outer plastic wash ers To define the height adjustment of the driving hoop you will have to remove the frontal carriage bolts and set it to one of the three height levels In doing s...

Page 10: ...dles to the carriage bolts Place the driving linkage in the borehole of the frontal swivel lever Secure this linkage with the set collar By all means make sure that the suction sweeper is turned off b...

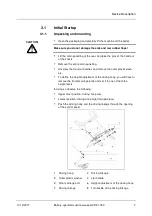
Page 11: ...e suction sweeper to prevent acci dental rolling Loosen the parking brake of the front wheel To do this use the upper unlocking lever 1 Parking brake 2 Front wheel Insert the key into the key operated...

Page 12: ...will cause dam age to the suction device and the filter Provide good aeration when using the machine in closed rooms or buildings Do not sweep up mate rials that may cause health impairment 1 Control...

Page 13: ...r snap in arresting position 4 2 6 Operating the ventilation flap Lever down ventilation on Lever up ventilation off The purpose of the ventilation flap is to protect the machine when sweeping moist s...

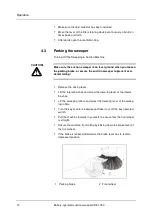
Page 14: ...suction sweeper to prevent acci dental rolling Release the driving lever Lift the lateral brushes and arrest the lowering lever of the lateral brushes Lift the sweeping rollers and arrest the lowering...

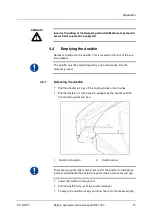
Page 15: ...weeper is used 4 4 1 Removing the dustbin Pull the attachment lugs off the holding knobs on both sides Pull the dustbin out of the suction sweeper by the handle until the front dustbin guides are free...

Page 16: ...se into an appropriate container only 4 4 2 Inserting the dustbin Place the dustbin in front of the dustbin mount Raise the front dustbin guides to the height of the guide rails Push the arrests to th...

Page 17: ...e warranty granted null and void When working on the electrical system the battery should be discon nected Maintenance work troubleshooting at the electric motor must not be done while the electric mo...

Page 18: ...d The filter is positioned on a frame Hold the filter frame in position with one hand Press the clips of the tension closures downwards Release the threaded hooks from the filter frame arrests Remove...

Page 19: ...ush 5 4 1 Dismounting the Side Brush Park the suction sweeper as described Take the key out of the key operated switch Pull up the lowering lever for the side brushes Arrest the lowering lever Pull of...

Page 20: ...the side brushes Park the suction sweeper as described Take the key out of the key operated switch Unlatch the lowering lever of the side brushes Push down the lowering lever Remove the entire main pa...

Page 21: ...operated switch Pull lowering lever of the sweeping rollers Arrest the lowering lever Loosen the bolts of the left side trim panel facing in driving direction Remove the side panel 1 forward drive 3...

Page 22: ...le sliding them in 1 forward drive 2 direction of motion of the sweeping rollers Each roller end is equipped with a keyway Turn the sweeping roller until the pick up pin of the rear roller swing fits...

Page 23: ...o approx 30 40 mm at the rear roller 5 6 2 Establishing the Sweeping Contour Drive the Sweeping Suction Machine to an area to be cleaned Switch on the sweeping rollers without moving the sweeping mach...

Page 24: ...reads Lock counternut B in position by counternut A Attention The sweeping rollers are pendulous and adapt to uneven surfaces up to a certain degree They are put into operating position by means of th...

Page 25: ...Information Original roller diameter 230 mm When diameter has decreased to 200 mm the roller needs to be replaced 5 7 Drive 5 7 1 Adjustments Adjustment of the frictional wheel will be necessary if t...

Page 26: ...r is secured to prevent accidental rolling Carefully actuate the driving lever to move forward The swivel lever pushes the frictional wheel in the direction of the fric tional roller The suction sweep...

Page 27: ...r Put the driving lever in neutral position horizontal position The swivel lever cannot push the frictional wheel against the fric tional roller The driving belt has to be freely movable Should this n...

Page 28: ...sure you only only turn the turnbuckle one or two threads Turning the the turnbuckle too far could result in the dangerous possibility that both rods of the driving linkage might not find suf ficient...

Page 29: ...the back nuts re attach the main panelling Should the suction sweeper not move forward and or backwards repeat these adjustments When making adjustments should the condition arise that while the driv...

Page 30: ...lf testing operation of the battery charg ing state The result of this self testing is displayed by the 5 LED s Information provided by LED indicators on the battery condition display Charging conditi...

Page 31: ...to charge fully with the manufac turer s original accessories charger The manufacturer s original charger can should remain connected after charging as it has a trickle charge function and thus ensure...

Page 32: ...weeping rollers are worn or cluttered Replace if required Check sweeping contour readjust if required Check if side brush adjustment is worn if required readjust or re place Cleaning the frictional wh...

Page 33: ...ot lowered Lower Side brush es or main sweeping rollers worn Adjust Filter heavily polluted if required switch off side brushes Filter not correctly fitted Leakage and subsequent aspi ration of false...

Page 34: ...0 mm with two side brushes 1000 mm Dust Container Volume 70 ltr Climbing Capacity 20 Speed Forward movement 0 4 km h Moving backwardst 0 2 5 km h Filter Area 3 m Volume flow turbine 600 m Bei 200 pa s...

Page 35: ...ording to the locally applicable waste disposal specifica tions Used batteries must be disposed of according to Directive 2006 66 EC 5 15 Accessories and spare parts Accessories and spare parts must c...

Page 36: ...us to the basic safety and health requirements of the EC Machine Directive 2006 42 EC In case of a change being made that has not previously been agreed with us this declaration will lose its validity...

Reviews: