2
1
3
-4-
1
3
2
1
230V
2
-5-
STOLZENBERG
Kehrmaschinen
·MATRIXMTX-900-V/-B/-VBTRS·20122006
STOLZENBERG
Kehrmaschinen
20122006
·MATRIXMTX-900-V/-B/-VBTRS·
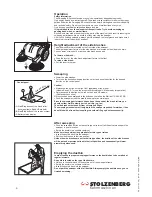
Emptying the dustbin
In order to ensure proper sweeping performance, the dustbin has to be emptied at
regular intervals.
A handle is located on the top of the dustbin.
Do not park the sweeper with a full dustbin. Always empty the dustbin once you've
finished sweeping.
•
•
•
Hold on to the handle and lift the dustbin out of the sweeper's frame.
Empty the dustbin in a suitable container.
Insert the dustbin back into the sweeper.
Sweeping
•
•
•
•
•
Lower the side brushes.
To turn on the desired sweeping function, select and push the button for the desired
function on the control panel.
Always use the button on the right first, regardless of the model.
(Models B and VB: Turn on the brush roller drive/Model V: Make ready for operation)
Only then push the button on the left on the V and VB models.
(Dust extraction unit on)
No function has been assigned to the button on the left on the Matrix MTX-900-B TRS.
Push the sweeper across the area to be swept at a normal pace.
Caution!
Since the sweeping performance depends on the speed of the brush rollers, you
should neither walk to slowly nor too quickly. (e.g. run)
The side brushes remove dirt from corners and edges.
The sweeping mechanism will only work if the sweeper is pushed forward as it has
been fitted with a free-wheel coupling to avoid whirling up dust unnecessarily.
.
After sweeping
•
•
•
•
Push the respective button on the control panel to turn off all the actuators and park the
sweeper in a safe location.
Empty the dustbin in a suitable container.
Insert the dustbin back into the sweeper.
Set the side brushes to their top position.
Make sure the container is appropriate for this type of refuse.
Unless the side brushes are set to their top position, the bristles of the side brushes
will be put under permanent load in their off-position and consequently will wear
prematurely when used.
Height adjustment of the side brushes
The side brush arms are located on the front side of the sweeper.
The height adjustment fixtures for the side brushes are located on the side brush arms.
You can lower or raise both or just one side brush as needed.
To lower a side brush:
To raise a side brush:
•
•
Push the lever of the side brush adjustment fixture to the front.
Pull the lever to the rear.
Operation
Safety Information
.
The Sweeping & Suction Machine may only be operated by dependable persons.
Only deploy trained and instructed staff. The areas or responsibility of staff must be clearly
defined Examine the Sweeping & Suction Machine before starting and check serviceability
and technical safety. Do not use the machine in case of malfunctions of any kind.
Only drive on specifically assigned pathways and lots.
Such objects may wind around the moving parts of the machinery and result in reducing the
sweeping performance (tie up bristles) or they may clog the sweeper.
After you've finished sweeping, always park the sweeper on level ground and make sure it
is secured from rolling away by accident.
It is prohibited to use the sweeper to transport loads. Try to avoid sweeping up
packing band, wires, or similar items.
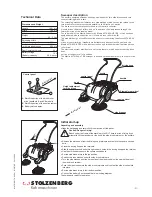
Control panel
Start/Stop button of the brush roller
drive (applies to B and VB models)
Start/Stop button of the suction system
Battery status display
-1-
-2-
-3-
forward
drive
Safety information
Only complete the type of maintenance work described in the following chapter. The
authorised dealer or the manufacturer is responsible for performing any other maintenance
work.
Closely follow the steps listed in the maintenance instructions. The improper completion of
maintenance tasks may result in malfunctions when using the sweeper and may possibly
render the warranty granted null and void.
To complete any work on the sweeper, it will have to be secured from rolling away by
accident.
The sweeper will have to be turned off.
The electric motors must not be running when performing any maintenance work on or
troubleshooting the electric motors.
Use only flawless and appropriate tools to complete maintenance work.
Replacement parts have to meet manufacturer specifications.
This is always ensured by using genuine replacement parts.
If covers and/or safety devices were removed during maintenance work/repairs, they will
have to be re-attached prior to starting the sweeper.
Battery
Safety Information for Battery Handling
When servicing the batteries, please absolutely observe the following warning information
and safety regulations:
Avoid spark formation while handling cables and electrical devices.
Never short-circuit battery poles. Danger of injury by highly charged sparks.
Always keep batteries in a clean and dry place to avoid leak current.
Only charge batteries in well ventilated rooms. Don't smoke and keep away open flames
and electric sparks, because the charging process produces a highly explosive combustive
mixture.
In order to prevent health impairment do not smoke,eat, or drink in the vicinity of the battery
charging device.
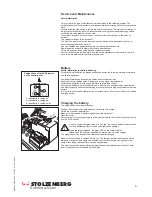
Explanations of the LED displays
on the control panel
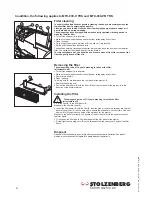
Charging the battery.
The machine has an on-board-charger.
Position the machine on an approprate surface close to a socket.
Switch the machine completely of.
Make sure the machine is blocked against possible movement
Open the cover.
Connect plug 1 of the charger using the cable delivered with the machine and connect plug
2 to the 230 V socket.
Only the original charging-cable is to be used: the use of a different cable makes
you lose warranty on the machine and might cause damage.
When charging is finished, the green LED on the charger will on.
(Meaning of the LED: see appendix: operators manual of the charger).
The machine can only be operated if disconnected after charging.
Make sure the machine is charged before use. The charger contains an electronic device
that keeps current of the battery on a constant level so the machine can be kept on the
charger for a longer period without causing any damage.
The machine contains a deep-discharge protection and automatically switches of if such
level is reached to protect battery from damage.
-1-
-2-
-3-
ready/battery charge ok
ready/battery charge low
ready/battery charge not ok
forward drive
Service and Maintenance
Summary of Contents for MATRIX MTX-900 TRS
Page 11: ......


