866-795-1586 • WWW.STONEAGETOOLS.COM
9
2” BADGER HEAD REPLACEMENT INFORMATION
TO REPLACE THE HEAD:
DISASSEMBLY:
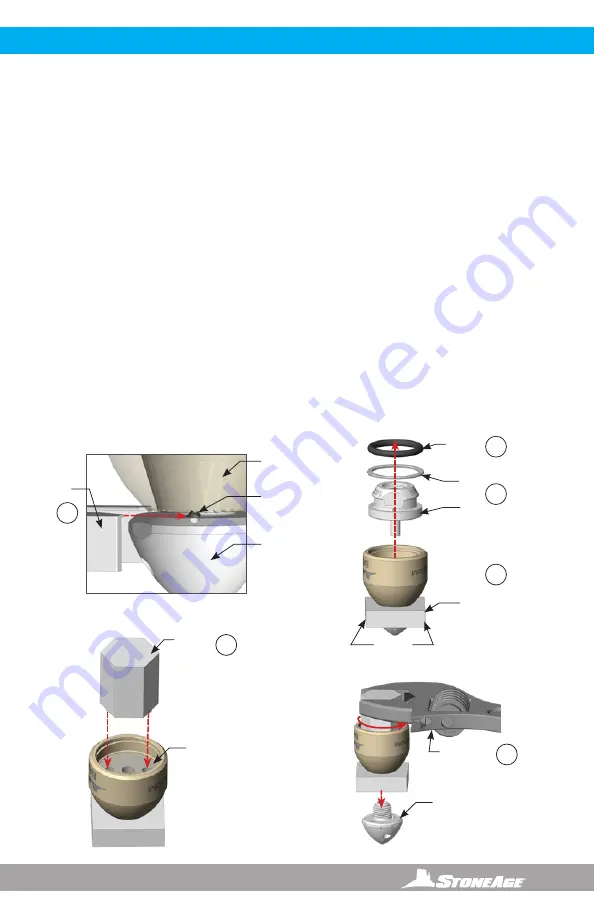
1. Slide the BA 182 Head Removal Tool
between the Head and the Shaft to release
the Head Locking Pin. There is only one
direction that will release the Pin. See the
figure below.
2. Leave the Badger in the BA 182 Removal
Tool and clamp the removal tool into a vise.
3. Using a small pick, remove the O-Ring.
4. Using a small flat head screw driver, pry the
Retaining Ring off the Inlet Nut, and pull the
Inlet nut out the Shaft.
5. Insert the two pins on the WV 181 Spanner
Wrench into the two bores in the Shaft.
6. Rotate the Spanner Wrench
Counterclockwise with an adjustable end
wrench to remove the Head from the Shaft.
BA 612-LK TOOL KIT INCLUDES:
•
BA 182 Head Removal Tool
•
BA 185 Red Loctite
®
262
•
WV 010 Retaining Rings (2)
•
WV 181 Spanner Wrench
Loctite
®
is a registered trademark
of Henkel AG & Co. KGaA.
RECOMMENDED GENERAL TOOLS:
(Not included in the BA-612-LK Kit)
•
Bench Vise (recommended)
•
Adjustable End Wrench
• 7/8” socket wrench
•
Clean lint free rags or blue shop towels
Product training and proper tools are required to service this tool. If you are uncomfortable performing
the service, bring the nozzle to your authorized dealer. Please go to the link below for more information
and service videos for the 2 inch Badger.
https://www.stoneagetools.com/2inch-badger
BA 182
Head
Removal
Tool
Head
Locking
Pin
Head
Shaft
1
WV 181
Spanner
Wrench
Shaft
5
Adjustable
End Wrench
Head
6
BA 182
Head
Removal
Tool
O-Ring
Retaining
Ring
Inlet
Nut
Clamp
in Vise
3
4
2


