background image

4

9+11

3

5

2. Improve safety mechanisms 

This pressure cooker is equipped with various safety mechanisms. Each time before using the 

pressure cooker, check the following steps to ensure that the safety mechanisms work properly. 

Never modify them in any way.

Before cooking make sure that the valves, the gasket and the lid handles fit properly and firmly.

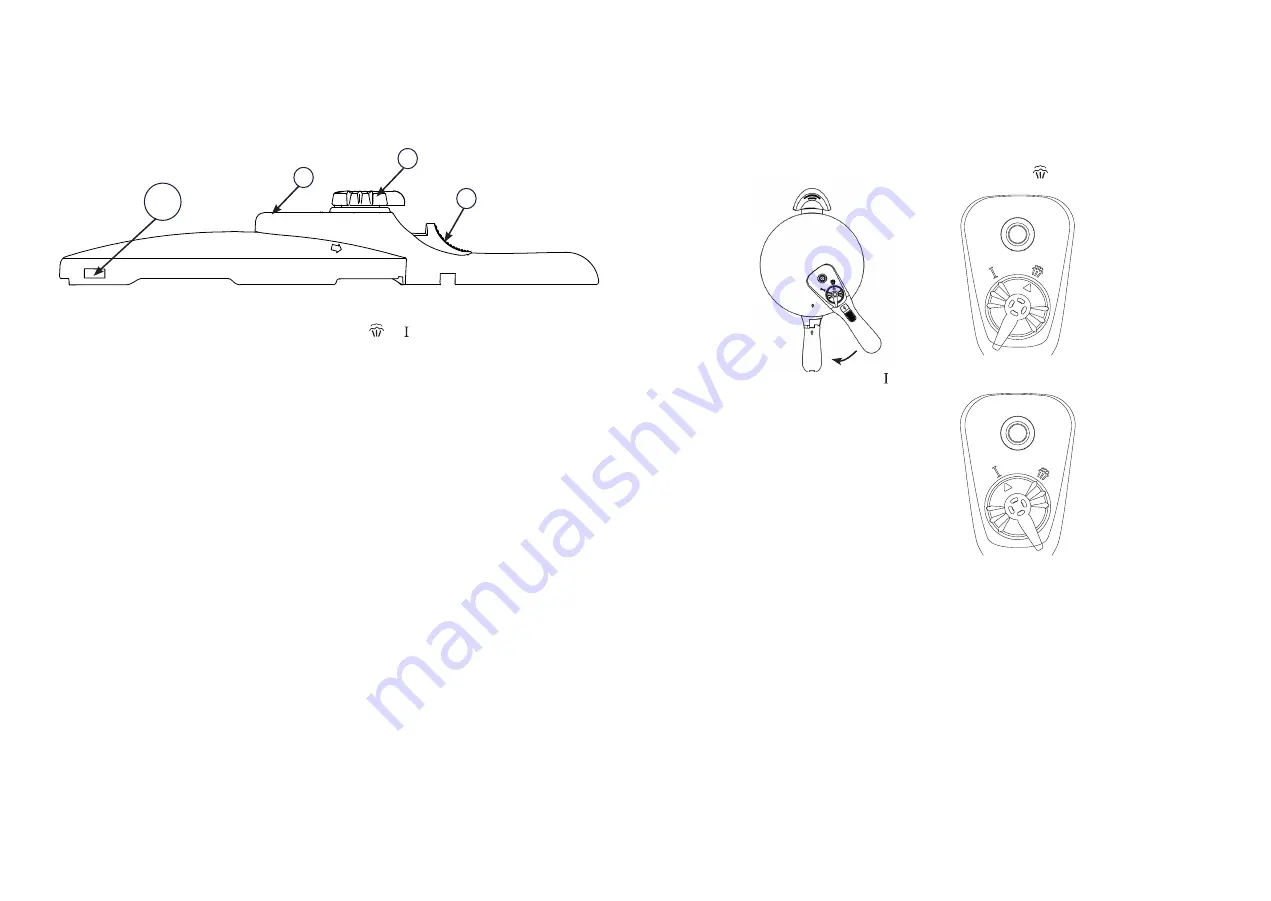
(3) Steam control valve

Check unobstructed mobility of the control valve (from    to   ).

(4) Safety valve

Check the safety valve for cleanness by holding the lid in the daylight and looking through the 

valve. If the valve is soiled, clean it with a small brush or pipe-cleaner 

(picture C).

(9 + 11) Silicone gasket und safety window

Make sure that the silicone gasket and the rim of the lid are clean. Before each use check the 

silicone gasket for damages. After that insert the silicone gasket so that it lies completely flat in 

the lid.

The safety window is additionally added in the lid rim. In case of too high pressure in the pot 

the silicone gasket pushes itself outwards so that the steam can escape.

Tip: We recommend spreading water or cooking oil on the silicone gasket so that the lid can 

easily be put on the pressure cooker.

(5) Release button

Before each use press the release button and turn the lid counter-clockwise to check if the 

pressure cooker can be opened. Pay attention that the arrows on the lid and the body handle 

are opposite each other. Only then the cooker can be opened 

(figure A + B).

3. Pressure cooking – that’s so simple:

     a. Fill the pressure cooker with the desired food and needed liquid. Please note the following 

         volumes (both together: food and liquid):

         o Add at least 1/4 litre

         o Fill the pressure cooker to a maximum of 2/3 of its capacity

         o Volume of content should not exceed 1/2 of the pressure cooker’s capacity for foods 

            which increase in volume or produce large amount of foam as for example: rice, cereals, 

            dried vegetables


b. Insert the silicone gasket (9) so that it lies completely flat in the lid.

     Hold the body handle (7) with your left hand, and with your right hand place the pressure   

     cooker lid (1) on the pressure cooker. When putting on the lid please pay attention that the 

     arrows on the lid and the body handle are opposite each other 

(figure A)

. Pull the lid clock- 

     wise in the direction of the body handle until the release button (5) locks audibly with a 

     clicking sound 

(figure B)

.


     Pay attention that the steam control valve (3) is positioned at  .

c. Turn the steam control valve (3) to     and place the pressure cooker on the stove.


     Set your stove at the highest cooking level. If the pressure in the pressure cooker increases,    

     the red safety valve (4) becomes visible and a slight sizzle is audible. From now the pressure 

     cooker cannot be opened anymore. It takes a few minutes until pressure cooker reaches the 

     cooking temperature 

(figure D + E)

.

     Now reduce the heat by setting the hotplate to a lower level. This saves energy and avoids 

     fast vaporization of the liquid in the cooker.

     Please note the following points:

     o If the heat is not regulated, the steam will escape from the steam control valve (3). This 

         causes the fast reduction of the liquid in the pressure cooker. The cooking times are 

         reduced. If all of the liquid is evaporated the food may burn and the pressure cooker may 

         be damaged. Avoid this by reducing the heat setting immediately.

     o If the heat is regulated too much/ is set too low the pressure in the pressure cooker will   

        decrease slowly and the safety valve (4) will sink. This extends the cooking time.

15

14

Summary of Contents for 803100

Page 1: ......

Page 2: ...natura del coperchio 3 Valvola d esercizio con regolatore di pressione 4 Valvola di sicurezza 5 Pulsante di blocco sblocco 6 Pentola 7 Manico della pentola 8 Contromanico 9 Guarnizione in silicone 10...

Page 3: ...die Herdarten die in der Gebrauchsanleitung angegeben werden Stellen Sie vor dem Kochen sicher dass sich Fl ssigkeit im Schnellkochtopf befindet Achten Sie auch darauf dass die Fl ssigkeit niemals gan...

Page 4: ...icherheitsmechanismen ausgestattet berpr fen Sie vor jedem Kocheinsatz die folgenden Schritte damit die Sicherheitsmechanis men ordnungsgem funktionieren Ver ndern Sie diese niemals Versichern Sie sic...

Page 5: ...ken ist und dr cken dann erneut den Entriegelungsknopf Wiederholen Sie diesen Schritt bis kein Dampf mehr entweicht Nun k nnen Sie den Entriegelungsknopf 5 gedr ckt halten und den Topf ffnen 5 Vor dem...

Page 6: ...tig Schalten Sie immer den Herd aus und lassen Sie den Schnellkochtopf abk hlen bevor Sie versuchen ein Problem zu beseitigen Problem M gliche Ursache L sung Wenn der Dampf l nger als gew hnlich unter...

Page 7: ...sure that the pressure cooker contains liquid before you heat it up Ensure that the liquid does not completely evaporate Otherwise the food may burn and the pressure cooker or stove may be damaged In...

Page 8: ...Fill the pressure cooker to a maximum of 2 3 of its capacity o Volume of content should not exceed 1 2 of the pressure cooker s capacity for foods which increase in volume or produce large amount of...

Page 9: ...pressure cooker cautiously The pressure can increase once more and the red safety valve can become visible again Cool down the lid once again until the red safety valve has sunk again Then push the re...

Page 10: ...s Important Always turn off the stove and let the pressure cooker cool down before you attempt to eliminate a problem Problem Possible causes Solution When the steam escapes longer than usual from und...

Page 11: ...ns les instructions de service V rifiez avant la cuisson qu il y ait du liquide dans l autocuiseur Le liquide ne doit jamais s vaporer compl tement Autrement l aliment cuire pourrait br ler l autocuis...

Page 12: ...quip de diff rents m canismes de s curit V rifiez avant toute utilisa tion les tapes suivantes le fonctionnement irr prochable de ces m canismes Ne les modi fiez jamais Assurez vous avant la cuisson q...

Page 13: ...rir la casserole 5 Avant la premi re utilisation V rifiez que votre ustensile de cuisson soit exempt de toute mati re r siduelle notamment sur le fond de l ustensile avant sa premi re utilisation Il e...

Page 14: ...inappropri s commedescouteauxpointusoutranchants desfourchettes desrobots m nagersoumixeurs Des dommages dus des d tergents agressifs que ce soit dans les laves vaisselle ou la main 10 Questions et r...

Page 15: ...iento extremo pueden derretirse las piezas de pl stico e incluso el aluminio Si esto ocurre apague inmediatamente el fuego y no mueva bajo ning n concepto la olla a presi n hasta que se haya enfriado...

Page 16: ...s cantidades alimentos y l quido junto o A adir por lo menos 1 4 de litro de l quido o Llenar la olla a presi n hasta 2 3 de su capacidad como m ximo o Si se van a cocinar alimentos que forman espuma...

Page 17: ...v lvula de seguridad de color rojo quede de nuevo a la vista Enfr e de nuevo la tapa hasta que la v lvula de seguridad de color rojo descienda de nuevo y vuelva a presionar el bot n de desbloqueo Repi...

Page 18: ...eje enfriar la olla a presi n antes de intentar solucionar un problema Tiempos de cocci n valores orientativos Problema Posible causa Soluci n Sigue saliendo vapor por debajo de la tapa m s tiempo del...

Page 19: ...ttura assicuratevi che nella pentola vi siano liquidi a sufficienza Fate attenzione che il liquido non evapori mai completamente altrimenti gli alimenti si bruciano e la pentola si rovina gravemente c...

Page 20: ...i crudi e il liquido necessario La pentola va riempita come segue alimenti crudi e liquido insieme o Aggiungere sempre almeno 1 4 di litro di liquido o Non riempire mai la pentola oltre i 2 3 della su...

Page 21: ...sere visibile Passate di nuovo il coperchio sotto l acqua fredda fino a che la valvola di sicurezza non si riabbassi poi premete nuovamente il pulsante di blocco sblocco Ripetete l operazione fino a c...

Page 22: ...fruste o frullatori ad immersione Danni provocati da detergenti molto aggressivi in lavastoviglie 10 Domande e risposte Importante spegnete sempre il fornello e lasciate freddare la pentola a pressio...

Page 23: ...oordat u de ingredi nten aan de kook brengt Houd er rekening mee dat de vloeistof nooit helemaal verdampt mag zijn anders kan het gerecht aanbranden en kunnen de snelkookpan en het fornuis beschadigd...

Page 24: ...gewenste levensmiddelen en de benodigde hoeveelheid vloeistof in de snelkookpan Houd de volgende hoeveelheden aan levensmiddelen en vloeistof samen o Voeg minstens 1 4 liter toe o Vul de snelkookpan...

Page 25: ...voorzichtig heen en weer Als er nog een keer stoom opstijgt wordt het rode veiligheidsventiel weer zicht baar Koel het deksel weer af en wacht tot het rode veiligheidsventiel weer gezakt is Druk nog e...

Page 26: ...igingsmiddelen in de afwasmachine 10 Vragen en antwoorden Belangrijk schakel steeds de kookplaat uit en laat de snelkookpan afkoelen voordat u het probleem gaat oplossen Kooktijden richtlijnen problee...

Page 27: ...ingen S kerst ll f re matlagning att det finns v tska i tryckkokaren Se ocks till att v tskan aldrig f r ngas helt Annars kan maten br nnas vid och tryckkokaren och spisen kan ta skada Vid extrem verh...

Page 28: ...nskade livsmedel och n dv ndig v tska D g ller f ljande m ngder mat och v tska tillsammans o Tills tt minst 1 4 liter o Fyll tryckkokaren max till 2 3 o Om du tillagar skummande och sv llande livsmede...

Page 29: ...Kyl locket igen till den r da s kerhetsventilen sjunkit igen och tryck sedan p uppl sningsknappen p nytt Upprepa dessa steg tills det inte l ngre pyser ut n gon nga Nu kan du h lla uppl sningsknappen...

Page 30: ...va reng ringsmedel i diskmaskiner 10 Fr gor och svar Viktigt St ng alltid av spisen och l t tryckkokaren svalna innan du f rs ker tg rda ett problem Riktv rden f r tillagningstider Problem M jlig orsa...

Page 31: ...cooker with lid Schnellkochtopf mit Deckel 22 cm Height approx H he ca 15 cm 5 l Grey Grau WX 16930 3 l WX 16413 5 l Red Rot WX 17092 3 l WX 17085 5 l Yellow Gelb WX 17096 3 l WX 17095 5 l Green Gr n...

Reviews: