151
Maintaining the inlet valve
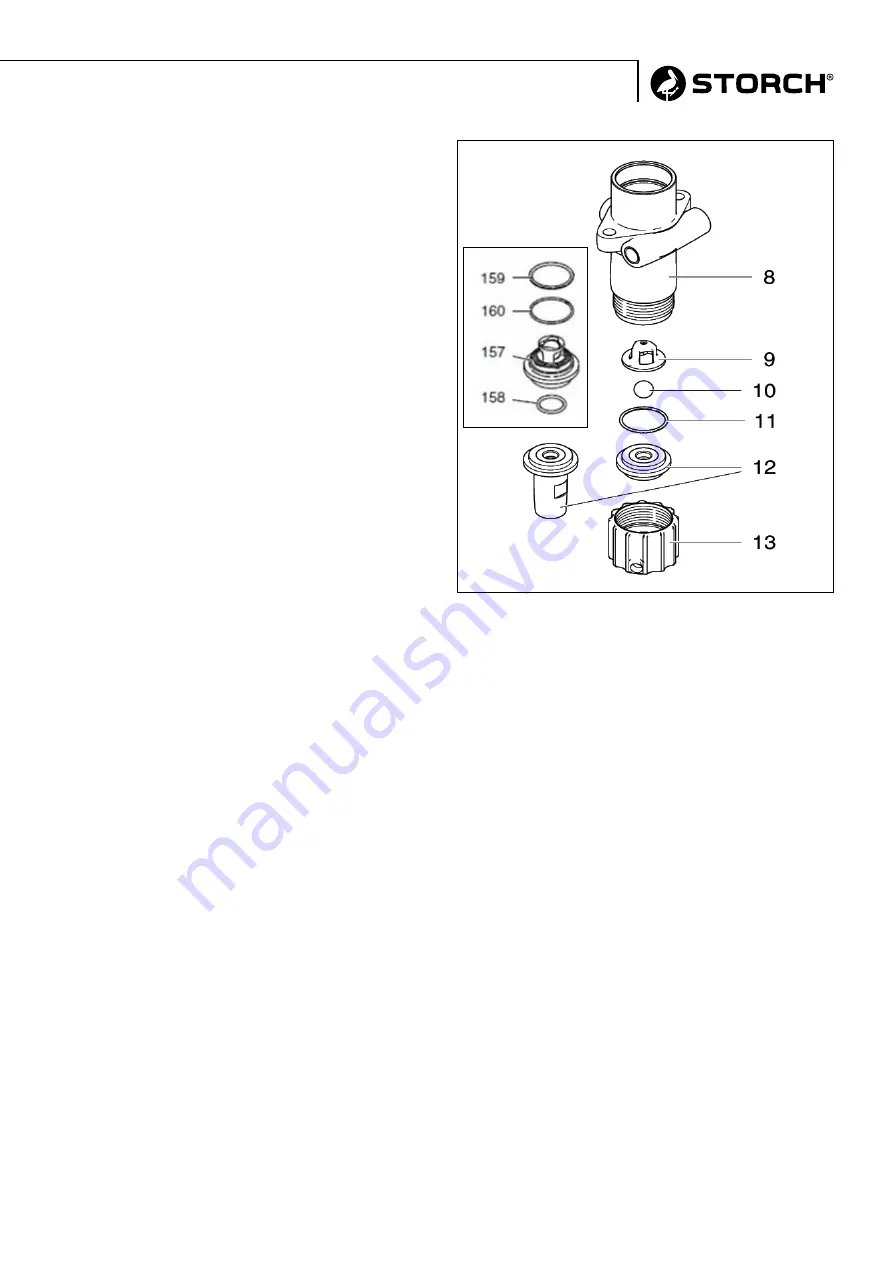
1. Unscrew the valve nut (13) from the fluid pump hou-
sing (8).
2. Remove the seating (12), the o-ring (11), the ball (10)
and the ball guide (9) on the suction valve.
2.1. Remove the O ring (158), the inlet valve unit (157),
and the O rings (160) as well as (159) from LP 500 F /
600 F devices.
3. Clean all the parts and check them for wear or dama-
ge. If needed, replace the worn parts.
4. Clean the lower part of the fluid pump housing (8).
5. Re-assemble the lower suction valve by placing the
seating (12), the o-ring (11), the ball (10) and the ball
guide (9) into the valve nut (13) and bolting onto the
fluid pump housing (8).
5.1. For LP 500 F / 600 F devices: reassemble the low-
er suction valve unit in reverse order to that shown and
fasten the valve nut using the enclosed tools.
Replacing the packing
Disassemble the fluid pump
1. Remove the fluid pump.
2. Unscrew the gland nut from the pump housing.
3. Push the piston rod downward through the packing
and out of the pump.
4. Now push the packing puller tool from the bottom
through the pump and remove the packing, spacers
and springs from the top so that the fluid pump hou-
sing is empty. Make sure that the old packings and
rings are removed from the fluid pump.
5. Clean the inside of the fluid pump housing.
6. Disassemble all parts and clean them before re-
assembling. Dispose of used packings.
7. Soak the leather packings from the new seal kit in
piston oil for about 10 minutes.
Reassembly of the fluid pump
1. Place the bottom retaining ring (1) on the flat side.
2. Pick up three of the lower polyethylene packings (2)
and two of the leather packings (23) and place these,
with the concave side facing downward, on the retai-
ning ring (1) in the following order:
•
Polyethylene
•
Leather
•
Polyethylene
•
Leather
•
Polyethylene
3. Take the adapter bushing (3) which is concave on both
sides and place this on the grouped lower packings.
4. Continue with step 2; with the concave side of the
packings now facing upward.
5. Take the second lower retaining ring (1) and place this
with the round side facing downward on the top of the
group of packings.
6. Take the packing set (13 pieces) and push this onto the
lower part of the piston (14).
7. Take the spacer (15) and push this over the piston (14).
8. Take the three spring washers (16) and push them over
the piston in the following order:
•
first spring - bulge facing upward
•
second spring - bulge facing downward
•
third spring - bulge facing upward
9. Take the upper retaining ring (17) and place this on the
top with the round side facing upward.
10. Pick up three of the upper polyethylene packings (18)
and two of the leather packings (22) and place these,
with the concave side facing downward, on the retai-
ning ring (17) in the following order:
•
Polyethylene
•
Leather
•
Polyethylene
•
Leather
•
Polyethylene
11. Take the top counter ring (19) and place this with the
convex side facing downward on the top of the group
of packings.
12. Take the connectors comprising top counter rings and
packings (7 pieces) and push these with the convex
side facing downward onto the top part of the piston
(14).
Original instruction
Summary of Contents for Airless LP 500 F
Page 1: ...Airless LP 500 F 600 F 650 S DE NL FR IT GB CZ LP 500 F LP 600 F LP 650 S...
Page 26: ...26 Ersatzteillisten Motor Antrieb bersetzung der Originalanleitung...
Page 28: ...28 Ersatzteillisten Querschnitt Farbstufengeh use bersetzung der Originalanleitung...
Page 60: ...60 Lijsten met vervangende onderdelen Motor aandrijving Vertaling van de originele handleiding...
Page 62: ...62 Doorsnede verfniveaubehuizing Vertaling van de originele handleiding...
Page 128: ...128 Motore Azionamento Elenchi dei pezzi di ricambio Traduzione delle istruzioni originali...
Page 162: ...162 Spare parts list Motor gearbox Original instruction...
Page 164: ...164 Spare parts list Cross section paint stage housing Original instruction...
Page 196: ...196 Seznamy n hradn ch d l Motor pohon P eklad origin lu n vodu...
Page 198: ...198 Seznamy n hradn ch d l Pr ez kryt barevn ho stupn P eklad origin lu n vodu...
Page 206: ...206...
Page 207: ...207...


