background image

36

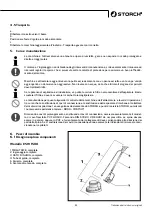
4. Utilisation

4.1 Préparation

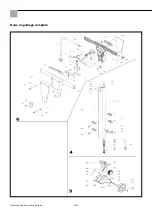
Montage de la barre de guidage :

a.

D‘abord visser la barre de guidage avec les 4 écrous de fixation au corps de la machine, puis les serrer avec une clé 

plate de 13 mm.

b.

Puis réaliser le branchement électrique entre la barre de guidage et le corps de la machine. 

c.

En tirant sur le levier intérieur droit de la barre de guidage, déverrouiller celle-ci et la pivoter vers l‘avant jusqu‘à ce que 

al barre de guidage soit positionnée à la verticale et s‘enclenche.

4.2 Mise en place et remplacement des outils dans l‘appareil.

a.

Débrancher la fiche. 

b.

Basculer la machine vers l‘arrière et poser la barre de guidage sur le sol.

c.

Insérer l‘outils dans le disque d‘entraînement par une légère rotation à gauche.

d.

Pour retirer l‘outils, le tourner brutalement vers la droite et l‘enlever du disque d‘entraînement.

4.3 Mise en service

a.

Etablir le branchement au secteur.

LORS DE LA MISE EN MARCHE, TENIR LA MACHINE FERMEMENT DES DEUX MAINS, SANS LA 

BLOQUER !

b. 

Basculer la barre de guidage sur la position de travail ergonomique souhaitée en tirant le levier droit inférieur, puis 

l‘enclencher et relâcher le levier.

c. 

Appuyer sur le bouton à l‘arrière du boîtier de commutateur et actionner le levier de commutateur (sécurité contre les 

mises en marche involontaires). 

Relâcher le bouton, la machine est en marche.

La machine s‘arrête lorsque le levier de commutation est relâché. Pour la mise en marche et l‘utilisation, il 

suffit d‘actionner un des deux leviers de commutation.

4.4 Mode  opératoire

a.

L‘ESM 1500 est automotrice, c‘est -o-dire qu‘en levant ou en abaissant légèrement la barre de guidage, elle est dirigée 

vers la gauche ou la droite.

Déplacement vers la gauche : abaisser légèrement la barre de guidage / Déplacement vers la droite : lever 

légèrement la barre de guidage.

POUR EVITER D‘ECRASER LE CABLE D‘ALIMENTATION DURANT LE PONCAGE, SE POSER LE CABLE 

SUR L‘EPAULE.

Traduction des instructions d‘origine

Summary of Contents for ESM 1500

Page 1: ...chleifmaschine ESM 1500 Enkelschijf slijpmachine ESM 1500 Ponceuse monodisque ESM 1500 Molatrice monopiatto ESM 1500 Single disc sanding machine ESM 1500 Jednokotoučového brousícího stroje ESM 1500 DE NL FR IT GB CZ ...

Page 2: ... 49 20 112 Fax 49 0 2 02 49 20 244 kostenlose Service Hotline 08 00 7 86 72 47 kostenlose Bestell Hotline 08 00 7 86 72 44 kostenloses Bestell Fax 08 00 7 86 72 43 nur innerhalb Deutschlands Inhaltsverzeichnis Seite 1 Sicherheits Hinweise 2 1 1 Elektrischer Anschluss 3 1 2 Personal 3 1 3 Betrieb 4 2 Produktinformation 4 2 1 Technische Beschreibung 4 2 2 Anwendungsgebiete 4 2 3 Technische Daten 5 2...

Page 3: ...r Stecker müssen von einer Elektrofachkraft oder von einer autorisierten STORCH Service Station kostenlose Tech nik Hotline 0800 7867247 ersetzt werden Die Erdungsleitung nie abschalten oder unbrauchbar machen Der Gebrauch dieser Maschine in einem nicht geerdeten Stromkreis kann zu Todesfällen durch Stromschlag führen Lassen Sie das Gerät von einer Elek trofachkraft oder einer autorisierten STORCH...

Page 4: ...ll dass die Maschine nicht bestimmungsgemäß eingesetzt wird geschieht dies in der alleinigen Verantwortung des Anwenders Jegliche Haftung des Her stellers entfällt somit 2 Produktinformation 2 1 Technische Beschreibung Die STORCH Einscheiben Schleifmaschinen ESM 1500 entfernt kraftvoll Belagreste schleift Estriche aller Art und gespachtelte Unterböden Durch ein vielseitiges Zubehörsortiment findet...

Page 5: ...inscheiben Schleifmaschine ESM 1500 Wir empfehlen grundsätzlich aus gesundheitstechnischen Gründen zwingend bei allen Schleifarbeiten Abtragsarbeiten die ESM 1500 mit Absaugmanschette und dem STORCH Schleifstaubsauger Vac Tec 25 Art Nr 65 15 00 einzuset zen Montageanleitung der Absaugmanschette optionales Zubehör an der ESM 1500 Lieferumfang Absaugmanschette Saugring komplett mit Manschette Kletth...

Page 6: ... Sie den Kletthaftring so dass die gewünschte Höhe bis zum Boden hin erreicht wird Abb 8 Staubsauger anschließen Schließen Sie den Saugschlauch des Schleifstaubsaugers ebenfalls am Y Verteilerad apter an und befestigen Sie diesen mit der Schlauchhalterung o Abb an der Füh rungsstange der Schleifmaschine Abb 4 Absaugstutzen Abb 5 Abb 6 Abb 7 Abb 8 2 6 Werkzeuge für ESM 1500 Filzschleifteller zur Au...

Page 7: ...leitungen Steckern Kupplungen Sicherungen oder Steckdosen müssen die vom Hersteller vorgegebenen technischen Daten bzw Originalersatzteile verwendet werden Die Kupplungen von Anschluss oder Verlängerungslei tungen müssen Spritzwassergeschützt sein 3 3 Vorschriften Niemals die Maschine bei senkrecht gestellter Führungsstange transportieren Beim Transport in Aufzügen sind die jeweils geltenden Benut...

Page 8: ...Netzanschluss herstellen MASCHINE BEIM EINSCHALTEN UND ARBEITEN FEST UND SICHER MIT BEIDEN HÄNDEN FÜH REN NICHT VERKRAMPFT HALTEN b Die Führungsstange durch Ziehen des rechten unteren Hebels in die gewünschte körpergerechte Arbeitsstellung abkip pen und einrasten lassen Hebel loslassen c Taste auf der Rückseite des Schaltergehäuses drücken und Schalterhebel betätigen Sicherung gegen unbeabsichtigt...

Page 9: ... aus klopfen ggf Staubauffangbeutel leeren Wartung im Sinne von Maschinen Gerätedurchsicht und Instandsetzung einschließlich das Auswechseln der Anschlussleitung und das Wechseln der Kohlebürsten am Kollektor der Saugmotoren ist nur durch STORCH und autorisierten STORCH Service Stationen zulässig Kostenlose STORCH Technik Hotline 0800 7867147 Bei Verwendung von Verlängerungsleitungen oder Ersatz v...

Page 10: ...10 Antrieb komplett Originalanleitung ...

Page 11: ...Gegengewicht 1 23 Scheibe A 6 4 2 24 Zylinderschraube M6x25 2 25 Kabelbinder 1 26 Spannband 1 27 Linsenschraube M4x8 1 28 Linsenschraube M3x16 2 29 Klemmleiste 4 pol 1 30 Linsenschraube CM5x10 2 31 Schaltkasten Oberteil blau 1 32 Scheibe A 4 3 4 33 Linsenschraube M4x8 4 34 Gerätesteckdose 10A 1 35 Gerätestecker 1 36 Linsenschraube M4x6 1 37 Zahnscheibe J4 3 1 38 Schaltkasten Unterteil blau 1 39 Sc...

Page 12: ...12 Führungsstange komplett Originalanleitung ...

Page 13: ...e 1 104 6 Kt Mutter M5 1 105 6 Kt Mutter M5 1 106 Rastenstück 1 107 Druckfeder 1 108 Scheibe 15x25x1 1 109 Spannhülse 4x20 1 111 Anschlußleitung 3x1x1 25m 1 112 Flanschnapf 1 113 Kabelmuffe mit Flansch 1 114 Linsenschraube M4x10 6 115 Klemmbügel 1 116 Erdungszeichen 1 117 Linsenschraube M4x10 2 118 Zahnscheibe J4 3 1 119 Tankträger 4 120 Zylinderschraube M5x45 4 121 4 Kt Mutter M5 6 122 Silikonsch...

Page 14: ...stik Center in Berka oder an eine von uns autorisierte Service Station eingeschickt wird Gewährleistungs bzw Garantieanspruch Ansprüche bestehen ausschließlich an Werkstoff oder Fertigungsfehler sowie ausschließlich bei bestimmungsgemäßer Verwendung des Geräts Verschleißteile fallen nicht unter derartige Ansprüche Sämtliche Ansprüche erlöschen durch den Einbau von Teilen fremder Herkunft bei unsac...

Page 15: ...mer 62 70 00 den einschlägigen Bestimmungen folgender Richtlinien entspricht Maschinenrichtlinie 2006 42 EG EMV Richtlinie 2014 30 EU Angewandte harmonisierte Normen EN 60 335 1 A2 2006 EN 60335 2 67 2005 EN 12100 1 2003 EN 12100 2 2003 EN ISO 13857 2008 EN 61000 3 2 2006 EN 61000 4 11 2004 EN 55014 2 2006 EN 55014 1 1997 A1 2001 A2 2008 Bevollmächtigter für die Zusammenstellung der technischen Un...

Page 16: ...44 Gratis service hotline 08 00 7 86 72 47 Gratis bestel hotline 08 00 7 86 72 44 Gratis bestel fax 08 00 7 86 72 43 alleen binnen Duitsland Inhoudsopgave Pagina 1 Veiligheidsrichtlijnen 16 1 1 Elektrische aansluiting 17 1 2 Personeel 17 1 3 Gebruik 18 2 Productinformatie 18 2 1 Technische beschrijving 18 2 2 Toepassingsgebieden 18 2 3 Technische gegevens 19 2 4 Levering 19 2 5 Toebehoren niet mee...

Page 17: ...et beschadigde kabel of stekker werken Versleten of beschadigde kabels of stekkers moeten door een elektrotechnicus of een door STORCH geautoriseerd servicestation gratis technische hotline 0800 7867247 worden vervangen De aardingsleiding nooit uitschakelen of buiten werking stellen Het gebruik van deze machine in een niet geaard stroomcircuit kan tot dodelijke ongevallen vanwege elektrische schok...

Page 18: ...de voorschriften wordt gebruikt gebeurt dit op vol ledige verantwoordelijkheid van de gebruiker Iedere vorm van aansprakelijkheid van de fabrikant vervalt hiermee 2 Productinformatie 2 1 Technische beschrijving De STORCH enkelschijf slijpmachine ESM 1500 verwijdert op krachtige wijze vloerbedekking en slijpt estrik van alle soorten en geplamuurde onder vloeren Dankzij een breed assortiment toebeho...

Page 19: ...aals zuigwerking voor enkelschijf slijpmachine ESM 1500 Wij raden u om gezondheidsredenen met klem aan bij alle schuur verwijderingswerkzaamheden de ESM 1500 met afzuigring en de STORCH spanenzuiger Vac Tec 25 art nr 65 15 00 te gebruiken Montage instructies voor de afzuigring optioneel toebehoren aan de ESM 1500 Levering afzuigring Zuigring compleet met afdichting sluitring 2 zuigslangen met Y ve...

Page 20: ...nste hoogte tot onderaan wordt bereikt afb 8 Stofzuiger aansluiten Sluit de zuigslang van de spanenzuiger ook op de Y verdeleradapter aan en bevestig deze met de slanghouder afb aan de geleistang van de slijpmachine Afb 4 Afzuigsteunen Afb 5 Afb 6 Afb 7 Afb 8 2 6 Gereedschappen voor ESM 1500 Vilt schuurplateau voor opname van dubbelzijdig schuurpapier en hardmetalen schuurplateau VE 1 Vervangende ...

Page 21: ...ingen of stopcontacten moeten de door de fabrikant aangegeven technische gegevens resp originele vervangende onderdelen worden gebruikt De koppelingen van aansluit of verlengleidingen moeten spatwaterdicht zijn 3 3 Voorschriften Transporteer de machine nooit met verticaal loodrecht geplaatste geleistang Bij transport in liften dienen de hiervoor geldende gebruiksrichtlijnen en veiligheidsvoorschri...

Page 22: ...t stopcontact BEDIEN DE MACHINE BIJ HET INSCHAKELEN EN TIJDENS HET WERKEN STEVIG MET BEIDEN HAN DEN NIET KRAMPACHTIG VASTHOUDEN b Kantel de geleistang omlaag door aan de hendel rechtsonder te trekken zet de geleistang in de gewenste werkpositie klik hem vast en laat vervolgens de hendel los c Druk op de knop aan de achterkant van de schakelbehuizing en druk op de schakelhendel beveiliging tegen pe...

Page 23: ...oud met betrekking tot machine apparaatinspectie en reparatie inclusief het vervangen van de aansluitleiding en het wisselen van de koolborstels op de collector van de zuigmotoren mag alleen door STORCH en door STORCH geautoriseerde servicestations worden uitgevoerd Gratis technische hotline van STORCH 0800 7867147 Bij gebruik van verlengleidingen of gebruik van aansluitleidingen mag er niet worde...

Page 24: ...24 Aandrijving compleet Vertaling van de originele handleiding ...

Page 25: ...aaggreep 2 22 Contragewicht 1 23 Plaatje A 6 4 2 24 Cilinderschroef M6x25 2 25 Kabelbinder 1 26 Spanband 1 27 Lenskopschroef M4 x 8 1 28 Lenskopschroef M3 x 16 2 29 Klemstrip 4 pol 1 30 Lenskopschroef CM5 x 10 2 31 Schakelkast bovendeel blauw 1 32 Plaatje A 4 3 4 33 Lenskopschroef M4 x 8 4 34 Apparaatcontactdoos 10A 1 35 Apparaatstekker 1 36 Lenskopschroef M4 x 6 1 37 Tandschijf J4 3 1 38 Schakelk...

Page 26: ...26 Geleistang compleet Vertaling van de originele handleiding ...

Page 27: ...Trekstang 1 104 6 kt moer M5 1 105 6 kt moer M5 1 106 Ruststuk 1 107 Drukveer 1 108 Plaatje 15x25x1 1 109 Spanhuls 4x20 1 111 Aansluitleiding 3x1x1 25m 1 112 Tussenplaatje 1 113 Kabelmof met flens 1 114 Lenskopschroef M4 x 10 6 115 Klembeugel 1 116 Aardringsteken 1 117 Lenskopschroef M4 x 10 2 118 Tandschijf J4 3 1 119 Tankdrager 4 120 Cilinderschroef M5x45 4 121 4 kt moer M5 6 122 Siliconenslang ...

Page 28: ...tuur naar onze Logistieke Centrum in Berka of een door ons geautoriseerd servicestation te verzenden Garantieclaims Claims gelden alleen voor materiaal of fabricagefouten en alleen bij reglementair gebruik van het apparaat Voor ver bruiksartikelen gelden deze aanspraken niet Alle claimrechten vervallen bij inbouw van onderdelen van andere fabri kanten bij ondeskundig gebruik en opslag en bij het n...

Page 29: ... 00 aan de geldende bepalingen van de volgende richtlijnen voldoet Machinerichtlijn 2006 42 EG EMV richtlijn 2014 30 EU Toegepaste geharmoniseerde normen EN 60 335 1 A2 2006 EN 60335 2 67 2005 EN 12100 1 2003 EN 12100 2 2003 EN ISO 13857 2008 EN 61000 3 2 2006 EN 61000 4 11 2004 EN 55014 2 2006 EN 55014 1 1997 A1 2001 A2 2008 Verantwoordelijke voor samenstelling van de technische documentatie STOR...

Page 30: ...gne d assistance SAV gratuite 49 800 7 86 72 47 Service gratuit de commande par téléphone 49 800 7 86 72 44 Fax de commande gratuit 49 800 7 86 72 43 uniquement en Allemagne Sommaire Page 1 Consignes de sécurité 30 1 1 Raccordement électrique 31 1 2 Personnel 3 1 1 3 Fonctionnement 32 2 Informations concernant le produit 32 2 1 Description technique 32 2 2 Domaines d application 32 2 3 Caractérist...

Page 31: ...t fiches usés ou endommagés par un électricien qualifié ou par un poste de service STORCH agréé ligne d appels gratuite du service technique 0800 7867247 Ne jamais désactiver ou rendre inefficace le câble de terre L utilisation de cette machine avec un circuit électrique non relié à la terre peut entraîner des décès par électrocution Faire vérifier l appareil par un élec tricien qualifié ou par un...

Page 32: ...on forme la responsabilité en appartient exclusivement à l utilisateur Le fabricant décline alors toute respon sabilité 2 Informations concernant le produit 2 1 Description technique La puissante ponceuse monodisque STORCH ESM 1500 enlève les résidus de revêtements ponce les chapes de tous types et les sols ragréés Grâce à sa gamme d accessoires étendue l ESM 1500 peut être utilisée dans de nombre...

Page 33: ...se monodisque ESM 1500 Par principe nous recommandons pour des raisons de santer d utiliser impérativement pour tous les travaux de ponçage d enlèvement l ESM 1500 avec le manchon d aspiration et l aspirateur de ponçage Vac Tec 25 réf art 65 15 00 de STORCH Instructions de montage pour le manchon d aspiration accessoire optionnel de l ESM 1500 Fourniture du manchon d aspiration Bague d aspiration ...

Page 34: ...sol Fig 8 Brancher l aspirateur Brancher le tuyau d aspiration de l aspirateur de ponçage également à l adaptateur en Y et le fixer au moyen du support de tuyau Fig ci dessus à la barre de guidage de la ponceuse Fig 4 Buse d aspiration Fig 5 Fig 6 Fig 7 Fig 8 2 6 Outils pour l ESM 1500 Plateau de ponçage en feutre pour l application de papier abrasif double face et plateau de ponçage en métal dur ...

Page 35: ...s techniques prescrites par le fabricant ou utiliser des pièces détachées d origine Les raccords des câbles d alimentation ou de rallonge doivent être protégés contre les projections d eau 3 3 Dispositions légales applicables Ne jamais transporter la machine alors que la barre de guidage est positionnée à la verticale Lors du transport dans les ascenseurs tenir compte des consignes respectives app...

Page 36: ...ablir le branchement au secteur LORS DE LA MISE EN MARCHE TENIR LA MACHINE FERMEMENT DES DEUX MAINS SANS LA BLOQUER b Basculer la barre de guidage sur la position de travail ergonomique souhaitée en tirant le levier droit inférieur puis l enclencher et relâcher le levier c Appuyer sur le bouton à l arrière du boîtier de commutateur et actionner le levier de commutateur sécurité contre les mises en...

Page 37: ...sac de filtre le cas échéant La maintenance dans le sens d une révision ou d une réparation de la machine de l appareil y compris le remplacement du câble d alimentation et des charbons du collecteur des moteurs d aspiration ne doit être confiée qu à STORCH et aux postes de service agréés par STORCH ligne d appels gratuite du service technique STORCH 0800 7867147 Lors de l utilisation de rallonges...

Page 38: ...38 Entraînement complet Traduction des instructions d origine ...

Page 39: ...4 Vis à tête cylindrique M6x25 2 25 Collier à câbles 1 26 Sangle de serrage 1 27 Vis à tête cylindrique bombée M4x8 1 28 Vis à tête cylindrique bombée M3x16 2 29 Barrette de serrage 4 pôles 1 30 Vis à tête cylindrique bombée CM5x10 2 31 Coffret de commutation partir supérieure bleue 1 32 Rondelle A 4 3 4 33 Vis à tête cylindrique bombée M4x8 4 34 Prise d appareil 10A 1 35 Fiche d appareil 1 36 Vis...

Page 40: ...40 Barre de guidage complète Traduction des instructions d origine ...

Page 41: ...rou hexagonal M5 1 105 Ecrou hexagonal M5 1 106 Pièce de calage 1 107 Ressort de pression 1 108 Rondelle 15x25x1 1 109 Douille de serrage 4x20 1 111 Câble d alimentation 3x1x1 25m 1 112 Creux de bride 1 113 Manchon de câble avec bride 1 114 Vis à tête cylindrique bombée M4x10 6 115 Etrier de serrage 1 116 Sigle de mise à la terre 1 117 Vis à tête cylindrique bombée M4x10 2 118 Rondelle crantée J4 ...

Page 42: ...ture ou de l expédier à une station SAV que nous avons homologuée Demande de prise en garantie Les demandes couvrent exclusivement les défauts de matériau ou d ouvrage et ne couvrent qu une utilisation conforme à la destination de l appareil Les pièces d usure ne peuvent pas faire l objet d une demande de garantie Tous droit est annulé en cas d intégration de pièces de provenance externe en cas d ...

Page 43: ...e d article 62 70 00 satisfait aux dispositions applicables des directives suivantes Directive Machines 2006 42 EG Directive CEM 2014 30 EU Normes harmonisées appliquées EN 60 335 1 A2 2006 EN 60335 2 67 2005 EN 12100 1 2003 EN 12100 2 2003 EN ISO 13857 2008 EN 61000 3 2 2006 EN 61000 4 11 2004 EN 55014 2 2006 EN 55014 1 1997 A1 2001 A2 2008 Responsable de la compilation de la documentation techni...

Page 44: ... 20 112 Fax 49 0 2 02 49 20 244 Hotline di servizio gratuita 49 0 8 00 7 86 72 47 numero verde ordinazioni 49 0 8 00 7 86 72 44 numero verde ordinazione via fax 49 0 8 00 7 86 72 43 solo in Germania Indice Pagina 1 Indicazioni di sicurezza 44 1 1 Allacciamento elettrico 45 1 2 Personale 45 1 3 Funzionamento 46 2 Informazione sul prodotto 46 2 1 Descrizione tecnica 46 2 2 Campi di applicazione 46 2...

Page 45: ...da un elettricista specializzato oppure da un punto di servizio autorizzato da parte di STORCH numero verde in questi casi 0800 7867247 Non disattivare o rendere inutilizzabile in nessun caso il circuito di messa a terra L utilizzo di questa mac china con un circuito elettrico senza messa a terra può comportare incidenti letali dovuti a scosse elettriche Fare controllare l attrezzo da parte di un ...

Page 46: ...caso di impiego improprio della macchina la responsabilità è tutta dell utente In questi casi il produttore non si assume responsabilità alcuna 2 Informazione sul prodotto 2 1 Descrizione tecnica La molatrice monopiatto ESM 1500 di STORCH rimuove in modo efficace residui di rivestimento rettifica massetto di ogni tipo e sottosuoli stuccati Grazie ad un ampio assortimento di accessori ESM 1500 si l...

Page 47: ...i salute consigliamo assolutamente di impiegare la guarnizione anulare di aspirazione durante lavori di ret tifica e di rimozione eseguiti con l ESM 1500 e l aspiratore di pulviscolo di rettifica di casa STORCH il modello VacTec 25 n art 65 15 00 Guida al montaggio della guarnizione anulare optional all ESM 1500 Fornitura guarnizione anulare Anello aspiratore con guarnizione anello di aderenza in ...

Page 48: ...rata dal pavimento Fig 8 Connettere l aspiratore Inserire anche il tubo flessibile di aspirazione dell aspiratore all adapter distributore a Y e fissarlo con il supporto per il tubo flessibili non raffigurato all asta di guida della molatrice Fig 4 Absaugstutzen Fig 5 Fig 6 Fig 7 Fig 8 2 6 Utensili per ESM 1500 Piatto di rettifica in feltro per alloggiare la carta abrasiva bilaterale e piatto di r...

Page 49: ...alla rete elettrica non sono in uno stato ineccepibile Quando si sostituiscono cavi di collegamento spine giunti fusibili o prese vanno osservati i dati tecnici prescritti dal produttore e utilizzati pezzi di ricambio originali Le guarnizioni dei cavi di collegamento o di prolunga devono essere a prova di spruzzi d acqua 3 3 Norme Non trasportare mai la macchina con un asta giuda in posizione vert...

Page 50: ...CHINA CON ENTRAMBI LE MANI E TENERLA BEN SALDA E SICURA IN FASE DI ACCENSIONE ED IMPIEGO NON TENERLA IN MODO IRRIGIDITO b Portare l asta di guida nella posizione desiderata e comoda per l operatore tirando la leva inferiore a destra e fare incastrare rilasciare la leva c Premere il pulsante sulla parte posteriore della scatola dell inseritore e azionare la leva dell interruttore sicura contro azio...

Page 51: ...cuotere il filtro ed event svuotare il sacchetto raccoglipolvere La manutenzione per quanto riguarda il controllo della macchina e dell attrezzatura e lavori di riparazione tra cui anche la sostituzione di cavi di connessione e la sostituzione delle spazzole di carbone al collettore dei motori di aspirazione va eseguita esclusivamente da STORCH e punti di servizio STORCH autorizzati numero verde a...

Page 52: ...52 Ingranaggio completo Traduzione delle istruzioni originali ...

Page 53: ...la A 6 4 2 24 Vite a testa cilindrica M6x25 2 25 Fermacavo 1 26 Espansore 1 27 Vite a testa bombata M 4 x 8 1 28 Vite a testa bombata M 3 x 16 2 29 Morsettiera 4 poli 1 30 Vite a testa bombata CM 5 x 10 2 31 Cassetta di manovra parte superiore blu 1 32 Rondella A 4 3 4 33 Vite a testa bombata M 4 x 8 4 34 Presa dell attrezzo 10A 1 35 Connettore dell attrezzo 1 36 Vite a testa bombata M 4 x 6 1 37 ...

Page 54: ...54 Asta di guida completa Traduzione delle istruzioni originali ...

Page 55: ... 105 Dado esagonale M5 1 106 Pistone dentato 1 107 Mola di pressione 1 108 Rondella 15x25x1 1 109 Boccola di fissaggio 4x20 1 111 Cavo di alimentazione 3x1x1 25m 1 112 Flangia 1 113 Manicotto per cavo con flangia 1 114 Vite a testa bombata M 4 x 10 6 115 Morsetto di fissaggio 1 116 Contrassegno messa a terra 1 117 Vite a testa bombata M 4 x 10 2 118 Disco dentato J4 3 1 119 Supporto serbatoio 4 12...

Page 56: ...co nostro centro di logistica a Berka oppure ad una service station da noi autorizzata Diritto alla garanzia Il diritti si possono far valere solo per errori di materiale o di produzione nonché esclusivamente in caso di utilizzo appropriato del dispositivo Componenti soggetti a logorio non vengono contemplate da tale diritto Decadranno tutti i diritti di garanzia con l aggiunta delle componenti di...

Page 57: ... 62 70 00 corrisponde alle disposizioni pertinenti delle seguenti normative Direttiva macchine 2006 42 EG Direttiva sulla compatibilità elettromagnetica 2014 30 EU Norme armonizzate applicate EN 60 335 1 A2 2006 EN 60335 2 67 2005 EN 12100 1 2003 EN 12100 2 2003 EN ISO 13857 2008 EN 61000 3 2 2006 EN 61000 4 11 2004 EN 55014 2 2006 EN 55014 1 1997 A1 2001 A2 2008 Procuratore per la composizione de...

Page 58: ...0 786 72 47 Toll free order hotline 49 800 7867244 Toll free order fax 49 800 7867243 only available in Germany Table of contents Page 1 Safety precautions 58 1 1 Electrical connection 59 1 2 Operating personnel 59 1 3 Operation 60 2 Product information 60 2 1 Technical description 60 2 2 Areas of application 60 2 3 Technical Specifications 61 2 4 Scope of delivery 61 2 5 Accessories not included ...

Page 59: ...ug is damaged Worn or damaged cables or plugs must be replaced by a qualified electrician or by an authorised STORCH service station free technical hotline 0800 7867247 Never disconnect or disable the grounding wire Use of this machine with an ungrounded electrical circuit can result in death through electrocution The machine should be checked by a qualified electrician or an authorised STORCH ser...

Page 60: ...s intended use If the machine is not used as intended it is the sole responsibility of the user The manufacturer shall be excluded from any liability in such a case 2 Product information 2 1 Technical description STORCH ESM 1500 single disc sanding machines effectively remove flooring remnants and sand all types of screed and primed subfloors Thanks to a wide range of accessories the ESM 1500 can ...

Page 61: ...e for single disc sanding machine ESM 1500 For health reasons we recommend operating the ESM 1500 sander with a suction sleeve and STORCH industrial vacu um cleaner Vac Tec 25 art no 65 15 00 when conducting any sanding stripping work Instructions for assembling the suction sleeve optional accessory onto the ESM 1500 Accessories supplied with the suction sleeve Suction ring complete with closure r...

Page 62: ... so that the desired height to the ground is established Fig 8 Connecting the vacuum Connect the suction hose from the industrial vacuum to the Y piece adapter and secure it to the guide bar of the sanding machine by using the hose bracket not shown Fig 6 Fig 7 2 6 Tools for the ESM 1500 Felt sanding disc for accommodating double sided sandpaper and carbide sanding discs 1 per pack Replacement fel...

Page 63: ...tions prescribed by the manufacturer must be adhered to and original spare parts used The couplings used for connecting or extension cables must be splash proof 3 3 Regulations Never transport the machine with the guide bar in a vertical position When using hoisting equipment to transport the machine the relevant user instructions and safety regulati ons particularly those with regard to load carr...

Page 64: ... mains connection WHEN SWITCHING ON AND USING THE MACHINE HOLD IT FIRMLY AND SECURELY IN BOTH HANDS DO NOT CLENCH TOO TIGHTLY b Tilt the guide bar to the desired working position by actuating the lower right hand lever and engage it in place then release the lever c Press the button on the rear of the switch housing and actuate the switch lever protection against accidental activati on d Release t...

Page 65: ... vacuum Knock the dust from the filter or empty the dust bag if necessary Maintenance procedures in terms of of machine equipment inspection and repair including replacement of the connecting cable and changing the carbon brushes on the suction motor are only permitted by STORCH and authorised STORCH service stations Free STORCH technical hotline 0800 7867147 The PVC cable H05VV F according to DIN...

Page 66: ...66 Drive mechanism complete Translation of the original instruction ...

Page 67: ... handle 2 22 Counter weight 1 23 Washer A 6 4 2 24 Cylinder screw M6x25 2 25 Cable tie 1 26 Strap 1 27 Fillister head screw M4x8 1 28 Fillister head screw M3x16 2 29 Terminal strip 4 pin 1 30 Fillister head screw CM5x10 2 31 Switching unit upper part blue 1 32 Washer A 4 3 4 33 Fillister head screw M4x8 4 34 Female connector 10A 1 35 Male connector 1 36 Fillister head screw M4x6 1 37 Toothed washe...

Page 68: ...68 Guide bar complete Translation of the original instruction ...

Page 69: ...ngaging piece 1 107 Pressure spring 1 108 Washer 15x25x1 1 109 Clamping sleeve 4x20 1 111 Connecting cable 3x1x1 25m 1 112 Flange 1 113 Cable sleeve with flange 1 114 Fillister head screw M4x10 6 115 Clamping bracket 1 116 Earth sign 1 117 Fillister head screw M4x10 2 118 Toothed washer J4 3 1 119 Tank holder 4 120 Cylinder screw M5x45 4 121 Square nut M5 6 122 Silicone hose 15 mm 1 123 Bracket 1 ...

Page 70: ...r invoice to our logistics centre in Berka postage paid or send it to one of our authorised service centres Your rights under our warranty or guarantee Claims for repairs only relate to material or manufacturing defects and are subject to the intended use of the equip ment Wear parts are not covered by such claims Installation of third party components improper use and storage as well as obvious f...

Page 71: ...omplies with the relevant provisions of the following directives Machinery Directive 2006 42 EG EMC Directive 2014 30 EU Applied harmonised standards EN 60 335 1 A2 2006 EN 60335 2 67 2005 EN 12100 1 2003 EN 12100 2 2003 EN ISO 13857 2008 EN 61000 3 2 2006 EN 61000 4 11 2004 EN 55014 2 2006 EN 55014 1 1997 A1 2001 A2 2008 Authorised agent for compilation of the technical documents STORCH Malerwerk...

Page 72: ...12 Fax 49 0 2 02 49 20 244 bezplatná linka Hotline servis 08 00 7 86 72 47 bezplatná linka Hotline objednávky 49 800 7 86 72 44 bezplatný fax objednávky 49 800 7 86 72 43 pouze v Německu Obsah Strana 1 Bezpečnostní pokyny 72 1 1 Elektrické připojení 73 1 2 Personál 73 1 3 Provoz 74 2 Informace o produktu 74 2 1 Technický popis 74 2 2 Oblasti použití 74 2 3 Technické údaje 75 2 4 Rozsah dodávky 75 ...

Page 73: ...vejte s poškozeným přívodním kabelem nebo zástrčkou Opotřebené nebo poškozené kabely nebo zástrčky musí vyměnit odborný elektro pracovník nebo autorizovaný servis STORCH bezplat ná linka Technika Hotline 0800 7867247 Zemnící vedení neodpojujte ani ho nečiňte nepoužitelným Používání tohoto stroje v neuzemněném elek trickém obvodu může vést ke smrtelným úrazům zasažením elektrickým proudem Nechte př...

Page 74: ...ně v souladu s určením Pro případ že stroj není používán v souladu s určením děje se tak výhradně na zodpovědnost uživatele Jakékoli ručení výrobce tím odpadá 2 Informace o produktu 2 1 Technický popis Jednokotoučový brousící stroj ESM 1500 firmy STORCH odstraňuje silou zbytky krytin brousí potěry všeho druhu a vystěrkované podklady Díky mnohostrannému sortimentu příslušenství nachází ESM 1500 roz...

Page 75: ...jednokotoučový brousící stroj ESM 1500 Zásadně doporučujeme ze zdravotně technických důvodů během veškerých prací při broušení odstraňování krytiny stroj ESM 1500 bezpodmínečně používat s odsávací manžetou a s vysavačem prachu z broušení STORCH Vac Tec 25 obj č 65 15 00 Montážní návod k odsávací manžetě volitelné příslušenství u stroje ESM 1500 Rozsah dodávky odsávací mažeta Sací prstenec kompletn...

Page 76: ...é výšky k podlaze obr 8 Připojení vysavače Připojte sací hadici vysavače k odsávaní prachu z broušení rovněž u rozdělovacího adaptéru ve tvaru Y a připevněte ho držákem hadic obr nahoře k vodící tyči brousícího stroje Obr 4 Odsávací hrdlo Obr 5 Obr 6 Obr 7 Obr 8 2 6 Nástroje pro ESM 1500 Plstěný brusný talíř k uchycení dvoustranného brusného papíru a brusného talíře z tvrdokovu VE 1 Náhradní plstě...

Page 77: ... naprosto bezvadný Při výměně připojovacího vedení zástrček spojek jištění nebo zásuvek musí být dodrženy výrobcem uvedené technické údaje příp musí být použity originální náhradní díly Spojky u připojovacího nebo prodlužovacího vedení musí být chráněny před odstřikující vodou 3 3 Předpisy Nikdy netransportujte stroj se svisle nastavenou vodící tyčí Při transportu ve výtahu je třeba vždy dodržovat...

Page 78: ... RUKAMA PEVNĚ A JISTĚ NEDRŽTE HO KŘEČOVITĚ b Vodící tyč zatáhnutím za pravou dolní páku sklopte do požadované pracovní polohy vhodné pro Vaše tělo a nechte zapadnout potom páku opět pusťte c Stiskněte tlačítko na zadní straně krytu spínače a stiskněte páku spínače jištění proti neúmyslnému zapnutí d Tlačítko opět pus ťte stroj je zapnutý Pokud pustíte páku spínače stroj se vypne K zapnutí a při pr...

Page 79: ...yklepejte příp vyprázdněte sáček k zachycování prachu Údržba ve smyslu prohlídka a oprava strojů přístrojů včetně výměny připojovacího vedení a výměny uhlí kových kartáčků u kolektoru sacích motorů je přípustná pouze servisem firmy STORCH a autorizovaným servisem firmy STORCH Bezplatná Hotline STORCH Technika 0800 7867147 Při použití prodlužovacího vedení nebo náhradě za připojovací vedení nesmí d...

Page 80: ...80 Pohon kompletní Překlad originálu návodu ...

Page 81: ... A 6 4 2 24 Šroub s válcovou hlavou M6x25 2 25 Vazač kabelů 1 26 Upínací pás 1 27 Šroub s čočkovitou hlavou M4x8 1 28 Šroub s čočkovitou hlavou M3x16 2 29 Svorková lišta 4 pol 1 30 Šroub s čočkovitou hlavou CM5x10 2 31 Spínací skříň horní díl modrá 1 32 Podložka A 4 3 4 33 Šroub s čočkovitou hlavou M4x8 4 34 Zástrčka přístroje 10A 1 35 Zásuvka přístroje 1 36 Šroub s čočkovitou hlavou M4x6 1 37 Ozu...

Page 82: ...82 Vodící tyč kompletní Překlad originálu návodu ...

Page 83: ...tice M5 1 106 Zarážkový kus 1 107 Přítlačná pružina 1 108 Podložka 15x25x1 1 109 Upínací pouzdro 4x20 1 111 Připojovací vedení 3x1x1 25m 1 112 Přírubová krytka 1 113 Kabelová spojka s přírubou 1 114 Šroub s čočkovitou hlavou M4x10 6 115 Upínací třmen 1 116 Zemnící značka 1 117 Šroub s čočkovitou hlavou M4x10 2 118 Ozubený kotouč J4 3 1 119 Nosič nádrže 4 120 Šroub s válcovou hlavou M5x45 4 121 4 h...

Page 84: ...našeho střediska Logisitk Center v Berka nebo do námi autorizované servisní stanice Nárok na záruku příp garanci Nároky na záruku existují výhradně u materiálu nebo výrobní vady a také výhradně při používání přístroje v souladu s určeným účelem Díly podléhající opotřebení nespadají do takovýchto nároků Veškeré nároky zanikají zamontováním dílů cizího původu při nepřiměřeném zacházení a skladování ...

Page 85: ...robku 62 70 00 odpovídá příslušným ustanovením následujících směrnic Směrnice o strojích 2006 42 EG Směrnice o elektromagnetické kompatibilitě 2014 30 EU Použité harmonizované normy EN 60 335 1 A2 2006 EN 60335 2 67 2005 EN 12100 1 2003 EN 12100 2 2003 EN ISO 13857 2008 EN 61000 3 2 2006 EN 61000 4 11 2004 EN 55014 2 2006 EN 55014 1 1997 A1 2001 A2 2008 Zplnomocněnec k sestavení technických podkla...

Page 86: ...86 ...

Page 87: ...87 ...

Page 88: ...poussièredeponçageVacTec25 62 15 31 Sachet de filtre Art Nr Bezeichnung 62 70 00 ESM 1500 62 70 05 Absaugmanschette 62 70 21 Filzschleifteller 62 70 22 Ersatz Filzmatte Schleifpapier Doppelseitig Ø 375 mm 62 70 53 Körnung 16 62 70 54 Körnung 24 62 70 55 Körnung 30 62 70 56 Körnung 40 62 70 57 Körnung 60 Hartmetall Schleifteller Ø 375 mm 62 70 44 Körnung 24 62 70 45 Körnung 36 62 15 00 Schleifstaub...

Reviews: