background image

76

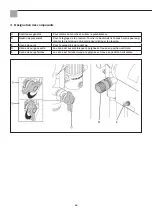
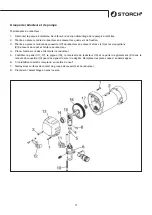
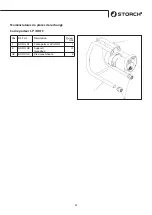
(suite) Remontage de la pompe à matériau

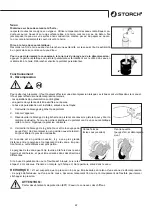
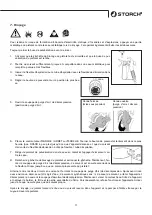
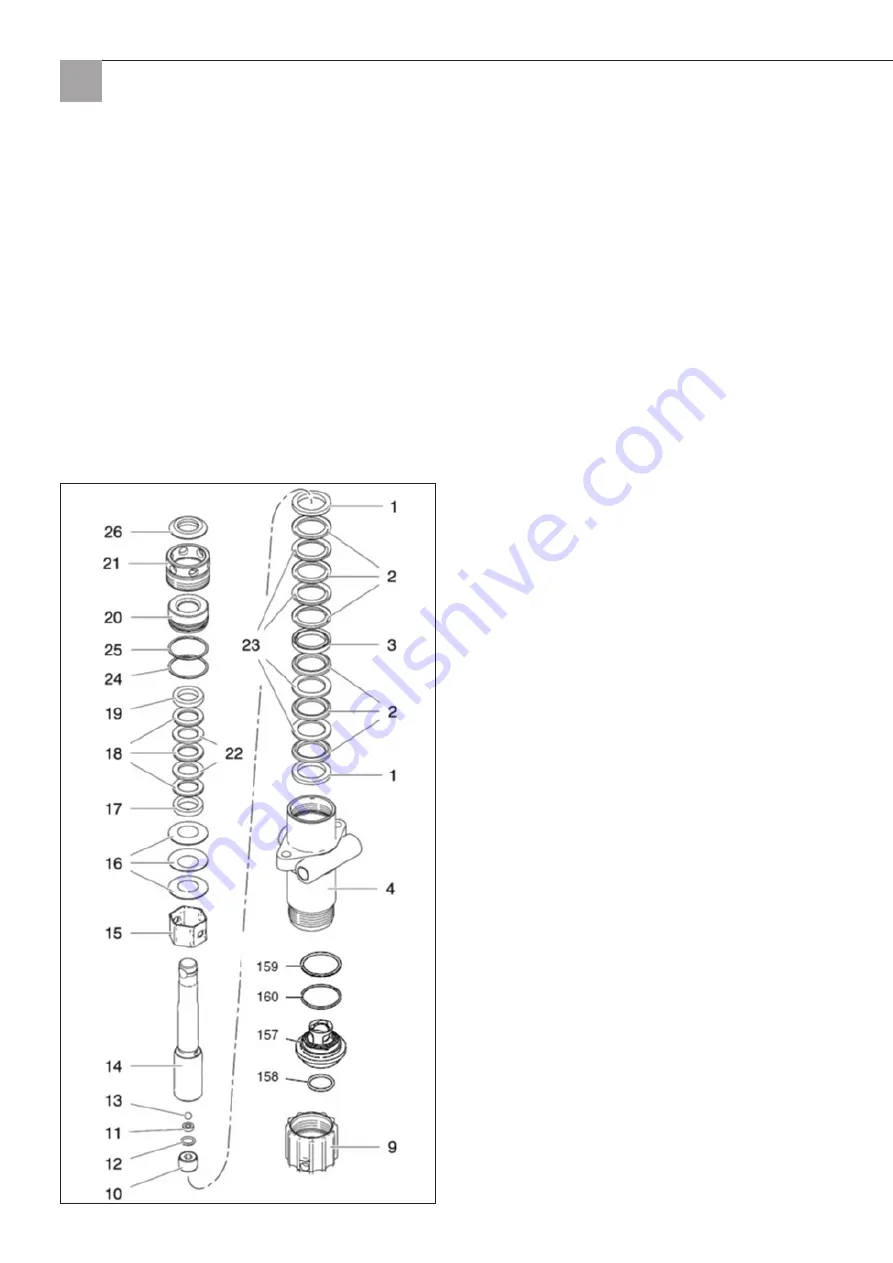
13. Prendre le cadre support de garniture (20) et remplacer le joint torique blanc (24) et le joint torique noir (25) par les 

joints toriques du kit de garnitures.
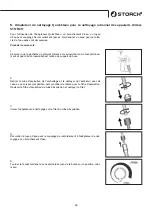
14. Faire glisser le cadre support de garniture (20) sur la partie supérieure des garnitures supérieures afin qu'elles rent-

rent.
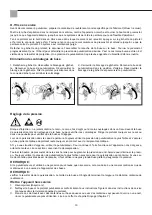
15. Lubrifier l'intérieur du boîtier de la pompe à matériau (4) et l'extérieur des garnitures avec de l'huile à piston.
16. Faire glisser l'ensemble dans le boîtier de la pompe à matériau.

REMARQUE :

Pour fixer les garnitures dans la position correcte, le boîtier de la pompe doit être tenu à l'envers et toute l'unité doit 

être glissée en haut dans le boîtier de la pompe à matériau. Remettre le boîtier de la pompe à l'endroit lorsque le 

module est positionné à l'intérieur pour garder toutes les parties à l'intérieur.
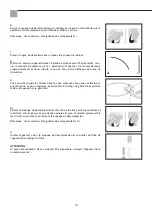
17. Serrer l'écrou de garniture (21) sur le dessus du boîtier de la pompe à matériau jusqu'à ce qu'une légère résistance 

contre les ressorts à disque (16) se fasse sentir. Serrer l'écrou à l'aide de l'outil de réglage de garniture encore trois 

quarts de tour. Le couple de serrage des écrous de garniture est de 2,7 Nm.
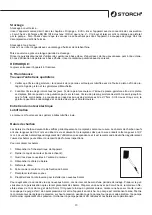
18. Remonter la pompe à matériau.

Summary of Contents for LP 400 F

Page 1: ...Airless LP 400 F DE NL FR IT GB CZ ...

Page 2: ...satz in explosionsgefährdeten Bereichen zugelassen DE Vielen Dank für Ihr Vertrauen zu STORCH Mit dem Kauf haben Sie sich für ein Qualitäts Produkt entschieden Haben Sie trotzdem Anregungen zur Verbesserung oder aber vielleicht einmal ein Problem so freuen wir uns sehr von Ihnen zu hören Bitte sprechen Sie mit Ihrem Außendienst Mitarbeiter oder in dringenden Fällen auch mit uns direkt Mit freundli...

Page 3: ...ng Den Stecker nur in eine dem Stecker entsprechende Steckdose einstecken Das Produkt nicht über ein Netzteil anschließen Keine Adapter verwenden Verlängerungskabel Ausschließlich ein geerdetes dreipoliges Verlängerungskabel mit entsprechendem Stecker und einer dem Gerätestecker entsprechenden Steckdose verwenden Darauf achten dass das Verlängerungskabel unbeschädigt ist Falls ein Verlängerungskab...

Page 4: ...chtigtes Gerät nicht unter Spannung oder unter Druck lassen Wenn das Gerät nicht verwendet wird ausschalten und den Vorgang zur Druckentlastung zum Ausschalten des Gerätes durchführen Beim Hochdruckspritzen können Gifte in den Körper injiziert werden und zu ernsthaften Körperverletzungen führen Bei einer Injektion umgehend einen Chirurg aufsuchen Schläuche und Teile auf Anzeichen von Beschädigunge...

Page 5: ...en die solche Lösungsmittel enthalten Viele andere Flüssigkeiten enthalten möglicherweise auch Chemikalien welche mit Aluminium reagieren können Informieren Sie sich beim Materiallieferanten über die Verträglichkeit GEFAHR DURCH BEWEGLICHE TEILE Bewegliche Teile können Finger und andere Körperteile quetschen schneiden oder abtrennen Anlage nicht ohne Schutzeinrichtungen oder Abdeckungen verwenden ...

Page 6: ...ersinn um den Druck zu erhöhen bzw gegen den Uhrzeigersinn um den Druck zu verringern C Entlüftungsventil Zur Entlüftung der Pumpe D Geöffnetes Entlüftungsventil Das Ventil ist geöffnet wenn sich der Griff in der senkrechten Stellung befin det E Geschlossenes Entlüftungs ventil Das Ventil ist geschlossen wenn sich der Griff in der waagerechten Stellung befindet ...

Page 7: ...edene Richtungen zeigen Ist die Spritzdüse oder der Schlauch verstopft befolgen Sie die Schritte 1 bis 4 oben Stellen Sie sich darauf ein dass bei Schritt 3 Farbe in den Eimer gelangen wird HINWEIS Wenn Sie vermuten dass der Druck aufgrund eines defekten Entlüftungs Druckentlastungsventils oder einer anderen Ursache nicht abgelassen werden konnte lösen Sie langsam die Mutter der Schlauchkupplung u...

Page 8: ... ausschalten Ursache prüfen siehe Kapitel 11 Lösemittel und wasserbasierende Materialien Wird von einem Material auf Wasserbasis auf ein Material mit Lösemittelbasis umgestellt muss das gereinigte Gerät zuerst kurz mit dem entsprechenden Lösemittel gespült werden Nach der Verarbeitung von lösemittelbasierenden Materialien ist das Gerät stets erst mit dem entsprechenden Löse mittel dann mit Wasser ...

Page 9: ...n Auslösen gesi chert und die Wendedüse aus der Düsenhalterung entfernt ist 2 Nehmen Sie das Ansaugrohr aus dem Gebinde und reinigen dieses inkl des Ansaugfilters äußerlich mit Wasser oder dem kompatiblen Lösemittel Schrauben Sie den Ansaugfilter vom Ansaugrohr und reinigen das Gewinde 3 Schrauben Sie den Reinigungsadapter auf das Gewinde des Ansaugrohres 4 Verbinden Sie den Wasserschlauch mit der...

Page 10: ...ess Pistole in und an den inneren Rand des Eimers mit dem aufgefangenen Schmutzwasser entriegeln die Abzugssperre an der Airless pistole und ziehen und halten den Pistolenabzug 10 Nun schließen Sie das Druckentlastungsventil und das Wasser fließt jetzt durch den Airless Schlauch und die Pistole Spülen Sie so lange bis klares Wasser aus tritt Wechseln Sie einige Male zw den beiden Kreisläufen durch...

Page 11: ... austritt 7 Richten Sie die Spritzpistole in den Metalleimer und drücken diese fest gegen den Eimer 8 Lösen Sie die Abzugssperre der Pistole und betätigen den Abzug Schließen Sie nun das Entlüftungs Druckentlastungsventil Das Lösemittel wird dann in den Schlauch geleitet Spülen Sie so lange bis sauberes Lösemittel aus der Pistole austritt Wechseln Sie zwischen den beiden Kreisläufen durch öffnen u...

Page 12: ...mmer in Kontakt mit dem Metallbehälter bleibt Kommt es zu einem Notfall schalten Sie das Spritzgerät ab Wollen Sie den Betrieb des Geräts im Notfall anhalten schalten Sie den Motor aus Lesen Sie den Abschnitt zur Druckentlastung Drehen Sie den Druckreglerknopf im Uhrzeigersinn um den Druck zu erhöhen bzw gegen den Uhrzeigersinn um den Druck zu verringern Verwenden Sie immer den geringsten Druck de...

Page 13: ...ng Der Motor wird mit lebendauergeschmierten Kugellagern angeliefert Kohlebürsten Die Kohlebürsten müssen in regelmäßigen Abständen überprüft und je nach Verschleiß ausgetauscht werden Neue Kohlebürsten haben zu Beginn eine Länge von 25 4 mm und sollten ausgetauscht werden sobald diese auf 12 7 mm abgenutzt ist Der Bürstenverschleiß hängt größtenteils von der jeweiligen Anwendung ab und es wird em...

Page 14: ...ie Verbindungsstange 2 und den Kolben hindurch Schieben Sie die Hülse 3 hoch über den Stift 1 der Verbindungsstange und schieben Sie den Spreng ring 4 in die Nut der Verbindungsstange 2 3 Schieben Sie die zwei Rohrdistanzstücke 11 zwischen Materialpumpe 9 und Abdeckung 14 und schieben Sie die zwei Schrauben 8 durch die Distanzstücke und schrauben diese gleichmäßig abwechselnd fest 4 Bauen Sie die ...

Page 15: ...lache Sei te 2 Nehmen Sie drei der unteren Polyethylen Packungen 2 und zwei der Leder Packungen 23 und setzen Sie diese mit der nach innen gewölbten Seite nach unten in folgender Reihenfolge auf den Stützring 1 Polyethylen Leder Polyethylen Leder Polyethylen 3 Nehmen Sie die Adapterbuchse 3 die auf beiden Seiten nach innen gewölbt ist und setzen Sie diese auf die zusammengesetzten unteren Packunge...

Page 16: ...ehäuse HINWEIS Um die Packungen in der richtigen Position zu sichern muss das Pumpengehäuse verkehrt herum gehalten und die gesamte Einheit nach oben in das Materialpumpengehäuse geschoben werden Kippen Sie nachdem die Baugruppe im Inneren positioniert ist das Pumpengehäuse zurück um alle Teile im Inneren zu halten 17 Ziehen Sie die Packungsmutter 21 oben auf dem Materialpumpengehäuse fest bis Sie...

Page 17: ...er Abdeckung und der Rückseite des Getriebes entfernen 4 Legen Sie die Einheit auf die Rückseite und demontieren Sie das Getriebe 5 Überprüfen Sie die Lager 14 17 das Getrieberad 16 die Getriebekurbel 15 und das Gleitlager 9 in der Deckel baugruppe 13 auf Verschleiß Schäden Tauschen Sie verschlissene beschädigte Teile aus 6 Muss das Getriebefett ausgetauscht werden ersetzen Sie dieses durch neues ...

Page 18: ...r Steuerkarte verbunden ist Das Gerät kann nicht betrieben werden wenn Drähte getrennt oder geknickt sind Vergewissern Sie sich beim Wieder zusammenbau dass alle Drähte angeschlossen sind und nicht geknickt werden EIN AUS Schalter 1 Senken Sie die Druckreglereinheit wie oben beschrieben ab 2 Trennen Sie die zwei Kabel des EIN AUS Schalters 3 Lösen Sie die Mutter auf der Schaltachse mittels eines 9...

Page 19: ...annte Sicherung Sicherung auswechseln 220 240 V Modelle Träge 8 A Sicherung Das Gerät lässt sich nicht starten Steuereinstellungen Vergewissern Sie sich dass der Netzstecker des Geräts eingesteckt ist Vergewissern Sie sich dass der EIN AUS Schalter in der EIN Stellung steht und der Druck reglerknopf ganz nach rechts im Uhrzeigersinn gestellt wurde max Druck Druckreglereinheit Steuerkarte Leuchtet ...

Page 20: ...ten Einlassventil Pos Art Nr Beschreibung Menge 8 69 02 20 Farbstufengehäuse 1 13 69 02 33 Überwurfmutter 1 157 69 03 96 Einlassventileinheit 1 158 159 160 69 03 97 Dichtungssatz für Einlassventileinheit 1 Pack 3 Stück 1 ...

Page 21: ...21 Ersatzteillisten Tragegestell LP 400 F Pos Art Nr Beschreibung Menge 1 69 04 01 Tragegestell LP 400 F 1 2 69 04 02 Halterung Außengewinde 4 42 69 02 42 Gummifuss 2 ...

Page 22: ...22 Ersatzteillisten Motor Antrieb ...

Page 23: ...tt 1 23 69 01 08 Sechskantschraube 2 24 69 02 47 Distanzhülse 2 25 69 04 07 Dichtung Klemmkasten 1 26 69 04 08 Klemmkasten LP 400 F 1 28 69 04 09 Linsenschraube für Klemm kasten LP 400 F 4 30 69 02 63 Zugentlastung 2 31 69 04 11 Mutter Klemmkasten LP 400 F ohne Abbildung 2 33 69 04 12 Schraube Befestigung Klemmkasten LP 400 F 2 35a 69 02 40 Lager 1 35b 69 02 43 Gleitlager 1 35c 69 02 51 Unterlegsc...

Page 24: ...sventilsitz 1 12 69 02 50 O Ring 1 13 69 02 30 Auslassventilkugel 1 14 69 02 48 Kolben komplett 10 14 1 15 69 02 23 Distanzhülse 1 16 69 02 28 Tellerfeder 3 17 69 02 26 Stützring 1 18 69 02 27 Obere Packungsdichtung 3 19 69 02 25 Aufnahme mit Nut für obere Packung 1 20 69 02 24 Dichtungshalter 1 21 69 02 36 Packungsmutter 1 22 69 02 81 Obere Packungsdichtung Leder 2 23 69 02 80 Untere Packungsdich...

Page 25: ... Schraube 2 HINWEIS Wird Bauteil 1 ausgetauscht geben Sie auf das Äuße re der Hülse gleichmäßig ein paar Tropfen Loctite 246 bevor Sie es in die Deckelbaugruppe einsetzen Pos Art Nr Beschreibung Menge 1 69 02 76 Ansaugschlauch 1 2 69 09 01 Ansaugfilter 1 4 69 04 16 Bypass Schlauch komplett LP 400 F 1 5 69 70 56 Auslass Bypass Schlauch 1 6 69 04 17 Anschlussadapter 1 ...

Page 26: ...midichtung Druckreg ler Kabel 1 28 69 04 09 Linsenschraube Klemm kasten LP 400 F 6 29 69 04 11 Sicherungsmutter 2 30 69 02 63 Zugentlastung 2 31 69 01 87 Ein Aus Schalter 1 32 69 04 23 Gummimuffe Ein Aus Schalter 1 33 69 04 12 Schraube M8 x 12 2 34 69 04 25 Steuerkarte 230 V LP 400 F 1 37 69 04 26 Verbinder 230 V für Steuerkarte LP 400 F 1 ...

Page 27: ...ün oder grün gelb Erdung schwarz braun blau weiss rot Ersatzteillisten Verdrahtung der Steuerung Pos Art Nr Beschreibung Menge 1 69 01 93 Netzkabel 1 3 69 01 87 Ein Aus Schalter 1 7 69 04 18 Druckregler LP 400 F 1 zum Motor Druckregler ...

Page 28: ...d sicher festziehen 9 Den Schutzbügel 4 wieder an der Arretierung 22 anbringen Reparatur Austausch der Nadel Druckentlastung ACHTUNG 1 Druck entlasten die Abzugsbügel arretieren 2 Düse 36 und Düsenschutz 35 von der Pistole abnehmen und Druck entlasten 3 Den Materialschlauch von Pistole und Drehgelenk 5 lösen 4 Den Abzug ziehen während der Diffusor 15a losge schraubt wird 5 Sicherungsmutter 9 und E...

Page 29: ...tolenfilter 100 M 009 1 7 69 06 78 Dichtung Pistolenhandgriff 009 1 8 69 06 79 Rückzugsblock 009 1 9 69 06 81 Mutter für Düsennadel 009 1 10 69 06 82 Rückzugsstifte 009 2 22 69 06 86 Arretierung Schutzbügel 009 1 23 69 06 87 Handgriff 1 24 69 06 88 O Ring 1 26 69 06 89 Pistolengehäuse 009 1 32 69 06 92 Achse Handgriff 009 1 33 69 06 93 Befestigungsmutter Achse 009 1 34 69 06 94 Düsendichtung 1 35 ...

Page 30: ... gesetzlichen Gewährleistungsfristen von 12 Monaten ab Kaufdatum Rechnungsdatum des gewerblichen Endkunden Geltendmachung Bei Vorliegen eines Gewährleistungs bzw Garantiefalles bitten wir dass das komplette Gerät zusammen mit der Rechnung frei an unser Logistik Center in Berka oder an eine von uns autorisierte Service Station eingeschickt wird Zuvor bitten wir Sie uns unter unserer kostenlosen STO...

Page 31: ...G Richtli nien entspricht Bei einer nicht mit uns abgestimmten Änderung des Gerätes verliert diese Erklärung ihre Gültigkeit Bezeichnung des Gerätes Airlessgerät LP 400 F Geräte Typ Farb Spritzgerät Artikel Nummer 69 00 40 Angewandte Richtlinien Maschinen Richtlinie 2006 42 EG Niederspannungs Richtlinie 2006 95 EG EG Richtlinie Elektromagnetische Verträglichkeit 2004 108 EG Bevollmächtigter für di...

Page 32: ...oud 43 47 10 Elektrische onderdelen vervangen 48 11 Verhelpen van storingen 49 12 Lijsten met vervangende onderdelen detailtekeningen 50 57 13 Airlesspistool 009 58 59 14 Tabel met sproeikoppen 60 15 Garantiebepalingen 60 16 EG conformiteitsverklaring 61 1 Technische gegevens LP 400 F Transportvermogen onder druk 2 0 l min Maximale sproeigrootte 0 021 Maximale werkdruk 207 bar Spanning 230 V 50 Hz...

Page 33: ... afbeelding De stekker alleen in een voor de stekker geschikt stopcontact steken Het product niet via een elektrische voeding aansluiten Gebruik geen adapter Verlengkabel Gebruik uitsluitend een geaarde 3 polige verlengkabel met een bijbehorende apparaatstekker en stopcontact Controleer of de verlengkabel niet beschadigd is Als er een verlengkabel vereist is ten minste een 12 AWG kabel 2 5 mm2 geb...

Page 34: ...et onder spanning of druk laten staan Wanneer het apparaat niet wordt gebruikt uitschakelen en de procedure voor drukontlasting voor uitschakeling van het apparaat uitvoeren Tijdens spuiten onder hoge druk kunnen er gitige stoffen in het lichaam terechtkomen die tot ernstig letsel kunnen leiden Bij een injectie direct een chirurg raadplegen Slangen en delen visueel op beschadigingen controleren Be...

Page 35: ...n gebruiken die dergelijke oplosmiddelen bevatten Veel andere vloeistoffen kunnen chemicaliën bevatten die niet compatibel met aluminium zijn Informeer bij de leverancier van de materialen over de verdraagzaamheid GEVAAR DOOR BEWEGENDE DELEN Bewegende delen kunnen vingers of andere lichaamsdelen beklemmen snijden of afrukken Installatie niet zonder veiligheidsinrichtingen of afdekkingen gebruiken ...

Page 36: ...ai de knop in de richting van de klok om de druk te verhogen en tegen de richting van de klok om de druk te verlagen C Ontluchtingsklep Voor ontluchting van de pomp D Geopende ontluchtingsklep De klep is geopend wanneer de greep in de verticale stand staat E Gesloten ontluchtingsklep De klep is gesloten wanneer de greep in de horizontale stand staat ...

Page 37: ...n verschillende richtingen wijzen Als de sproeikop of de slang verstopt is volg dan de bovensta ande stappen 1 tot 4 Houd er rekening mee dat er bij stap 3 verf in de emmer komt TIP Wanneer u vermoedt dat de druk vanwege een defecte ontluchtings drukontlastingsklep of een andere oorzaak niet kan worden afgelaten maak dan langzaam de moer van de slangkoppeling los om de druk af te laten LET OP Besc...

Page 38: ...rect uitschakelen Oorzaken controleren zie hoofdstuk 11 Oplosmiddel en watergebaseerde materialen Bij omschakelen van een materiaal op waterbasis naar een materiaal op oplosmiddelbasis moet het apparaat eerst kort met het betreffende oplosmiddel worden gespoeld Na verwerking van oplosmiddelgebaseerde materialen moet het apparaat altijd eerst met het betreffende oplosmiddel en dan met water en zeep...

Page 39: ...egen activering is beveiligd en de draaiende spuitkop uit de spuitkophouder is verwijderd 2 Haal de aanzuigbuis uit het reservoir en reinig dit incl de aanzuigfilter van buiten met water of een geschikt oplosmiddel Schroef de aanzuigfilter van de aanzuig buis en reinig de schroefdraad 3 Schroef de reinigingsadapter op de schroefdraad van de aanzuigbuis 4 Sluit de waterslang met de aansluitkoppelin...

Page 40: ...et airless pistool tegen de binnenrand van de emmer met het opgevangen verontreinigde water ontgrendel de trekkerblokkering op het airless pistool en houd de pistooltrekker ingedrukt 10 Sluit de drukontlastingsklep en het water stroomt nu door de airless slang en het pistool Spoel net zo lang totdat er schoon water naar buiten komt Wissel een paar keer tussen de beide circulaties door openen en sl...

Page 41: ...uig buis naar buiten komt 7 Richt het spuitpistool in de metalen emmer en druk het stevig tegen de emmer 8 Maak de trekkerblokkering op het pistool los en haal de trekker over Sluit nu de ont luchtings drukontlastingsklep Het oplosmiddel wordt in de slang geleid Spoel net zo lang tot er schoon oplosmiddel uit het pistool komt Wissel tussen de beide circulaties door openen en sluiten van de ontluch...

Page 42: ...et pistool in contact met de metalen emmer blijft Schakel in noodgevallen het spuitapparaat uit Als u de werking van het apparaat in geval van nood stoppen schakel dan de motor uit Lees de paragraaf over drukontlasting Draai de drukregelknop in de richting van de klok om de druk te verhogen en tegen de richting van de klok om de druk te verlagen Gebruik altijd de laagste druk die voor volledige ve...

Page 43: ...aaid kan de pakking worden beschadigd en de levensduur worden verkort Onderhoud van de elektromotor Smering De motor wordt met permanent gesmeerde kogellagers geleverd Koolborstels De koolborstels moeten regelmatig worden gecontroleerd en indien versleten worden vervangen Nieuwe koolborstels hebben een lengte van 25 4 mm en moeten worden vervangen zodra ze tot 12 7 mm zijn versleten De slijtage ha...

Page 44: ...g door de verbindingsstang 2 en de zuiger Schuif de huls 3 omhoog over de pen 1 van de verbindingsstang en schuif de borgring 4 in de groef van de verbindingsstang 2 3 Schuif de twee buis afstandhouders 11 tussen mate riaalpomp 9 en afdekking 14 en schuif de twee schroeven 8 door de afstandhouders en schroef deze gelijkmatig afwisselend vast 4 Zet de onderste aanzuigklepgroep weer in elkaar door d...

Page 45: ...erste steunring 1 op de vlakke kant 2 Neem drie van de onderste polyethyleen pakkingen 2 en twee leder pakkingen 23 en plaats deze met de naar binnen gewelfde kant naar onder in de deze volgorde op de steunring 1 Polyethyleen Leder Polyethyleen Leder Polyethyleen 3 Neem de adapterbus 3 die aan beide kanten naar binnen gewelfd is en plaats deze op de in elkaar gezette onderste pakkingen 4 Ga verder...

Page 46: ... de materiaalpompbehuizing TIP Om de pakkingen in de juiste positie te kunnen fixeren moet de pompbehuizing op de kop worden gehouden en de gehele eenheid naar boven in de materiaalpompbehuizing worden geschoven Kiep nadat het onderdeel intern correct is gepostioneerd de pompbehuizing terug om alle onderdelen binnen te houden 17 Draai de pakkingsmoer 21 bioven op de materiaalpompbehuizing vast tot...

Page 47: ...chroeven 2 van de voorkant van de afdekking en de achterkant van de aandrijving te verwijderen 4 Leg de eenheid op de achterkant en demonteer de aandrijving 5 Controleer de lagers 14 17 het tandwiel 16 de kruk 15 en het glijlager 9 in de dekselgroep 13 op slijtage schade Vervang de versleten beschadigde onderdelen 6 Als het transmissievet moet worden vervangen vervang dit dan door nieuw transmissi...

Page 48: ...A met de montageschroef onder de stuurkaart is verbonden Het apparaat kan niet worden gebruikt wanneer er kabels losgekoppeld of geknikt zijn Controleer bij de montage of alle kabels zijn aangesloten en niet zijn geknikt Aan uit schakelaar 1 Laat de drukregeleenheid zakken zoals hierboven beschreven 2 Maak de twee kabels van de Aan uit schakelaar los 3 Maak de moer op de schakelas los met een 9 16...

Page 49: ... modellen trage 8 A zekering Het apparaat kan niet worden gestart Besturingsinstellingen Controleer of de stekker in het stopcontact is gestoken Controleer of de Aan uit schakelaar in de aan positie staat en de drukregelknop geheel naar rechts in de richting van de klok is gezet max druk Drukregeleenheid stuurkaart Als de stroomindicatie ook na controleren van de bestu ringsinstellingen en de stro...

Page 50: ...gende onderdelen Inlaatklep Pos Art nr Beschrijving Hoe veel heid 8 69 02 20 Verfniveaubehuizing 1 13 69 02 33 Dopmoer 1 157 69 03 96 Inlaatklepeenheid 1 158 159 160 69 03 97 Dichtingset voor inlaatkle peenheid 1 pak 3 stuks 1 ...

Page 51: ...51 Lijsten met vervangende onderdelen Onderstel LP 400 F Pos Art nr Beschrijving Hoe veel heid 1 69 04 01 Onderstel LP 400 F 1 2 69 04 02 Houder buitenschroefdraad 4 42 69 02 42 Gummivoet 2 ...

Page 52: ...52 Motor aandrijving ...

Page 53: ... Verftrap compleet 1 23 69 01 08 Zeskantschroef 2 24 69 02 47 Afstandshuls 2 25 69 04 07 Dichting klemkast 1 26 69 04 08 Klemkast LP 400 F 1 28 69 04 09 Kruiskopschroef voor klem kast LP 400 F 4 30 69 02 63 Trekontlasting 2 31 69 04 11 Moer klemkast LP 400 F niet afgebeeld 2 33 69 04 12 Schroef bevestiging klem kast LP 400 F 2 35a 69 02 40 Lager 1 35b 69 02 43 Glijlager 1 35c 69 02 51 Onderlegschi...

Page 54: ...tting 1 12 69 02 50 O ring 1 13 69 02 30 Uitlaatklepkogel 1 14 69 02 48 Zuiger compleet 10 14 1 15 69 02 23 Afstandshuls 1 16 69 02 28 Schotelveer 3 17 69 02 26 Steunring 1 18 69 02 27 Bovenste pakkingsafdich ting 3 19 69 02 25 Opname met groef voor bovenste pakking 1 20 69 02 24 Dichtingshouder 1 21 69 02 36 Pakkingsmoer 1 22 69 02 81 Bovenste pakkingsafdich ting leder 2 23 69 02 80 Onderste pakk...

Page 55: ...9 02 64 Schroef 2 TIP Als onderdeel 1 wordt vervangen doe dan op de bui tenkant van de huls op gelijkmatige afstanden een paar druppels Loctite 246 voordat u het in de dekselgroep plaatst Pos Art nr Beschrijving Hoe veel heid 1 69 02 76 Aanzuigslang 1 2 69 09 01 Aanzuigfilter 1 4 69 04 16 Bypass slang compleet LP 400 F 1 5 69 70 56 Uitlaat bypass slang 1 6 69 04 17 Aansluitadapter 1 ...

Page 56: ... 69 04 19 Rubberen dichting drukre gelaar kabel 1 28 69 04 09 Kruiskopschroef klemkast LP 400 F 6 29 69 04 11 BORGMOER 2 30 69 02 63 Trekontlasting 2 31 69 01 87 Aan Uit schakelaar 1 32 69 04 23 Rubberen mof Aan uit schakelaar 1 33 69 04 12 Schroef M8 x 12 2 34 69 04 25 Stuurkaart 230 V LP 400 F 1 37 69 04 26 Verbinder 230 V voor stuurkaart LP 400 F 1 ...

Page 57: ...aarding zwart bruin blauw wit rood Lijsten met vervangende onderdelen Bekabeling van de besturing Pos Art nr Beschrijving Hoe veel heid 1 69 01 93 Stroomkabel 1 3 69 01 87 Aan uit schakelaar 1 7 69 04 18 Drukregelaar LP 400 F 1 naar de motor Drukregelaar ...

Page 58: ...et pistool en goed vastdraaien 9 Breng de beschermbeugel 4 weer aan de vergrendeling 22 aan Reparatie De naald vervangen Drukontlasting OPGELET 1 Druk ontlasten vergrendel de trekkerbeugel 2 Sproeikop 36 en sproeikopbescherming 35 van het pistool verwijderen en druk aflaten 3 Maak de materiaalslang los van het pistool en de beweegbare koppeling 5 4 Druk op de trekker terwijl de diffusor 15a wordt ...

Page 59: ...lfilter 100M 009 1 7 69 06 78 Dichting pistoolhandgreep 009 1 8 69 06 79 Terugtrekblokkering 009 1 9 69 06 81 Moer voor sproeinaald 009 1 10 69 06 82 Terugtrekpen 009 2 22 69 06 86 Vergrendeling van beschermbeugel 009 1 23 69 06 87 Handgreep 1 24 69 06 88 O ring 1 26 69 06 89 Pistoolbehuizing 009 1 32 69 06 92 As handgreep 009 1 33 69 06 93 Bevestigingsmoer as 009 1 34 69 06 94 Sproeikopdichting 1...

Page 60: ...antieperioden van 12 maanden vanaf aankoopdatum factuurdatum van de eindklant Indien wij langere perioden in een garantieverklaring hebben toegezegd dan worden deze speciaal in de gebruiksaanwijzingen van de desbetreffende apparaten toegelicht Indienen van garantieclaims Bij een garantieclaim vragen wij u het gehele apparaat samen met de rekening franco aan ons logistiekcentrum in Ber ka of naar e...

Page 61: ... richtlijnen voldoet Bij een niet met ons afgestemde modificatie van het apparaat is deze verklaring niet langer geldig Aanduiding van het apparaat Airlessapparaat LP 400 F Apparaattype Verf spuitapparaat Artikelnummer 69 00 40 Toegepaste richtlijnen Machinerichtlijn 2006 42 EG Laagspanningsrichtlijn 2006 95 EG EG richtlijn Elektromagnetische compatibiliteit 2004 108 EG Gevolmachtigde voor samenst...

Page 62: ...ntretien 73 77 10 Remplacement des composants électriques 78 11 Résolution des défauts 79 12 Liste des pièces de rechange schémas détaillés 80 87 13 Pistolet airless 009 88 89 14 Tableau des buses 90 15 Dispositions de garantie 90 16 Déclaration de conformité CE 91 1 Caractéristiques techniques LP 400 F Débit sous pression 2 0 l min Dimensions maximales des buses 0 021 Pression de service maximale...

Page 63: ...it avec un bloc d alimentation Ne pas utiliser d adaptateur Rallonge Utiliser exclusivement une rallonge tripolaire mise à la terre avec la fiche correspondante et une prise compatible avec la fiche de l appareil Veiller que la rallonge ne soit pas endommagée Si une rallonge est nécessaire utiliser au moins un câble 12 AWG 2 5 mm2 pour garantir la consommation de courant du produit Un câble sous d...

Page 64: ...ettoyage Ne pas laisser un appareil sous tension ou sous pression sans surveillance Si l appareil n est pas utilisé mettre à l arrêt et procéder à la décompression pour arrêter l appareil Dans le cas d une pulvérisation sous haute pression des substances toxiques peuvent être injectées dans le corps et entraîner de graves blessures En cas d injection consulter immédiatement un chirurgien Examiner ...

Page 65: ...contenant ces solvants De nombreux autres liquides contiennent éventuellement des produits chimiques pouvant réagir à l aluminium Informez vous auprès du fournisseur de produits en ce qui concerne la compatibilité DANGER PAR DES PIÈCES EN MOUVEMENT Les pièces en mouvement peuvent écraser couper ou arracher les doigts et d autres parties du corps Ne pas utiliser l installation sans dispositifs ou c...

Page 66: ...ion Tourner le bouton dans le sens horaire pour aug menter la pression ou anti horaire pour diminuer la pression C Vanne de purge Pour la purge d air de la pompe D Vanne de purge ouverte La vanne est ouverte lorsque la poignée se trouve en position verticale E Vanne de purge fermée La vanne est fermée lorsque la poignée se trouve en position horizontale ...

Page 67: ...use de pulvérisation ou le flexible est bloqué suivre les étapes 1 à 4 ci dessus Prendre en compte qu à l étape 3 de la peinture arrive dans le seau REMARQUE s il est suspecté que la pression n a pas pu être évacuée en raison d une vanne de décompression de purge défectueuse ou d une autre cause desserrer lentement l écrou de l accouplement de flexible pour laisser s échapper la pression ATTENTION...

Page 68: ...e voir chapitre 11 Matériaux à base de solvant et d eau Si l on passe d un matériau sur base aqueuse à un matériau sur base de solvant l appareil nettoyé doit d abord briève ment être rincé avec le solvant approprié Après le traitement des matériaux sur base de solvant il faut rincer l appareil d abord avec le solvant approprié ensuite avec de l eau et du détergent puis avec de l eau Ne jamais lai...

Page 69: ...actionne ment et que la buse inversable est retirée du support de buse 2 Retirer le tube d aspiration de l emballage et le nettoyer de l extérieur avec de l eau ou un solvant compatible puis procéder de même pour le filtre d aspiration Dévisser le filtre d aspiration du tube d aspiration et nettoyer le filet 3 Visser l adaptateur de nettoyage sur le filet du tube d aspiration 4 Raccorder le tuyau ...

Page 70: ... Tenir ensuite le pistolet Airless dans le seau contenant l eau usée collectée et orienté contre sa paroi intérieure déverrouiller le blocage de gâchette du pistolet Airless et appuyer sur la gâchette 10 Fermer la soupape de décompression et l eau s écoule alors par le tuyau Airless et le pistolet Rincer jusqu à ce que de l eau propre s écoule Commuter plusieurs fois les circuits en ouvrant et en ...

Page 71: ...nt clair sorte du flexible de dérivation à côté du flexible tube d aspiration 7 Diriger le pistolet de pulvérisation dans le seau en métal et l appuyer fermement con tre le seau 8 Relâcher la gâchette de blocage du pistolet et actionner la gâchette Maintenant fer mer la soupape de purge d air de décompression Le solvant est ensuite amené dans le flexible Rincer jusqu à ce que du solvant propre sor...

Page 72: ...et reste toujours en contact avec le récipient métallique S il y a une situation d urgence arrêter le pulvérisateur Pour continuer à faire fonctionner l appareil en cas d urgence arrêter le moteur Lire la section concernant la décompression Tourner le bouton de pressostat dans le sens horaire pour augmenter la pression ou anti horaire pour diminuer la pressi on Toujours utiliser la pression de pul...

Page 73: ...urée de vie peut être raccourcie Entretien du moteur électrique Lubrification Le moteur est fourni avec des paliers à billes lubrifiés à vie Balais de charbon Les balais de charbon doivent être vérifiés périodiquement et remplacés selon leur usure Les balais de charbon neufs ont une longueur de 25 4 mm en début de vie et doivent être remplacés dès que l usure a réduit cette longueur à 12 7 mm L us...

Page 74: ...la broche 1 de la bielle et faire glisser la bague d arrêt 4 dans la rai nure de la bielle 2 3 Faire glisser les deux bagues d écartement de flexi ble 11 entre la pompe à matériau 9 et le capot 14 et faire glisser les deux vis 8 à travers les bagues d écartement et les visser uniformément en alter nance pour les fixer 4 Réassembler le groupe inférieur de vanne d aspiration en mettant le siège le j...

Page 75: ... anneau de soutien inférieur 1 sur la partie plate 2 Prendre trois des garnitures inférieures en polyéthy lène 2 et deux des garnitures en cuir 23 et les placer dans l ordre suivant sur la bague de soutien 1 avec le côté incurvé vers le bas Polyéthylène Cuir Polyéthylène Cuir Polyéthylène 3 Prendre la douille d adaptateur 3 qui est incurvée sur les deux côtés et la mettre sur les garnitures infé r...

Page 76: ...a pompe à matériau REMARQUE Pour fixer les garnitures dans la position correcte le boîtier de la pompe doit être tenu à l envers et toute l unité doit être glissée en haut dans le boîtier de la pompe à matériau Remettre le boîtier de la pompe à l endroit lorsque le module est positionné à l intérieur pour garder toutes les parties à l intérieur 17 Serrer l écrou de garniture 21 sur le dessus du bo...

Page 77: ... vis 1 et les vis papillons 2 de l avant du capot et l arrière du réducteur 4 Placer l unité sur le dos et démonter le réducteur 5 Contrôler le palier 14 17 le pignon 16 la manivelle du réducteur 15 et le palier de glissement 9 dans le module de couvercle 13 pour des signes d usure de dégâts Remplacer les pièces usées endommagées 6 Si le lubrifiant doit être remplacé en mettre du neuf 7 Nettoyer l...

Page 78: ...avec la vis chapeau de montage sous la carte de commande L appareil ne peut pas être exploité si des câbles sont débranchés ou pliés Lors du remontage s assurer que tous les câbles sont connectés et pas pliés Commutateur MARCHE ARRÊT 1 Faire descendre le manostat comme décrit ci dessus 2 Débrancher les deux câbles du commutateur MARCHE ARRÊT 3 Desserrer l écrou sur l axe de commutateur au moyen d ...

Page 79: ... supérieur La pompe ne fonction ne pas Fusible ayant sauté Remplacer le fusible modèle 220 240 V fusible 8 A inerte L appareil ne démarre pas Réglages de contrôle S assurer que la fiche est branchée dans l appareil S assurer que le commutateur MARCHE ARRÊT est en position MARCHE et le bouton de contrôle de la pression est complètement à droite sens horaire pres sion max Manostat carte commande Si ...

Page 80: ...d admission Pos Réf art Description Quan tité 8 69 02 20 Boîtier nuancement des couleurs 1 13 69 02 33 Écrou raccord 1 157 69 03 96 Unité de soupape d admission 1 158 159 160 69 03 97 Kit de joints pour unité de soupape d admission 1 paquet 3 unités 1 ...

Page 81: ...81 Nomenclatures de pièces de rechange Cadre porteur LP 400 F Pos Réf art Description Quan tité 1 69 04 01 Cadre porteur LP 400 F 1 2 69 04 02 Support taraudage 4 42 69 02 42 Pied caoutchouté 2 ...

Page 82: ...82 Nomenclatures de pièces de rechange Moteur entraînement ...

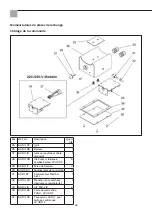
Page 83: ...01 08 Vis à tête hexagonale 2 24 69 02 47 Douille d écartement 2 25 69 04 07 Joint bornier 1 26 69 04 08 Bornier LP 400 F 1 28 69 04 09 Vis à tête cylindrique bom bée pour bornier LP 400 F 4 30 69 02 63 Soulagement de contrainte 2 31 69 04 11 Écrou bornier LP 400 F sans représentation 2 33 69 04 12 Vis fixation bornier LP 400 F 2 35a 69 02 40 Appuis 1 35b 69 02 43 Palier de glissement 1 35c 69 02 ...

Page 84: ... 1 12 69 02 50 Joint torique 1 13 69 02 30 Bille de soupape d admission 1 14 69 02 48 Pistons complets 10 14 1 15 69 02 23 Douille d écartement 1 16 69 02 28 Ressort à disque 3 17 69 02 26 Anneau de soutien 1 18 69 02 27 Joint de garniture supérieur 3 19 69 02 25 Réception avec rainure pour garniture supérieure 1 20 69 02 24 Support de joint 1 21 69 02 36 Écrou de garniture 1 22 69 02 81 Joint de ...

Page 85: ... 3 69 02 64 Vis 2 REMARQUE Si le composant 1 est remplacé déposer quelques gouttes de Loctite 246 à l extérieur de la douille avant de l insérer dans le couvercle Pos Réf art Description Quan tité 1 69 02 76 Flexible d aspiration 1 2 69 09 01 Filtre d aspiration 1 4 69 04 16 Flexible de dérivation complet LP 400 F 1 5 69 70 56 Sortie flexible de dériva tion 1 6 69 04 17 Adaptateur de branche ment ...

Page 86: ...anostat 1 28 69 04 09 Vis à tête cylindrique bombée bornier LP 400 F 6 29 69 04 11 Écrou de fixation 2 30 69 02 63 Soulagement de contrainte 2 31 69 01 87 Commutateur Marche Arrêt 1 32 69 04 23 Manchon en caoutchouc interrupteur marche arrêt 1 33 69 04 12 Vis M8 x 12 2 34 69 04 25 Carte de commande 230 V LP 400 F 1 37 69 04 26 Connecteur 230 V pour carte de commande LP 400 F 1 ...

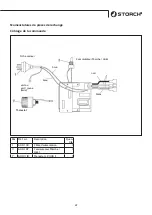
Page 87: ...t ou vert jaune terre noir brun bleu blanc Nomenclatures de pièces de rechange Câblage de la commande Pos Réf art Description Quan tité 1 69 01 93 Câble d alimentation 1 3 69 01 87 Commutateur Marche Arrêt 1 7 69 04 18 Manostat LP 400 F 1 Manostat ...

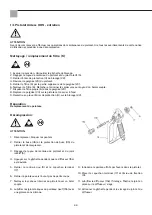
Page 88: ...r à fond 9 Remettre en place l étrier de protection 4 sur le blocage 22 Réparation Remplacement du pointeau Décompression ATTENTION 1 Décompresser bloquer les pontets 2 Retirer la buse 36 et la protection de buse 35 du pistolet et décompresser 3 Dégager le tuyau de matériau du pistolet et du joint rotatif 5 4 Appuyer sur la gâchette pendant que le diffuseur 15a est dévissé 5 Retirer le contre écro...

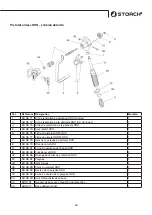
Page 89: ...istolet 100 M 009 1 7 69 06 78 Joint de la poignée du pistolet 009 1 8 69 06 79 Bloc de recul 009 1 9 69 06 81 Écrou du pointeau de la buse 009 1 10 69 06 82 Tige de recul 009 2 22 69 06 86 Blocage de l étrier de protection 009 1 23 69 06 87 Poignée 1 24 69 06 88 Joint torique 1 26 69 06 89 Corps du pistolet 009 1 32 69 06 92 Boulon de la poignée 009 1 33 69 06 93 Écrou du boulon de la poignée 009...

Page 90: ...ompter de la date d achat de la facture du client final professionnels s appliquent à nos appareils Si nous mentionnons des délais supérieurs dans le cadre d une déclaration de garantie ceux ci sont mentionnés dans les instructions de service des appareils concernés Exercice Dans un cas couvert par la garantie nous vous demandons de renvoyer l appareil complet franco à notre centre logisti que à B...

Page 91: ...ée par nos soins En cas de modification non convenue avec nous la présente déclaration perd toute validité Désignation de l appareil Appareil Airless LP 400 F Type d appareil Pulvérisateur de peinture Référence article 69 00 40 Directives appliquées Directive sur les machines 2006 42 CE Directive sur la basse tension 2006 95 CE Directive européenne sur la compatibilité électromagnétique 2004 108 C...

Page 92: ...r l applicazione di colori nel settore edile e di rivestimenti Utilizzo solo da personale addestrato Non ammesso all impiego in aree a rischio di esplosione IT Grazie per la fiducia accordata a STORCH Con l acquisto avete scelto un prodotto di qualità Se comunque avete dei suggerimenti volti a migliorare la nostra offerta o se doveste incontrare qualche difficoltà non esitate a rivolgerVi a noi Co...

Page 93: ...otto attraverso un alimentatore Non usare un adattatore Cavo di prolunga Usare solamente un cavo di prolunga a tre poli con messa a terra e spina relativa come anche una presa adatta alla spina dell apparecchio Badare che il cavo di prolunga non sia danneggiato Nel caso sia necessario una prolunga utilizzare almeno un cavo tipo 12 AWG 2 5 mm2 per assicurare l assorbimento di corrente del prodotto ...

Page 94: ...todito l attrezzo sotto tensione o sotto pressione Se l attrezzo non viene utilizzato spegnerlo ed eseguire la procedura di decompressione per spegnere l attrezzo Quando si spruzza ad alta pressione è possibile iniettare delle sostanze tossiche nel corpo provocando delle gravi lesioni In caso di iniezione immediatamente rivolgersi ad un chirurgo Controllare se vi sono dei segni di guasto su flessi...

Page 95: ...iali contenenti tali solventi Vi sono tanti altri liquidi che probabilmente contengono delle sostanze chimiche che possono reagire con l alluminio Informatevi presso il fornitore del materiale sulla compatibilità PERICOLO DOVUTO A COMPONENTI MOBILI Le parti mobili possono schiacciare incastrare o tagliare le dita o altri parti del corpo Non utilizzare l impianto senza dispositivi o coperture di pr...

Page 96: ...della pressione Girare la manopola in senso orario per aumentare oppure in senso antiorario per ridurre la pressione C Valvola di sfiato Per spurgare l aria dalla pompa I Valvola di sfiato aperta La valvola è aperta quando l impugnatura si trova nella posizione verticale E Valvola di sfiato chiusa La valvola è chiusa quando l impugnatura si trova nella posizione orizzontale ...

Page 97: ...sibile siano intasati occorre seguire i passi da 1 a 4 riportati in alto Tenere in men te che durante passo 3 vi uscirà del colore nel secchio INFORMAZIONE Se si sospetta che a causa di una valvola di spurgo decompressione guasta non è stato possi bile scaricare la pressione allentare lentamente il dado del raccordo del tubo flessibile per eseguire la decompressione ATTENZIONE Indossare indumenti ...

Page 98: ...pegnere l apparecchio Controllarne la causa vedasi capitolo 11 Materiali a base di solventi e acqua Se si passa da un materiale a base di acqua ad un materiale a base di solvente occorre prima risciacquare l apparecchio pulito con dell apposito solvente Dopo la lavorazione di materiali a base di solvente l apparecchio deve sempre essere risciacquato prima con l apposito solvente poi con dell acqua...

Page 99: ... che l ugello reversibile sia rimosso dal supporto per l ugello 2 Rimuovere il tubo di aspirazione dal contenitore e pulirne la superficie esterna insieme al filtro di aspirazione servendosi dell acqua o di un solvente compatibile Svitare il filtro di aspirazione dal tubo di aspirazione e pulire la filettatura 3 Avvitare l adattatore di pulitura sulla filettatura del tubo di aspirazione 4 Collegar...

Page 100: ... pistola Airless verso l interno del secchio toccando la superficie interna del secchio contenente l acqua sporca raccolta sbloccare la protezione del grillet to alla pistola Airless tenere tirato il grilletto 10 Ora chiudere la valvola di sfiato ora l acqua scorre attraverso il tubo flessibile Air less e la pistola Risciacquare fino a che fuoriesca dell acqua pulita Passare più volte da un circui...

Page 101: ... tubo flessibile da bypass accanto al flessibile tubo di aspirazione fuoriesce del solvente chiaro 7 Puntare la pistola a spruzzo verso l interno del secchio e premerla fortemente contro il secchio 8 Rilasciare il blocco grilletto della pistola e azionare il grilletto Ora chiudere la valvola di spurgo decompressione Il solvente viene quindi diretto nel tubo Risciacquare fino alla fuoriuscita di so...

Page 102: ... e badare che una parte metallica della pistola sia sempre in contatto con il contenitore in metallo Spegnere l apparecchio in caso di emergenza Nel caso vogliate spegnere il funzionamento dell apparecchio in caso di emergenza occorre spegnere il motore Leggere la sezione sulla decompressione Girare la manopola di controllo della pressione in senso orario per aumentare la pressione o in senso anti...

Page 103: ...ggiamento e la riduzione della sua durata di vita Manutenzione dell elettromotore Lubrificazione Il motore viene fornito con cuscinetti a sfere a lubrificazione permanente Spazzole di carbone Le spazzole di carbone devono essere regolarmente controllate e sostituite secondo il loro stato di usura Le spazzole di carbone nuove inizialmente hanno una lunghezza di 25 4 mm e devono essere sostituite qu...

Page 104: ... e attra verso l asta di collegamento 2 e il pistone Spingere il manicotto 3 verso l alto e oltre il perno 1 nell asta di collegamento e spingere l anello di sicurezza 4 nella scanalatura dell asta di collegamento 2 3 Spingere i due distanziatori 11 tra la pompa del materiale 9 e la copertura 14 e far attraversare le due viti 8 attraverso i distanziatori e serrarle unifor memente e alternativament...

Page 105: ... Assemblaggio della pompa del materiale 1 Appoggiare l anello di supporto inferiore 1 sul lato piatto 2 Prendere i tre premiguarnizioni inferiori in polietilene 2 e i dure premiguarnizioni in cuoio 23 ed appli carli con il lato curvato verso l interno rivolta in basso sull anello di supporto 1 nella sequenza seguente Polietilene Cuoio Polietilene Cuoio Polietilene 3 Prendere il manicotto adattator...

Page 106: ...a premere il tutto nel corpo della pompa del materiale AVVERTENZA Per fissare i premiguarnizioni nella posizione corretta occorre tenere in posizione capovolta il corpo della pompa e inse rire l intera unità dal di sopra nel corpo della pompa del materiale Dopo aver posizionato il gruppo all interno nuova mente girare il corpo della pompa per mantenere le parti all interno 17 Stringere il dado pre...

Page 107: ...riore della copertura e dal lato posteriore dell ingranaggio 4 Appoggiare l unità sul lato posteriore e smontare l ingranaggio 5 Controllare lo stato di usura danni presso i cuscinetti 14 17 la ruota dentata 16 la manovella dell ingranaggio 15 e il cuscinetto a scorrimento 9 nel gruppo coperchio 13 Sostituire le parti usurate danneggiate 6 Nel caso occorre cambiare il grasso dell ingranaggio sosti...

Page 108: ...n testa esagonale con calotta sferica sotto la scheda di comando L apparecchio non può funzionare se vi sono dei fili separati o piegati Durante l assemblaggio occorre perciò assicurarsi che siano collegati tutti i fili e che essi non siano piegati Interruttore ON OFF 1 Abbassare l unità di regolazione della pressione come descritto in alto 2 Rimuovere i due cavi dell interruttore ON OFF 3 Allenta...

Page 109: ...a non funzi ona Fusibile bruciato Sostituire il fusibile Modelli da 220 240 V fusibile ritardato da 8 A L apparecchio non si avvia Impostazioni di comando Assicurarsi che il cavo di alimentazione sia inserito nell apparecchio Assicurarsi che l interruttore ON OFF sia in posizione ON e la manopola del regolatore della pressione sia stata completamente girata verso destra senso orario pressione mass...

Page 110: ...ola d ingresso Pos N art Descrizione Quan tità 8 69 02 20 Corpo stadio di colore 1 13 69 02 33 Dado di accoppiamento 1 157 69 03 96 Unità valvola d ingresso 1 158 159 160 69 03 97 Set guarnizioni per unità valvola d ingresso 1 pacco 3 pezzi 1 ...

Page 111: ...111 Elenchi dei pezzi di ricambio Telaio portante LP 400 F Pos N art Descrizione Quan tità 1 69 04 01 Telaio portante LP 400 F 1 2 69 04 02 Supporto Filettatura esterna 4 42 69 02 42 Piede in gomma 2 ...

Page 112: ...112 Elenchi dei pezzi di ricambio Motore Azionamento ...

Page 113: ... 24 69 02 47 Manicotto distanziatore 2 25 69 04 07 Guarnizione per scatola morsetti 1 26 69 04 08 Scatola morsetti LP 400 F 1 28 69 04 09 Vite a testa bombata per scatola morsetti LP 400 F 4 30 69 02 63 Scarico di trazione 2 31 69 04 11 Dado per scatola morsetti LP 400 F senza illustrazi one 2 33 69 04 12 Vite per fissaggio scatola morsetti LP 400 F 2 35a 69 02 40 Cuscinetto 1 35b 69 02 43 Cuscine...

Page 114: ...ello toroidale 1 13 69 02 30 Sfera della valvola di sca rico 1 14 69 02 48 Pistone completo 10 14 1 15 69 02 23 Manicotto distanziatore 1 16 69 02 28 Molla a tazza 3 17 69 02 26 Anello di supporto 1 18 69 02 27 Tenuta a baderna in alto 3 19 69 02 25 Alloggiamento con incavo per tenuta a baderna in alto 1 20 69 02 24 Supporto per guarnizione 1 21 69 02 36 Dado premiguarnizioni 1 22 69 02 81 Tenuta ...

Page 115: ...2 64 Vite 2 AVVERTENZA Se si sostituisce la parte 1 occorre applicare qualche goccia di Loctite 246 sull esterno del manicotto prima di inserirlo nel gruppo coperchio Pos N art Descrizione Quan tità 1 69 02 76 Tubo di aspirazione 1 2 69 09 01 Filtro di aspirazione 1 4 69 04 16 Tubo flessibile da bypass completo LP 400 F 1 5 69 70 56 Scarico tubo flessibile da bypass 1 6 69 04 17 Adattatore di coll...

Page 116: ...l regolatore di pressione 1 28 69 04 09 Vite a testa bombata per scatola morsetti LP 400 F 6 29 69 04 11 Controdado di sicurezza 2 30 69 02 63 Scarico di trazione 2 31 69 01 87 Interruttore ON OFF 1 32 69 04 23 Manicotto in gomma per interruttore ON OFF 1 33 69 04 12 Vite M8 x 12 2 34 69 04 25 Scheda di comando 230 V LP 400 F 1 37 69 04 26 Connettore 230 V per scheda di comando LP 400 F 1 ...

Page 117: ...o a terra nero marrone blu bianco rosso Elenchi dei pezzi di ricambio Cablaggio del comando Pos N art Descrizione Quan tità 1 69 01 93 Cavo di alimentazione 1 3 69 01 87 Interruttore ON OFF 1 7 69 04 18 Regolatore di pressione LP 400 F 1 verso il motore Regolatore di pressione ...

Page 118: ...sto 22 Riparazione Sostituzione dell ago Decompressione ATTENZIONE 1 Scaricare la pressione bloccare il grilletto 2 Rimuovere l ugello 36 e la protezione dell ugello 35 dalla pistola e toglierne la pressione 3 Rimuovere il tubo per il materiale dalla pistola e dal giunto articolato 5 4 Tirare il grilletto mentre si svita il diffusore 15a 5 Rimuovere il dado di arresto 9 e il cappuccio di pro tezio...

Page 119: ...100 M 009 1 7 69 06 78 Guarnizione manico pistola 009 1 8 69 06 79 Blocco di richiamo 009 1 9 69 06 81 Dado per ago dell ugello 009 1 10 69 06 82 Perni di richiamo 009 2 22 69 06 86 Arresto archetto di protezione 009 1 23 69 06 87 Manico 1 24 69 06 88 Guarnizione circolare 1 26 69 06 89 Corpo della pistola 009 1 32 69 06 92 Asse manico 009 1 33 69 06 93 Dado di fissaggio asse 009 1 34 69 06 94 Gua...

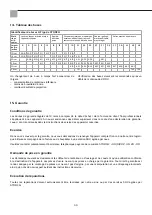
Page 120: ...i di garanzia con l aggiunta delle componenti di terzi maneggio e magazzi naggio non appropriato come anche in casi di ovvia non osservanza delle istruzioni per l uso Esecuzione di riparazioni Ogni intervento di riparazione va eseguito esclusivamente nei nostri stabilimenti o presso una service station autorizza ta STORCH 14 Tabella degli ugelli Trova ugello STORCH A Tipp Ma teriali lavora bili Ve...

Page 121: ...e Direttive CE In caso di una modifica apportata all utensile non concordata con noi questa dichiarazione perde ogni sua validità Denominazione dell apparecchio Attrezzo Airless LP 400 F Tipo di utensile Apparecchio a spruzzo di colore Numero articolo 69 00 40 Direttive applicate Direttiva macchine 2006 42 CE Direttiva sulla bassa tensione 2006 95 CE Direttiva CE sulla Compatibilità elettromagneti...

Page 122: ... 132 133 9 Maintenance 133 137 10 Replacing electronic components 138 11 Troubleshooting 139 12 Lists of spares Detailed drawings 140 147 13 Airless gun 009 148 149 14 Nozzle table 150 15 Warranty conditions 150 16 EC Declaration of Conformity 151 1 Technical data LP 400 F Delivery rate under pressure 2 0 l min Maximum nozzle size 0 021 Maximum working pressure 207 bar Voltage 230 V 50 Hz Power ra...

Page 123: ...the one illus trated in the figure below Only connect the product to a corresponding outlet Do not connect the product via a power supply unit Do not use any adapters Extension cable Only use a 3 wire extension cable that has a 3 blade earthing plug and a 3 slot receptacle that accepts the plug on the product Make sure the extension cable is not damaged If an extension cable is necessary use a 12 ...

Page 124: ... the noz zle Do not leave the unit energized or under pressure while unattended When the unit is not in use turn off the unit and follow the Pressure Relief Procedure for turning off the unit High pressure spray is able to inject toxins into the body and cause serious bodily injury In the event that injection occurs get immediate surgical treatment Check hoses and parts for signs of damage Replace...

Page 125: ...ontaining such solvents Many other fluids may contain chemicals that can react with aluminium Contact your material supplier for compa tibility MOVING PARTS HAZARD Moving parts can pinch cut or amputate fingers and other body parts Do not operate equipment with protective guards or covers removed Pressurised equipment can start without warning Before checking moving or servicing equipment follow t...

Page 126: ...r button To set the pressure Turn the button clockwise to increase the pressure or anti clockwise to reduce the pressure C Air valve To drain the pump D Open air valve The valve is open if the handle is positioned vertically E Closed air valve The valve is closed if the handle is positioned horizontally ...

Page 127: ...ged follow steps 1 through 4 above You can expect the paint to spray into the bucket in step 3 NOTE If you suspect that pressure cannot be relieved due to a defective ventilation pressure release valve or some other cause slowly release the nut on the hose coupling to relieve the pressure WARNING Wear personal protective equipment Cover the area with a cloth Valve closed Pressure build up Valve op...

Page 128: ...witch off the device Check the cause see Section 11 Solvent and water based materials When moving from a water based to a solvent based material you must first briefly flush the cleaned device with the corresponding solvent After processing solvent based materials first flush the device with the corresponding solvent then with soap and detergent then with water Never leave solvent in the device If...

Page 129: ...as been removed from the nozzle holder 2 Remove the vacuum hose from the container and clean it including vacuum fil ter on the outside with water or a compatible solvent Unscrew the vacuum filter from the vacuum pipe and clean the container 3 Screw the cleaning adapter onto the thread of the vacuum pipe 4 Connect the water hose including connection coupling to the cleaning adapter and the water c...

Page 130: ... hose 9 Hold the Airless gun into and at the inner edge of the bucket with the collected waste water unlock the trigger lock on the Airless gun and pull and hold the trig ger on the gun 10 Now close the pressure relief valve and water now flows through the Airless hose and the gun Now rinse until clear water escapes Change between the two cir cuits by opening and closing the pressure relief valve ...

Page 131: ...t exits through the bypass hose suction hose suction pipe 7 Point the spraying gun at the metal bucket and press it firmly against the bucket 8 Disengage the gun s safety latch and squeeze the trigger Now close the ventilation pressure relief valve The solvent is fed into the hose Continue flushing until clean solvent exists from the gun Change between the two circuits by opening and closing the v...

Page 132: ...raying pressure and make sure that one metal part of the gun always has contact with the metal container In case of emergency switch off the spraying device If you want to interrupt operations with the device in case of emergency switch off the motor Read the depressurisation section Turn the pressure regulator button clockwise to increase the pressure or anti clockwise to reduce the pressure Alwa...

Page 133: ...ce life Maintaining the electric motor Lubrication The motor is supplied with lifetime lubricated ball bearings Carbon brushes The carbon brushes must be checked at regular intervals and replaced depending on wear New carbon brushes have an initial length of 25 4 mm and should be replaced once they have worn down to 12 7 mm Brush wear mainly depends on the application in hand we recommend checking...

Page 134: ...gh the connecting rod 2 and the piston Push the sleeve 3 upward over the pin 1 on the connec ting rod and then push the circlip 4 into the groove on the connecting rod 2 3 Push the two pipe spacers 11 between the fluid pump 9 and the cover 14 and push the two screws 8 through the spacers then tighten the screws evenly alternately 4 Re assemble the lower suction valve group by pla cing the seating ...

Page 135: ...polyethylene packing ele ments 2 and two of the leather packing elements 23 and place these with the concave side facing downward on the retaining ring 1 in the following order Polyethylene Leather Polyethylene Leather Polyethylene 3 Take the adapter bushing 3 which is concave on both sides and place this on the grouped lower packing elements 4 Continue with step 2 with the concave side of the pac...

Page 136: ...he fluid pump housing NOTE To secure the packing elements in the correct position you must hold the pump housing upside down and push the enti re assembly upward into the fluid pump housing After positioning the assembly in the inside tilt the pump housing back to keep all the parts in the inside of the pump housing 17 Tighten the gland nut 21 on the top of the liquid pump housing until you feed s...

Page 137: ...s 1 and the wing screws 2 from the front side of the cover and the rear side of the gearbox 4 Lay the unit on its rear and remove the gearbox 5 Check the bearings 14 17 the gear wheel 16 the cranks 15 and the plain bearing 9 in the cover assembly 13 for wear damage Replace worn damaged parts 6 If you need to replace the gearbox lubricant replace it with new gearbox lubricant 7 Clean the contact su...

Page 138: ...onnected to the assembly cap bolt below the controller card The device cannot be operated if cables are disconnected or kinked On re assembly make sure that all cables are con nected and that they are not kinked ON OFF switch 1 Lower the pressure regulator unit as described above 2 Separate the two cables on the ON OFF switch 3 Release the nut on the switching axis using a 9 16 inch spanner 4 Re a...

Page 139: ... seat Pump not working Fuse gone Replace fuse 220 240 V models slow blow 8A fuse The device will not switch on Control settings Make sure the mains plug on the device is plugged in Make sure that the ON OFF switch is set to ON positi on and that the pressure regulator button has been fully turned in clockwise direction max pressure Pressure regulation unit controller card If the power display is n...

Page 140: ... lists Inlet valve Item Code number Description Quan tity 8 69 02 20 Paint stage housing 1 13 69 02 33 Coupling nut 1 157 69 03 96 Inlet valve unit 1 158 159 160 69 03 97 Sealing kit for inlet valve unit 1 pack 3 units 1 ...

Page 141: ...141 Spare parts lists LP 400 F carrying frame Item Code number Description Quan tity 1 69 04 01 LP 400 F carrying frame 1 2 69 04 02 Holder external thread 4 42 69 02 42 Rubber foot 2 ...

Page 142: ...142 Spare parts lists Motor gearbox ...

Page 143: ...bolt 2 24 69 02 47 Spacer sleeve 2 25 69 04 07 Terminal box seal 1 26 69 04 08 LP 400 F terminal box 1 28 69 04 09 Pan head screw for LP 400 F terminal box 4 30 69 02 63 Strain relief 2 31 69 04 11 LP 400 F terminal box nut not shown 2 33 69 04 12 Fastening screw for LP 400 F terminal box 2 35a 69 02 40 Bearings 1 35b 69 02 43 Plain bearing 1 35c 69 02 51 Washer 2 35d 69 02 64 Screw for friction b...

Page 144: ...utlet valve seat 1 12 69 02 50 O ring 1 13 69 02 30 Outlet valve ball 1 14 69 02 48 Piston complete 10 14 1 15 69 02 23 Spacer sleeve 1 16 69 02 28 Disk spring 3 17 69 02 26 Support ring 1 18 69 02 27 Upper water protective seal 3 19 69 02 25 Support with groove for upper packaging element 1 20 69 02 24 Seal retainer 1 21 69 02 36 Gland nut 1 22 69 02 81 Upper water protective seal leather 2 23 69...

Page 145: ...er 2 3 69 02 64 Screw 2 NOTE If component 1 is replaced apply a few drops of Loctite 246 to the outside of the sleeve before you install it in the cover assembly Item Code number Description Quan tity 1 69 02 76 Intake hose 1 2 69 09 01 Suction filter 1 4 69 04 16 LP 400 F bypass hose complete 1 5 69 70 56 Bypass hose outlet 1 6 69 04 17 Connector adapter 1 ...

Page 146: ...seal for pressure regulator cable 1 28 69 04 09 LP 400 F terminal box pan head screw 6 29 69 04 11 Locking nut 2 30 69 02 63 Strain relief 2 31 69 01 87 On off switch 1 32 69 04 23 Rubber sleeve for On Off switch 1 33 69 04 12 Screw M8 x 12 2 34 69 04 25 Controller card 230 V LP 400 F 1 37 69 04 26 Connector 230 V for LP 400 F controller card 1 ...

Page 147: ...en yellow earth black brown blue white red Spare parts lists Controller wiring Item Code number Description Quan tity 1 69 01 93 Power cable 1 3 69 01 87 ON OFF switch 1 7 69 04 18 LP 400 F pressure regulator 1 towards motor Pressure regulator ...

Page 148: ...d tighten it 9 Reattach the safety guard 4 on the detent 22 Repairs Exchanging needles Pressure relief NOTE 1 Relieve the pressure lock the trigger 2 Remove the nozzle 36 and nozzle guard 35 from the spray gun and relieve the pressure 3 Disconnect the fluid hose from the spray gun and swivel joint 5 4 Pull the trigger while the diffuser 15a is being unscrewed 5 Remove the lock nut 9 and end cap 17...

Page 149: ...77 Spray gun filter 100 M 009 1 7 69 06 78 Spray gun handle seal 009 1 8 69 06 79 Pullback block 009 1 9 69 06 81 Nut for nozzle needle 009 1 10 69 06 82 Pullback pin 009 2 22 69 06 86 Protective clip lock 009 1 23 69 06 87 Handle 1 24 69 06 88 O ring 1 26 69 06 89 Spray gun housing 009 1 32 69 06 92 Handle axle 009 1 33 69 06 93 Axle attachment nut 009 1 34 69 06 94 Nozzle seal 1 35 69 91 01 Nozz...

Page 150: ...lve months from the date of purchase date of invoice applies to our tools for commercial customers If we have granted an extended warranty period this period will be noted separately in the operating manu al for the equipment in question Claims If you wish to claim under our warranty or guarantee please return the complete device and your invoice to our logisti cs centre in Berka postage paid or s...

Page 151: ... circulation This warranty loses its validity in case of unauthorised modification of the tool Designation of the machine Airless device LP 400 F Machine Type Paint spraying device Item number 69 00 40 Applicable Directives Machinery Directive 2006 42 EC Low Voltage Directive 2006 95 EC EC Electromagnetic Compatibility Directive 2004 108 EC Representative authorised to compile the technical docume...

Page 152: ...9 160 7 Vyplachování 161 8 Uvedení do provozu 162 163 9 Údržba 163 167 10 Výměna elektrických konstrukčních dílů 168 11 Odstranění chyb 169 12 Seznamy náhradních dílů detailní výkresy 170 177 13 Airless pistole 009 178 179 14 Tabulka trysek 180 15 Záruční ustanovení 180 16 Prohlášení o shodě ES 181 1 Technické údaje LP 400 F Čerpací výkon pod tlakem 2 0 l min Maximální velikost trysky 0 021 Maximá...

Page 153: ... zástrčce Produkt nepřipojujte přes síťový díl Nepoužívejte adaptéry Prodlužovací kabel Používejte výhradně uzemněný trojpólový prodlužovací kabel s odpovídající zástrčkou a zásuvku odpovídající zástrčce přístroje Dbejte na to aby prodlužovací kabel nebyl poškozen Pokud je třeba prodlužovací kabel používejte minimálně kabel 12 AWG 2 5 mm2 aby byl zaručen příkon produktu Poddimenzovaný kabel může z...

Page 154: ...stroje a před vyjmutím trysky k čištění snižte tlak Nenechávejte bez dozoru přístroj pod napětím nebo pod tlakem Pokud není přístroj používán vypněte ho a proveďte postup k tlakovému odlehčení k vypnutí přístroje Při vysokotlakém stříkání může dojít ke vstříknutí jedů do těla a k vážnému zranění Pokud došlo ke vstříknutí okamžitě vyhledejte chirurga Hadice a díly zkontrolujte ohledně známek poškoz...

Page 155: ...la s halogenizovanými uhlovodíky nebo materiá ly které obsahují taková rozpouštědla Mnoho jiných kapalin může případně obsahovat chemikálie které mohou reagovat s hliníkem Informujte se o slučitelnosti u dodavatele materiálu NEBEZPEČÍ OD POHYBLIVÝCH DÍLŮ Pohyblivé díly mohou přiskřípnout uříznout nebo utrhnout prsty a jiné části těla Přístroj nepoužívejte bez ochranných zařízení nebo krytů Přístro...

Page 156: ... knoflík ve směru hodinových ručiček abyste zvýšili tlak příp proti směru hodinových ručiček abyste tlak snížili C Odvzdušňovací ventil K odvzdušnění čerpadla D Otevřený odvzdušňovací ventil Ventil je otevřený když se držadlo nachází ve svislé poloze E Uzavřený odvzdušňovací ventil Ventil je zavřený když se držadlo nachází ve vodorovné poloze ...

Page 157: ... a může směrovat do různých směrů Pokud je stříkací tryska nebo hadice ucpaná řiďte se kroky 1 až 4 nahoře Připravte se na to že u kroku 3 se barva dá do kbelí ku UPOZORNĚNÍ Když se domníváte že tlak na základě vadného odvzdušňovacího ventilu ventilu k odlehčení tla ku nebo jiné příčiny nemohl být vypuštěn uvolněte pomalu matici hadicové spojky abyste tlak vypustili POZOR Noste ochranné oděvy Obla...

Page 158: ...kontrolujte příčinu viz kapitola 11 Materiály na bázi rozpouštědel a vody Pokud se přechází z materiálu na bázi vody na materiál na bázi rozpouštědel musí se vyčištěný přístroj nejdříve krátce vypláchnout příslušným rozpouštědlem Po zpracování materiálů na bázi rozpouštědel je třeba přístroj vždy nejdříve vypláchnout příslušným rozpouštědlem potom teprve vodou a mýdlovým louhem a potom vodou Nikdy...

Page 159: ... Airless pistole bylo zajištěno proti spuštění a otočná tryska byla odstraněna z držáku trysky 2 Vyjměte sací trubku z nádoby a z vnější strany ji vč sacího filtru očistěte vodou nebo kompatibilním rozpouštědlem Odšroubujte sací filtr od sací trubky a vyčistěte závit 3 Našroubujte čistící adaptér na závit sací trubky 4 Vodovodní hadici spojte připojovací spojkou Gardena s čistícím adaptérem a přip...

Page 160: ...rless pistoli u vnitřního okraje kbelíku s vyteklou znečištěnou vodou odblokujte blokování spouště u Airless pistole a natáhněte spoušť pistole a držte ji 10 Nyní zavřete ventil k odlehčení tlaku a voda teď teče skrz Airless hadici a pisto li Proplachujte tak dlouho až začne vytékat čistá voda Mezi oběma okruhy střídejte několikrát polohu otevíráním a zavíráním odvzdušňovacího ventilu ven tilu k o...

Page 161: ...ubky vytéká čisté rozpouštědlo 7 Nasměrujte stříkací pistoli do kovového kbelíku a pevně ji přitiskněte proti kbelíku 8 Uvolněte blokování spouště pistole a stiskněte spoušť Nastavte nyní odvzdušňovací ventil ventil k odlehčení tlaku Rozpouštědlo je potom vedeno do hadice Vyplachu jte tak dlouho až z pistole vytéká čistá voda Mezi oběma okruhy střídejte polohu otevíráním a zavíráním odvzdušňovacíh...

Page 162: ...stala v kontaktu s kovovou nádobou Pokud nastane případ nouze vypněte stříkací přístroj Pokud chcete v nouzovém případě zachovat provoz přístroje vypněte motor Přečtěte si oddíl k tlakovému odlehčení Otočte knoflík regulátoru tlaku ve směru hodinových ručiček abyste zvýšili tlak příp proti směru hodinových ručiček abyste tlak snížili Používejte vždy ten nejnižší tlak který je třeba k úplnému rozst...

Page 163: ...ní Motor se dodává s kuličkovými ložisky s mazáním na celou dobu životnosti Uhlíkové kartáčky Uhlíkové kartáčky musí být kontrolovány v pravidelných intervalech a podle opotřebení vyměněny Nové uhlíkové kartáčky mají na začátku délku 25 4 mm a měly by být vyměněny jakmile dojde k jejich opotřebení na délku 12 7 mm Opotřebení kartáčků závisí z větší části na aktuálním použití a doporučuje se aby op...

Page 164: ...z spojovací tyč 2 a píst Posuňte pouzdro 3 nahoru přes čep 1 spojovací tyče a rozpěrný kroužek 4 vsuňte do drážky spojovací tyče 2 3 Vsuňte dva trubkové distanční kusy 11 mezi čerpadlo materiálu 9 a kryt 14 a prostrčte dva šrouby 8 skrz distanční kusy a přišroubujte je rovnoměrně střídavě 4 Smontujte opět dohromady skupinu sacích ventilů tím že sedlo O kroužek kuličku a kuličkové vedení nasadíte d...

Page 165: ...dla materiálu 1 Spodní opěrný kroužek 1 položte na plochou stranu 2 Vezměte tři ze spodních polyetylénových těsnění 2 a dvě z kožených těsnění 23 a nasaďte je dovnitř vyboulenou stranou směrem dolů na opěrný kroužek 1 v následujícím pořadí polyetylén kůže polyetylén kůže polyetylén 3 Vezměte adaptérovou vložku 3 která je na obou stranách vypouklá a nasaďte ji na spodní smonto vaná těsnění 4 Pokrač...

Page 166: ...iálu UPOZORNĚNÍ Aby se těsnění zajistilo ve správné poloze je nutno kryt čerpadla materiálu držet obráceně a celou jednotku zasunout nahoru do krytu čerpadla materiálu Poté co je celá konstrukční skupina umístěna uvnitř sklopte kryt čerpadla zpět aby všechny díly držely uvnitř 17 Dotáhněte pevně matici těsnění 21 nahoře na krytu čerpadla materiálu až cítíte lehký odpor proti talířovým pružinám 16 ...

Page 167: ...ouby 1 a křídlové šrouby 2 z přední strany krytu a zadní strany převodovky 4 Položte jednotku na zadní stranu a demontujte převodovku 5 Překontrolujte ložiska 14 17 kolo převodovky 16 kliku převodovky 15 a kluzné ložisko 9 v konstrukční skupině krytu 13 ohledně opotřebení poškození Vyměňte opotřebené poškozené díly 6 Pokud musí být vyměněn převodový tuk vyměňte ho za nový převodový tuk 7 Vyčistěte...

Page 168: ...ovým šroubem pod řídící kartou Přístroj nesmí být provozován pokud jsou dráty oddělené nebo přiskřípnuté Ujistěte se při opětném montování dohro mady že jsou připojeny všechny dráty a že nejsou přiskřípnuté Spínač ZAPNOUT VYPNOUT 1 Spusťte trochu dolů jednotku regulátoru tlaku jak je popsáno nahoře 2 Oddělte dva kabely spínače ZAPNOUT VYPNOUT 3 Povolte matici na spínací ose pomocí klíče 9 16 palce...

Page 169: ...třebované Vyměňte horní sedlo ventilu Čerpadlo nefunguje Spálená pojistka Vyměňte pojistku 220 240 V modely setrvačná 8 A pojistka Přístroj nelze zapnout Nastavení řízení Ujistěte se že je zasunutá síťová zástrčka přístroje Ujistěte se že spínač ZAP VYP je v poloze ZAP a že knoflík regulátoru tlaku je nastaven úplně vpravo ve směru hodinových ručiček max tlak Jednotka regulátoru tlaku řídící karta...

Page 170: ...řívodní ventil Pol Obj č Popis Množství 8 69 02 20 Kryt barevného stupně 1 13 69 02 33 Převlečná matice 1 157 69 03 96 Přívodní ventilová jed notka 1 158 159 160 69 03 97 Těsnící sada pro přívodní ventilovou jednotku 1balení 3 kusy 1 ...

Page 171: ...171 Seznamy náhradních dílů Nosný stojan LP 400 F Pol Obj č Popis Množství 1 69 04 01 Nosný stojan LP 400 F 1 2 69 04 02 Držák vnější závit 4 42 69 02 42 Pryžová nožička 2 ...

Page 172: ...172 Seznamy náhradních dílů Motor pohon ...

Page 173: ...u hlavou 2 24 69 02 47 Distanční objímka 2 25 69 04 07 Těsnění skříň svorkovnice 1 26 69 04 08 Skříň svorkovnice LP 400 F 1 28 69 04 09 Šroub s čočkovitou hlavou pro skříň svorkovnice LP 400 F 4 30 69 02 63 Odlehčovač od tahu 2 31 69 04 11 Matice skříň svorkovnice LP 400 F bez obrázku 2 33 69 04 12 Šroub připevnění skříň svor kovnice LP 400 F 2 35a 69 02 40 Ložisko 1 35b 69 02 43 Kluzné ložisko 1 ...

Page 174: ...ypouštěcího ventilu 1 12 69 02 50 O kroužek 1 13 69 02 30 Koule vypouštěcího ventilu 1 14 69 02 48 Píst kompletní 10 14 1 15 69 02 23 Distanční objímka 1 16 69 02 28 Talířová pružina 3 17 69 02 26 Opěrný kroužek 1 18 69 02 27 Ucpávkové těsnění nahoře 3 19 69 02 25 Uchycení s drážkou pro těsnění nahoře 1 20 69 02 24 Držák těsnění 1 21 69 02 36 Matice ucpávky 1 22 69 02 81 Ucpávkové těsnění nahoře 2...

Page 175: ...3 69 02 64 Šroub 2 UPOZORNĚNÍ Při výměně konstrukčního dílu 1 dejte na vnější část objímky rovnoměrně pár kapek Loctite 246 dříve než ho vsadíte do konstrukční skupiny krytu Pol Obj č Popis Množství 1 69 02 76 Sací hadice 1 2 69 09 01 Sací filtr 1 4 69 04 16 Obtoková hadice komplet ní LP 400 F 1 5 69 70 56 Odtok obtoková hadice 1 6 69 04 17 Připojovací adaptér 1 ...

Page 176: ...egulátoru tlaku 1 28 69 04 09 Šroub s čočkovitou hlavou skříň svorkovnice LP 400 F 6 29 69 04 11 Pojistná matice 2 30 69 02 63 Odlehčovač od tahu 2 31 69 01 87 Spínač Zapnout Vypnout 1 32 69 04 23 Pryžová objímka spínač Zapnout Vypnout 1 33 69 04 12 Šroub M8 x 12 2 34 69 04 25 Řídící karta 230 V LP 400 F 1 37 69 04 26 Spojka 230 V pro řídící kartu LP 400 F 1 ...

Page 177: ...á nebo zelená žlutá uzemnění černá hnědá modrá bílá červená Seznamy náhradních dílů Propojení řízení Pol Obj č Popis Množství 1 69 01 93 Síťový kabel 1 3 69 01 87 Spínač Zapnout Vypnout 1 7 69 04 18 Regulátor tlaku LP 400 F 1 k motoru Regulátor tlaku ...

Page 178: ...táhněte 9 Ochranné ramínko 4 opět namontujte na aretaci 22 Oprava Výměna jehly Tlakové odlehčení POZOR 1 Odlehčete tlak aretujte ramínko spouště 2 Trysku 36 a ochranu trysky 35 odmontujte od pistole a odlehčete tlak 3 Hadici na materiál odmontujte od pistole a otočného kloubu 5 4 Tiskněte spoušť zatímco budete odšroubovávat difuzor 15a 5 Odstraňte pojistnou matici 9 a koncovou krytku 17 6 Jehlu vy...

Page 179: ...pistole 100M 009 1 7 69 06 78 Těsnění rukojeť pistole 009 1 8 69 06 79 Blok zpětného tahu 009 1 9 69 06 81 Matice pro jehlu trysky 009 1 10 69 06 82 Kolíky zpětného tahu 009 2 22 69 06 86 Aretace ochranné ramínko 009 1 23 69 06 87 Držadlo 1 24 69 06 88 O kroužek 1 26 69 06 89 Kryt pistole 009 1 32 69 06 92 Osa rukojeť 009 1 33 69 06 93 Připevňovací matice osa 009 1 34 69 06 94 Těsnění trysky 1 35 ...

Page 180: ...ím dílů cizího původu při nepřiměřeném zacházení a skladování a také při zřejmém nedodržování provozního návodu Provádění oprav Veškeré opravy smějí být prováděny výhradně naším závodem nebo servisními stanicemi autorizovanými firmou STORCH 14 Tabulka trysek STORCH A tip vyhledávač trysek Zpraco vatelné materi ály Lazury alkydové pryskyřičné laky akrylátové laky Penetrace základní nátěry Disperze ...

Page 181: ... ochraně zdraví směrnic ES Při námi neodsouhlasené změně zařízení ztrácí toto prohlášení svou platnost Označení zařízení Airless přístroj LP 400 F Typ nářadí Stříkací přístroj na barvu Výrobek číslo 69 00 40 Použité směrnice Směrnice o strojích 2006 42 EG Směrnice o nízkém napětí 2006 95 EG Směrnice ES Elektromagnetická slučitelnost 2004 108 EG Směrnice RoHS2 2011 65 EU Zplnomocněnec k sestavení t...

Page 182: ...182 ...

Page 183: ...183 ...

Page 184: ...érence Désignation 69 00 40 LP 400 F 69 09 10 Protection contre la corrosion 1 l 69 09 15 Huile à piston 69 07 10 Flexible airless 15 m 1 4 pouce 69 07 11 Raccords doubles pour 1 4 Flexible airless N art Descrizione 69 00 40 LP 400 F 69 09 10 Protezione anti corrosione 1 l 69 09 15 Olio per pistoni 69 07 10 Tubo flessibile Airless 15 m 1 4 69 07 11 Nipplo doppio per tubo flessibile Air less da 1 4...

Reviews: