background image

25

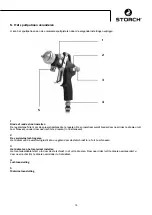
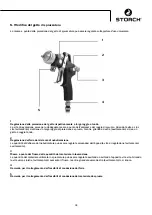
6. Régulation du jet      


La régulation du jet des pistolets de pulvérisation universels peut être modifiée par les réglages suivants :

5

Réglage jet large ou jet rond   

La vis de réglage permet d’ajuster la largeur du jet. Un réglage vers la gauche (desserrer) permet d’obtenir un jet large. 

Un réglage vers la droite (serrer) permet d’obtenir un jet rond. 

2

Régulation de l’air de pulvérisation    

Le débit d’air de pulvérisation se régule en serrant ou desserrant la vis de réglage. 

3

Régulation du débit matière   

Le débit matière se régule en serrant ou desserrant la vis de réglage. Le débit est augmenté en desserrant vers la gau-

che, il est réduit en serrant vers la droite.

Raccordement air  


Raccordement matière

2

4

Summary of Contents for System HD

Page 1: ...ole System HD Universeel spuitpistool Systeem HD Pistolet pulvérisateur universel système HP Pistola per verniciatura a spruzzo System HD Universal Spray Gun System HD Univerzální stříkací pistole systém VT DE NL FR IT GB CZ ...

Page 2: ... innerhalb Deutschlands Lieferumfang Spritzpistole Fließbecher Bedienungsanleitung Technische Daten Netto Gewicht 440 g Luftkopf Sechslochkopf Druckbereiche max Zerstäuberdruck 8 bar max Materialdruck 8 bar max Betriebstemperatur 80 C Schallpegel gemessen in ca 1 m Abstand zur Spritzpistole 85 dB A Weitere Luftköpfe auf Anfrage Technische Änderungen vorbehalten Inhaltsverzeichnis Seite Lieferumfan...

Page 3: ...en verboten Beim Verspritzen leichtentzündlicher Materialien z B Lacke Kleber Reinigungsmittel usw besteht erhöhte Gesundheits Explosions und Brandgefahr Um eine ausreichende Erdung der Spritzpistole zu gewährleisten sind nur geerdete Luftschläuche zu verwenden Schalten Sie vor jeder Wartung und Instandsetzung die Luft und Materialzufuhr zur Spritzpistole drucklos Verlet zungsgefahr Halten Sie bei...

Page 4: ...edienung ACHTUNG Bevor Sie die Spritzpistole in Betrieb setzen muss folgende Voraussetzung erfüllt sein Der Material druck darf nicht höher eingestellt sein als 8 bar Der Luftdruck darf 8 bar nicht überschreiten HINWEIS 1 Setzen Sie die Spritzpistole in Betrieb um eine Spritzbildprobe zu erzeugen Das Spritzbild kann auf ein Probewerkstück Blech Pappe oder Papier abgegeben werden 2 Kontrollieren Si...

Page 5: ...en Ausschrauben zum Breitstrahl durch Rechtsdrehen Einschrauben zum Rundstrahl 2 Zerstäuberluft regulieren Die Zerstäuberluftmenge lässt sich durch Ein bzw Ausschrauben der Stellschraube regulieren 3 Materialdurchflussmenge einstellen Die Materialmenge lässt sich durch Ein bzw Ausschrauben der Stellschraube regeln Die Materialmenge wird durch Linksdrehen Ausschrauben erhöht durch Rechtsdrehen Eins...

Page 6: ...rialdruck erhöhen Spritzbild ist sehr ballig Materialdruck verringern Zerstäuberluftdruck erhöhen Pistole tropft Materialnadel oder düse verschmutzt bzw beschädigt Stellschraube Pos 18 zu weit nach hinten gedreht zu wenig Material im Materialbehälter Reinigen bzw ersetzen Stellschraube etwas einschrauben Rechtsdrehen Material auffüllen Stoßweiser oder flatternder Spritzstrahl Becher wird während d...

Page 7: ...enkörper aus 4 Nehmen Sie die Dichtung Pos 4 von der Materialdüse ab Die Montage der neuen Düseneinlage sowie der restlichen Bauteile erfolgt in umgekehrter Reihenfolge 8 2 Materialnadel wechseln 1 Schrauben Sie die Stellschraube Pos 18 ab 2 Entnehmen Sie die Feder Pos 17 3 Ziehen Sie die Materialnadel Pos 16 aus dem Pistolenkörper Die Montage erfolgt in umgekehrter Reihenfolge Eine Vorlufteinstel...

Page 8: ...führliche Reinigung 1 Zerlegen Sie die Pistole 2 Reinigen Sie den Luftkopf und die Materialdüse mit einem Pinsel und dem Reinigungsmittel 3 Reinigen Sie alle übrigen Bauteile und den Pistolenkörper mit einem Tuch und dem Reinigungsmittel 4 Bestreichen Sie folgende Teile mit einem dünnen Fettfilm Nadelfeder alle gleitenden Teile und Lagerstellen Die beweglichen Innenteile sind wenigstens einmal wöc...

Page 9: ...schenring Düse HD 5 63 91 07 Luftverteilerring HD 6 Pistolenkörper kompl HD 7 63 91 09 Ventildichtung HD 8 Ventilstopfbuchse 9 Ventilschaft 10 Ventilkegel 11 Ventilfeder 12 Scheibe 13 63 91 11 O Ring klein HD 14 63 91 13 O Ring groß HD 15 Federbuchse 16 Materialnadeln für Düsengröße wahlweise 63 92 03 Materialnadel kompl 0 3 mm HD 63 92 05 Materialnadel kompl 0 5 mm HD 63 92 08 Materialnadel kompl...

Page 10: ...schleißteile fallen nicht unter die Garantieansprüche Sämtliche Ansprüche erlöschen durch den Einbau von Teilen fremder Herkunft bei unsachgemäßer Handhabung und Lagerung sowie bei offensichtlicher Nichtbeachtung der Betriebsanleitung Durchführung von Reparaturen Sämtliche Reparaturen dürfen ausschließlich durch unser Werk oder von STORCH autorisierten Service Stationen durchgeführt werden 11 Zube...

Page 11: ... nien entspricht Bei einer nicht mit uns abgestimmten Änderung des Gerätes verliert diese Erklärung ihre Gültigkeit Bezeichnung des Gerätes Universal Spritzpistole System HD Geräte Typ Spritzpistole Artikel Nummer 63 91 00 Angewandte Richtlinien Maschinen Richtlinie 2006 42 EG ATEX Richtlinie 94 9 EG DIN EN 12100 Teil 1 DIN EN 12100 Teil 2 DIN EN 1127 1 DIN EN 1953 DIN EN 13463 1 Bevollmächtigter ...

Page 12: ...vloeibeker handleiding Technische gegevens Nettogewicht 440 g Luchtkop kop met 6 gaatjes Druksectoren Max verstuifdruk 8 bar Max materiaaldruk 8 bar Max bedrijfstemperatuur 80 C Geluidsniveau gemeten op ca 1 m afstand van het spuitpistool 85 dB A Op verzoek zijn ennog meer luchtkoppen verkrijgbaar Technische wijzigingen voorbehouden Omvang van de levering 12 Technische gegevens 12 1 Algemeen 13 2 ...

Page 13: ...n van makkelijk ontvlambaar materiaal als lak kleefmid del reinigingsmiddel e d bestaan er meer gezondheidsrisico s en is er meer gevaar voor ontploffing en brand Om een toereikende aarding van het spuitpistool te waarborgen mag u enkel gebruik maken van geaarde luchtslangen Zet de lucht en materiaaltoevoer naar het spuitpistool in drukloze toestand alvorens onderhoud of herstelling van het toeste...

Page 14: ...t spuitpistool in bedrijf stelt dient de volgende voorwaarde vervuld te zijn de materiaaldruk mag niet hoger ingesteld zijn dan 8 bar De luchtdruk mag de 8 bar niet overschrijden OPMERKING 1 Zet het spuitpistool in werking om een spuitpatroon uit te proberen Het spuitpatroon kan u op een proefwerkstuk plaat karton of papier proberen 2 Controleer het spuitpatroon en verander eventueel de instelling...

Page 15: ...ks te draaien uit te schroeven ronder door naar rechts te draaien in te schroeven 2 De verstuivinglucht regelen Het debiet van de verstuivinglucht kan u regelen door de stelschroef in of uit te schroeven 3 Het debiet van het materiaal instellen Het materiaaldebiet stelt u in door de stelschroef in of uit te draaien Door naar links uit te draaien vermeerdert u door naar rechts in te draaien vermind...

Page 16: ...aaldruk verhogen Het spuitpatroon staat bol de materiaaldruk verlagen de verstuivingluchtdruk verhogen Het pistool druipt De materiaalnaald of sproei kop is vuil of beschadigd De stelschroef pos 18 is te ver naar achteren gedraaid Te weinig materiaal in het materiaalreservoir schoonmaken of vervangen de stelschroef ietwat inschroeven naar rechts draaien materiaal bijvullen Sproeistraal schokkend o...

Page 17: ...t een sleutel SW 13 uit de pistoolbody 4 Neem de dichting pos 4 van de materiaalsproeikop af De montage van de nieuwe sproeikopinzet alsook van de overige onderdelen gebeurt in omgekeerde volgorde 8 2 De materiaalnaald vervangen 1 Schroef de stelschroef pos 18 af 2 Neem de veer pos 17 weg 3 Trek de materiaalnaald pos 16 uit de pistoolbody De montage gebeurt in omgekeerde volgorde De voorlucht hoef...

Page 18: ...en 1 Haal het pistool uit elkaar 2 Maak de luchtkop en de materiaalsproeikop met een kwast en het reinigingsmiddel schoon 3 Maak al de overige onderdelen en de pistoolbody schoon met een doek en het reinigingsmiddel 4 Bestrijk de volgende onderdelen met een dunne vetfilm de naaldveer al de glijdende onderdelen en lagers De beweeglijke onderdelen binnenin dient u minstens eens per week te vetten De...

Page 19: ...eriaalsproeikop 2 5 mm HD 4 63 91 06 tussenring sproeikop HD 5 63 91 07 luchtverdeelring HD 6 pistoolbody HD compleet 7 63 91 09 klepdichting HD 8 klepdichtingbus 9 klepsteel 10 klepkegel 11 klepveer 12 schijfje 13 63 91 11 O ring HD klein 14 63 91 13 O ring HD groot 15 veerbus 16 materiaalnaalden voor de spuitopeningen naar keuze 63 92 03 materiaalnaald 0 3 mm HD compleet 63 92 05 materiaalnaald ...

Page 20: ...tend bij gebruik van het apparaat conform de voorschriften Voor slijtdelen gelden deze aanspraken niet Alle claims vervallen bij inbouw van onderdelen van externe herkomst bij verkeerde hantering en opslag en bij het klaarblijkelijk niet in acht nemen van de gebruiksaanwij zing Reparaties uitvoeren Reparaties mogen uitsluitend door onze fabriek of door STORCH geautoriseerde servicestations worden ...

Page 21: ...jnen voldoet Bij een niet met ons afgestemde modificatie van het apparaat is deze verklaring niet langer geldig Aanduiding van het apparaat Universeel spuitpistool Systeem HD Apparaattype Spuitpistool Artikelnummer 63 91 00 Toegepaste richtlijnen Machinerichtlijn 2006 42 EG ATEX ichtlijn 94 9 EG DIN EN 12100 Teil 1 DIN EN 12100 Teil 2 DIN EN 1127 1 DIN EN 1953 DIN EN 13463 1 Gevolmachtigde voor sa...

Page 22: ...s matières Page Contenu de la livraison Pistolet de pulvérisation godet gravité mode d emploi Données techniques Poids net 440 g Têtes à air Têtes à 6 trous Pression Pression max de pulvérisation 8 bar Pression max de matière 8 bar Température max de service 80 C Niveau sonore mesuré à 1 m du pistolet 85 dB A Autres modèles de têtes à air disponibles sur demande Tous droits de modification réservé...

Page 23: ...il bien ventilée Toute source d étincelle est interdite dans la zone de travail L application de produits très inflammables laques adhésifs et solvants augmente les risques d explosion et d incendie Pour une mise à la terre adéquate n utilisez que des flexibles à air d origine STORCH Le conduit d air devra être mis à la terre Fermez l alimentation en matière et en air du pistolet avant tous travau...

Page 24: ...rimé Le pistolet est prêt pour la mise en service 5 Mise en service et manipulation ATTENTION Avant la mise en service du pistolet de pulvérisation assurez vous que les conditions suivantes sont réunies la pression matière ne doit pas être supérieure à 8 bar RECOMMANDATION 1 Mettez le pistolet en service pour effectuer un essai d application L essai d application peut être réa lisé sur une pièce t...

Page 25: ...ermet d obtenir un jet large Un réglage vers la droite serrer permet d obtenir un jet rond 2 Régulation de l air de pulvérisation Le débit d air de pulvérisation se régule en serrant ou desserrant la vis de réglage 3 Régulation du débit matière Le débit matière se régule en serrant ou desserrant la vis de réglage Le débit est augmenté en desserrant vers la gau che il est réduit en serrant vers la ...

Page 26: ...ression matière L application est ovale Réduisez la pression matière Augmentez la pression de pulvérisation Le pistolet goutte Aiguille buse encrassée ou abîmée Vis de réglage pos 18 trop en arrière Pas assez de matière dans le godet Nettoyez ou remplacez Resserrez légèrement à droite Remplissez le godet de matière Jet saccadé ou hésitant Le godet est trop incliné pendant la pulvérisation La buse ...

Page 27: ...du pistolet avec une clé de 13 4 Sortez le joint de la buse pos 4 Procédez inversement pour l assemblage d une nouvelle buse et des autres pièces 8 2 Remplacement de l aiguille 1 Desserrez la vis de réglage pos 18 2 Sortez le ressort pos 17 3 Sortez l aiguille pos 16 du corps du pistolet Procédez inversement pour l assemblage Un réglage préalable de l air n est pas nécessaire 8 3 Undichte Nadelpac...

Page 28: ...a buse avec un pinceau enduit de l agent nettoyant 3 Nettoyez toutes les autres pièces et le corps du pistolet avec un chiffon enduit de l agent nettoyant 4 Lubrifiez les pièces suivantes avec une fine pellicule de graisse Ressort d aiguille Toutes les pièces coulissantes et les logements Lubrifiez les pièces internes mobiles au moins une fois par semaine Les ressorts doivent être enduits en perma...

Page 29: ...ague de distribution d air HP 6 Corps de pistolet complet HP 7 63 91 09 Joint de valve HP 8 Presse étoupe de valve 9 Tige de valve 10 Cône de valve 11 Ressort de valve 12 Rondelle 13 63 91 11 Joint torique petit HP 14 63 91 13 Joint torique grand HP 15 Douille de ressort 16 Aiguille pour les calibres de buses au choix 63 92 03 Aiguille complète 0 3 mm HP BP 63 92 05 Aiguille complète 0 5 mm HP 63 ...

Page 30: ...t qu une utilisation conforme à la destination de l appareil Les pièces d usure ne sont pas prises en charge par la garantie Tout droit à garantie est rendu caduque par le montage de pièces qui ne sont pas d origine par une manipulation et un entreposage incorrects ainsi qu en cas de non respect évident des instructions de service Exécution de réparations Toutes les réparations doivent exclusiveme...

Page 31: ... nos soins En cas de modification non convenue avec nous la présente déclaration perd toute validité Désignation de l appareil Pistolet pulvérisateur universel système HP Type d appareil Pistolet de pulvérisation Référence article 63 91 00 Directives appliquées Directive sur les machines 2006 42 CE Directive ATEX 94 9 EG DIN EN 12100 part 1 DIN EN 12100 part 2 DIN EN 1127 1 DIN EN 1953 DIN EN 1346...

Page 32: ...amma pressioni max di polverizzazione 8 bar Pressione max del materiale liquido 8 bar Temperatura max d esercizio 80 C Livello di pressione sonora misurata a 1 m circa di distanza dalla pistola 85 dB A Ulteriori testine su richiesta Salvo modifiche tecniche Fornitura 32 Dati tecnici 32 1 Generalità 33 2 Avvertimenti generali attinenti la sicurezza 33 3 Descrizione tecnica 34 4 Allacciamento delle ...

Page 33: ...re fiamma o luce non schermate Durante la spruzzatura di liquidi facilmente infiammabili per es vernici collante detergenti ecc sussi ste pericolo di incendio esplosione e danni alla salute delle persone Per garantire una sufficiente messa a terra della pistola occorre utilizzare flessibili portati a terra Prima di procedere a manutenzione o riparazione togliere la pressione dell aria e del materi...

Page 34: ...zione la pistola a spruzzo occorre assicurare di soddisfare la seguente esigenza La pressione del materiale non deve essere impostata a un valore superiore agli 8 bar La pressione dell aria non devo superare gli 8 bar AVVERTENZA 1 Mettere in funzione la pistola a spruzzo per controllare il risultato di verniciatura a spruzzo Ciò può essere eseguito spruzzando su un provino del materiale da lavorar...

Page 35: ...to a raggio tondo 2 Regolazione dell aria del sistema di nebulizzazione La quantità di deflusso dal nebulizzatore può essere regolata servendosi dell apposita vite di regolazione svitamento avvitamento 3 Messa a punto del flusso della quantità del materiale in lavorazione La quantità del materiale utilizzato in spruzzatura può essere regolata avvitando o svitando l apposita vite vite Girando la vi...

Page 36: ...ione esercitata sul materiale di spruzzo Aumentare la pressione dell aria nebulizzante La pistola gocciola L ago in uscita spruzzo del materiale è rispettivamente sporco o danneggiato Pulirlo o sostituire Rientrare di poco la vite di regolazione avvitandola verso destra Aggiungere materiale utilizzato per lo spruzzo Proiezione dello spruzzo discontinua o tremolante Durante l operazione di spruzzo ...

Page 37: ...testina dell aria pos 2 3 Svitare e togliere l ugello pos 3 usando apposita chiave SW 13 ed estrarlo dal corpo della pistola 4 Togliere dall ugello la guarnizione pos 4 Il montaggio del nuovo ugello e dei rimanenti pezzi si svolge procedendo in senso inverso 8 2 Sostituzione dell ago 1 Svitare e togliere la vite di messa a punto pos 18 2 Togliere la molla pos 17 3 Estrarre l ago pos 16 dal corpo d...

Page 38: ...re la testina dell aria e l ugello servendosi di pennello e appropriato detergente 3 Pulire tutte le rimanenti parti e il corpo della pistola usando panno morbido e detergente 4 Spalmare le seguenti parti formando una patina sottile di grasso Molla dell ago tutte le parti scorrevoli e di supporto Le parti interne mobili vanno lubrificate almeno una volta la settimana Occorre ripassare in continuaz...

Page 39: ...o per spruzzo materiale da 2 2 mm HD 63 91 25 Ugello per spruzzo materiale da 2 5 mm HD 4 63 91 06 Anello intercalare per ugello HD 5 63 91 07 Anello di distribuzione dell aria HD 6 Corpo della pistola compl HD 7 63 91 09 Guarnizione della valvola HD 8 Premistoppa della valvola 9 Stelo della valvola 10 Sfera della valvola 11 Molla della valvola 12 Rondella 13 63 91 11 Anello a O piccolo HD 14 63 9...

Page 40: ...sono soggetti a diritti di garanzia Decadranno tutti i diritti di garanzia con l aggiunta delle componenti di terzi maneggio e magazzinaggio non appropriato come anche in casi di ovvia non osservanza delle istruzioni per l uso Esecuzione di riparazioni Ogni intervento di riparazione va eseguito esclusivamente nei nostri stabilimenti o presso una service station autorizza ta STORCH 11 Accessori e r...

Page 41: ...ate nelle Direttive CE In caso di una modifica apportata all utensile non concordata con noi questa dichiarazione perde ogni sua validità Denominazione dell apparecchio Pistola per verniciatura a spruzzo System HD Tipo di utensile Pistola a spruzzo Numero articolo 63 91 00 Direttive applicate Direttiva macchine 2006 42 CE Direttiva ATEX 94 9 EG DIN EN 12100 parte 1 DIN EN 12100 parte 2 DIN EN 1127...

Page 42: ...Page Scope of delivery Spray gun gravity feed cup operating manual Technical Data Net weight 440 g Air cap Six hole cap Pressure range Max atomizing pressure 8 bar Max material pressure 8 bar Max operating temperature 80 deg C Noise level measure in abt 1 m distance to the spray cabin 85dB A Other air caps upon request Subject to technical modifications Scope of delivery 42 Technical Data 42 1 Gen...

Page 43: ...ammable materials such as lacquers adhesives cleaning agents et cetera there is a higher health explosi on and fire risk In order to ensure sufficient earthing of the spray gun earthed air tubes only shall be used Prior to any servicing and repair depressurise the air and material feed to the spray gun risk of injury When spraying materials do not hold hands or other parts of the body in front of ...

Page 44: ...now 5 Start up and operation WARNING Before starting up the spray gun the following prerequisites have to be fulfilled The material pressure must not be set any higher than 8 bar The air pressure must not exceed 8 bar NOTE 1 Start up the spray gun in order to produce a spray pattern The spray pattern can be made on a sampling work piece sheet metal cardboard or paper 2 Check the spray pattern and ...

Page 45: ...oad jet and by turning to the right turning in it becomes a round jet 2 Controlling the atomisation air The volume of the atomisation air can be controlled by screwing the adjusting screw in or out 3 Setting the material flow volume The material volume can be controlled by screwing the adjusting screw in or out By turning to the left turning out the material volume is increased and by turning to t...

Page 46: ...ease Fluid Pressure Spray pattern is very bally Reduce the material pressure Increase the atomisation air pres sure Gun is dripping Material needle or nozzle is dirty and or damaged Adjusting screw item 18 is turned too far back Too little material in the material hopper Clean or replace Screw the adjusting screw in a bit turning to the right Fill material Intermittent or flutte ring jet Cup is ti...

Page 47: ...le item 3 from the gun body 4 Remove the seal item 4 from the material nozzle The installation of the new nozzle insert as well as the remaining component parts is carried out in reverse order 8 2 Changing the material needle 1 Unscrew the adjusting screw item 18 2 Remove the spring item 17 3 Pull the material needle item 16 from the gun body Assembly is conducted in reverse sequence The pre air s...

Page 48: ...al and degree of contamination Thorough cleaning 1 Disassemble the gun 2 Use a brush and cleaning agent to clean the air cap and material nozzle 3 Clean all other components and the piston gun with a cloth and cleaning agent 4 Cover the following parts with a thin film of grease needle spring all sliding parts and bearing positions Grease the moving interior parts at least once a week The springs ...

Page 49: ...ozzle HD 5 63 91 07 Air distribution ring HD 6 Gun body complete HD 7 63 91 09 Valve seal HD 8 Valve compression gland 9 Valve stem 10 Valve cone 11 Valve spring 12 Disc 13 63 91 11 O ring seal small HD 14 63 91 13 O ring seal large HD 15 Spring bush 16 Material needle for nozzle size optional 63 92 03 Material needle complete 0 3 mm HD 63 92 05 Material needle complete 0 5 mm HD 63 92 08 Material...

Page 50: ...ng errors and only assuming intended use of the appli ance Wear parts are not covered by such claims All claims shall become void in the event of installation of third party components improper handling and storage as well as in the event of obvious disregard of the operating instructions Repairs All repairs have to be conducted on our premises or by an authorised STORCH service centre 11 Accessor...

Page 51: ...n This warranty loses its validity in case of unauthorised modification of the tool Designation of the machine Universal Spray Gun System HD Machine Type Spray gun Item number 63 91 00 Applicable Directives Machinery Directive 2006 42 EC ATEX Directive 94 9 EU DIN EN 12100 part 1 DIN EN 12100 part 2 DIN EN 1127 1 DIN EN 1953 DIN EN 13463 1 Representative authorised to compile the technical documen...

Page 52: ...ah Strana Rozsah dodávky Stříkací pistole vytékací kelímek návod k obsluze Technické údaje Hmotnost netto 440 g Vzduchová hlavice Hlavice se šesti otvory Oblasti tlaku max tlak rozprašovače 8 barů max tlak materiálu 8 barů max provozní teplota 80 C Hladina hluku měřeno v cca 1 m vzdálenosti od stříkací pistole 85 dB A Další vzduchové hlavice na vyžádání Technické změny vyhrazeny Rozsah dodávky 52 ...

Page 53: ...ozstřikování snadno zápalných materiálů např laky lepidla čistící prostředky atd existuje zvýšené nebez pečí ohrožení zdraví výbuchu a požáru Aby se zaručilo dostatečné uzemnění stříkací pistole je třeba použít uzemněné vzduchové hadice Před každou údržbou a opravou přepněte přívod vzduchu a materiálu ke stříkací pistoli na beztlaký nebezpečí úrazu Při rozstřikování materiálů nedávejte ruce ani ji...

Page 54: ...obsluha POZOR Dříve než stříkací pistoli uvedete do provozu musí být splněn následující předpoklad Tlak materiálu nesmí být nastaven výše než na 8 barů Tlak vzduchu nesmí překročit 8 barů UPOZORNĚNÍ 1 Uveďte stříkací pistoli do provozu abyste vytvořili zkušební vzorek vzhledu aplikovaného nástři ku Tento vzorek vzhledu aplikovaného nástřiku lze dát na zkušební obráběný kus na plech lepenku nebo pa...

Page 55: ...šroubováním změní na široký paprsek otočením doprava zašroubováním se změní na kulatý paprsek 2 Regulování rozprašovaného vzduchu Množství rozprašovaného vzduchu lze regulovat zašroubováním příp vyšroubováním regulačního šroubu 3 Nastavení průtočného množství materiálu Množství materiálu lze regulovat zašroubováním příp vyšroubováním regulačního šroubu Množství materiálu se zvýší otočením doleva v...

Page 56: ...í tlaku materiálu vzhled nástřiku je velmi vypouklý snížení tlaku materiálu zvýšení tlaku vzduchu rozprašovače pistole odkapává jehla nebo tryska u přívodu materiálu je znečištěna příp poškozena regulační šroub pol 18 je otočen příliš daleko dozadu příliš málo materiálu v nádobě na materiál čištění příp výměna regulační šroub poněkud zašroubu jte otočením doprava naplnění materiálem trhavý nebo tř...

Page 57: ... pistole trysku na materiál pol 3 klíčem SW 13 4 Sundejte těsnění pol 4 z trysky na materiál Montáž nové tryskové vložky a také zbývajících konstrukčních dílů se provede v opačném pořadí 8 2 Výměna jehly u přívodu materiálu 1 Odšroubujte regulační šroub pol 18 2 Vyjměte pružinu pol 17 3 Vytáhněte jehlu u přívodu materiálu pol 16 z tělesa pistole Montáž se provede v opačném pořadí Nastavení přívodu...

Page 58: ...čištění několikrát za týden Důkladné čištění 1 Rozeberte pistoli 2 Vyčistěte vzduchovou hlavici a trysku na materiál štětcem a čistícím prostředkem 3 Vyčistěte všechny ostatní konstrukční díly a těleso pistole hadrem a čistícím prostředkem 4 Následující díly namažte tukem naneste tenký film z tuku pružina jehly všechny kluzné díly a místa uložení Pohyblivé vnitřní díly je třeba mazat minimálně jed...

Page 59: ... 63 91 06 Mezikroužek trysky VT 5 63 91 07 Kroužek rozdělovače vzduchu VT 6 Těleso pistole kompl VT 7 63 91 09 Těsnění ventilu VT 8 Ucpávka ventilu 9 Dřík ventilu 10 Kuželka ventilu 11 Ventilová pružina 12 Podložka 13 63 91 11 O kroužek malý VT 14 63 91 13 O kroužek velký VT 15 Pouzdro pružiny 16 Jehly u přívodu materiálu pro velikost trysky volitelně 63 92 03 Jehla u materiálu kompl 0 3 mm VT 63 ...

Page 60: ...u s určeným účelem Díly podléhající opotřebení nespadají do nároků na záruku Veškeré nároky zanikají zamontováním dílů cizího původu při nepřiměřeném zacházení a skladování a také při zřejmém nedodržování provozního návodu Provádění oprav Veškeré opravy smějí být prováděny výhradně naším závodem nebo servisními stanicemi autorizovanými firmou STORCH 11 Seznam příslušenství a náhradních dílů k Univ...

Page 61: ...ům k ochraně zdraví směrnic ES Při námi neodsouhlasené změně zařízení ztrácí toto prohlášení svou platnost Označení zařízení Univerzální stříkací pistole systém VT Typ nářadí Stříkací pistole Výrobek číslo 63 91 00 Použité směrnice Směrnice o strojích 2006 42 EG Směrnice ATEX 94 9 EG DIN EN 12100 díl 1 DIN EN 12100 díl 2 DIN EN 1127 1 DIN EN 1953 DIN EN 13463 1 Zplnomocněnec k sestavení technickýc...

Page 62: ...62 ...

Page 63: ...63 ...

Page 64: ... Bezeichnung 63 91 00 Universal Spritzpistole System HD Art nr Beschrijving 63 91 00 Universeel spuitpistool met hoge druksysteem Référence Désignation 63 91 00 Pistolet pulvérisateur universel système HP N art Denominazione 63 91 00 Pistola per verniciatura a spruzzo System HD Art no Description 63 91 00 Universal Spray Gun System HD Výr č Označení 63 91 00 Univerzální stříkací pistole systém VT ...

Reviews: