8
IMPORTANT: These instructions are a very basic guideline for the steps to installing your chimney.
For complete instructions, refer to the installation manual that came with your chimney. Chimney
installation instructions are usually located in the box with the chimney cap or chimney support
components. If you have any questions about the installation of your chimney, please contact the
dealer where you purchased your stove.
CAUTION: Inspect all chimney components for damage. Do not use any damaged chimney
components.
1.
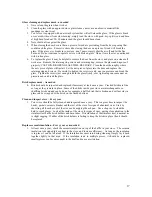
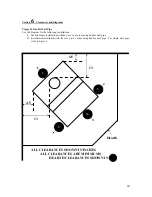
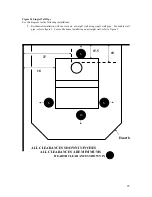
Familiarize yourself with the clearances of the stove, for the configuration in which you have
chosen to install, i.e. corner installation or straight wall installation (see section 6). Notice the
clearances listed for the chimney, this will help you determine the location of the hole in the
ceiling.
2.
Once you’ve determined the hole location for the chimney, use a sheet rock saw or reciprocating
saw to cut the ceiling to the desired hole size.
BE SURE TO CHECK FOR OBSTRUCTIONS
BEFORE CUTTING THE HOLE, REFER TO PIPE INSTALLATION INSTRUCTIONS
FOR HOLE SIZE.
3.
Use a plumb to transfer the ceiling hole center to the underside of the roof sheeting in the attic.
Once you’ve marked the hole center on the roof sheeting, drill a hole from the inside or poke a
screw or nail through the sheeting so you can find that location once you’re on the roof.
4.
Always be careful when using a ladder and working on a roof. Have someone hold the
ladder for you while you are climbing up and down. Use a positioning belt or harness and
safety rope to secure yourself on the roof.
Locate the hole or screw/nail on the roof that you
poked through from the attic. Lay the roof flashing down and center over the hole, screw or nail.
Using a pencil, trace the inside of the flashing cone onto the roof. Remove the flashing and use a
reciprocating saw to cut out the hole.
Cut the hole out about 1” larger than the mark all the
way around.
5.
Use the two pieces of 2x4 or 2x6 to brace across the trusses in the attic. Position the bracing in a
way that you will be able to attach the chimney support with the proper clearance to the bracing
(see chimney installation instructions for proper clearances). Attach the chimney support to the
bracing using screws or nails.
6.
Using a flat pry bar, gently lift the shingles off the roof from the middle of the hole up. Slide the
flashing up under the shingles on the top half of the hole and let the flashing sit on top of the
shingles on the bottom half of the hole. Use silicone or roof tar to seal underneath the flashing and
use screws or nails to fasten the flashing to the roof. Be sure to apply a small amount of sealer to
each screw head.
7.
Slide the first section of chimney through the flashing and into the chimney support. Chimney
supports vary from one brand of pipe to another, be sure that the first section of pipe is well
secured into the chimney support, again, paying close attention to the chimney manufacturers
installation instructions.
8.
Continue to fasten chimney sections above the first one until the correct height is reached (see pipe
installation instructions)
9.
Install the chimney cap
10.
Install the storm collar above the flashing and use high temp silicone to seal.
11.
If necessary, install a roof brace or guy wires to steady the chimney. Bracing is usually required if
the chimney extends more than five feet above the roof.
STEP 3: Installing Hearth and outside air.
1.
The hearth must be a non-combustible material and must extend beyond the base of the stove 6” to
the sides and back and 16" to the front (see section 6).
Outside Air –
An
outside air supply is required in all manufactured/mobile home installations.


