INSTALLING ACCESSORIES
INSTALLING FASCIA AS BARGE
FASCIA INSTALLATION
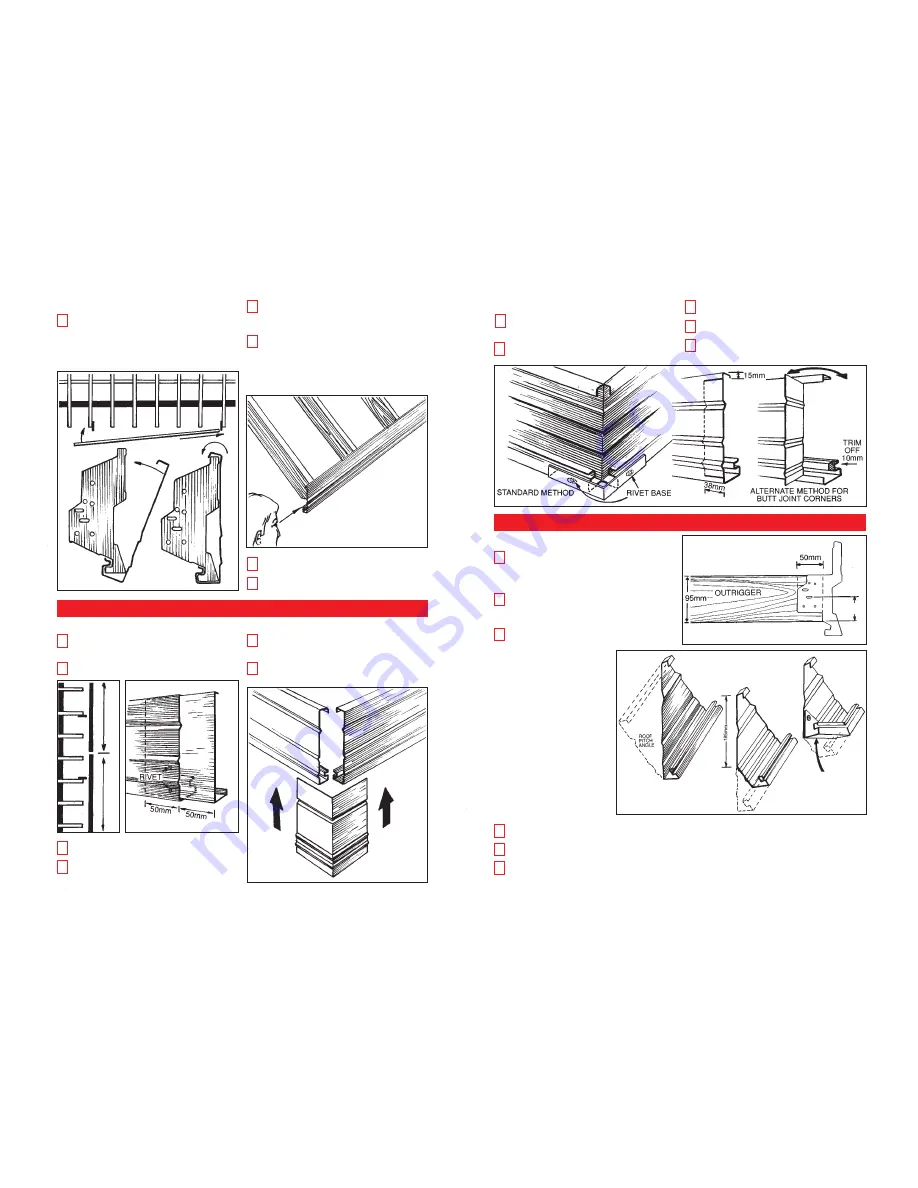
Slide the fascia onto one of the two brackets fixed
(see 5 above).
▫
Clip the base of the fascia into the second bracket.
▫
Stretch the top of the fascia over the top of the
bracket. In some cases, fascia can be simply slid
over the second bracket.
At the centre point of the run, insert a bracket into
the fascia and then fix the bracket to the set up
point previously marked (Step 7 previous page) with
a nail in the centre slot only.
Check the fascia for straightness (by eye) by
looking along the base of the fascia (also check
with spirit level to base of fascia). When straight, fix
every second rafter to the set up lines marked, again
using the centre slot and now utilizing one of the
base holes. Ensure that the base of the fascia
stays straight.
1
MARKING OUT
On the barge rafter bracket, the centre slot is set
52 mm from the base of the outrigger and the
back of the bracket is set in 50 mm from its end.
FIXING BRACKETS
Fix only two brackets as previously described
using three nails on each side of gable.
INSTALLING
The first length of barge to be installed must first
have the lower end made to fit the fascia.
This is done by:
▫
Marking on the front of the
barge the roof pitch and then cut
off.
▫
On the cut edge, mark down
185 mm, and then draw a line at
90˚ from the base to intersect this
point, then cut this off.
▫
On the cut edge, mark a line at
90˚ at the intersection of the two
previous steps. This line will go to
the base of the fascia.
▫
Cut along the line marked in the
previous step. Also cut excess
metal from below soffit groove
(trim this groove to length if
needed). Push upwards and rivet.
Attach barge as previously described for fascia.
Attach barge mould as per external mitre (remember that the long leg of the barge mould fits on the
fascia. Both left hand and right hand barge moulds are available).
Install remaining barge rafter brackets.
1
1
1
2
3
4
JOINING SLEEVES
Where a joining sleeve is required, do not fully
nail standard rafter brackets for at least two
rafters adjacent to the join.
Rivet the joining sleeve to one length of fascia
as shown.
1
2
Slide the second piece of fascia over the joining
sleeve and rivet.
Check that the fascia is straight by sighting
along the base of the fascia and nail the
remaining brackets.
3
4
EXTERNAL MITRES
Slide the external mitre over the adjoining fascia
and check that the fascia has not been pulled out
of line and that the corner remains square.
Rivet the external mitre at the 'dimples' embossed
in the mitre. Recheck for square and alignment.
1
2
2
3
INTERNAL MITRES
Measure the fascia from the inside of the nearest
external corner or joining sleeve to the proposed
position of the internal mitre.
Cut the top lip of the fascia and the base with a
hacksaw and bend to 90˚.
Fix the fascia to the brackets on the long run in
the same manner as previously described.
Ensuring that the internal corner remains at 90˚,
fix the rafter brackets to the short run of fascia.
Attach the internal corner with rivets as shown.
Note that the alternate butt joint method still
requires an internal corner mitre.
1
2
3
5
4
Finish nailing all marked brackets and then all
brackets not previously installed.
Install hip rafter brackets remembering to fold the
top tag over the rafter and nail.
4
5
52mm


