PREPARING AND INSTALLING BARGE GUTTER
CLICKFAST
®
GUTTER INSTALLATION
Cut barge vertically at apex. The second length of
barge to be put up is done in a reverse manner.
This is done by:
▫
Cut barge vertically to suit apex on the ground.
▫
Install barge as per previous length.
▫
Mark length against fascia.
▫
Remove the second piece of barge.
▫
Modify end to suit fascia as per previous length.
▫
Re-install barge.
▫
Attach barge mould as per previous.
▫
Install remaining barge rafter brackets.
▫
Install barge apex cover by pushing up from
bottom, rivet to barge and trim excess.
5
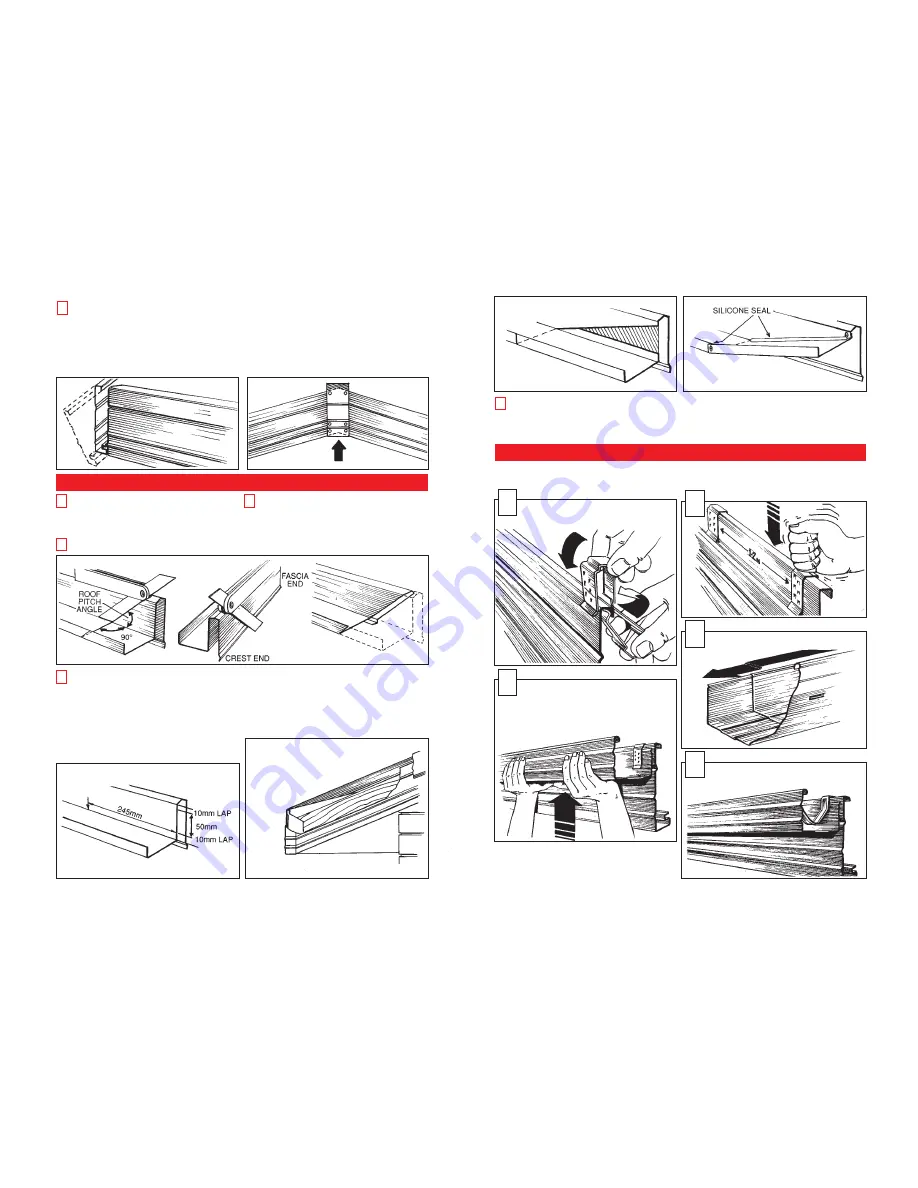
On the apex end of your barge gutter, set an
adjustable bevel to the roof pitch, mark a line up
the front of the barge gutter, continue the line over
the crest of the gutter, across the pan and up the
short side, again using the roof pitch.
Cut along the lines to remove the excess
material.
1
2
Repeat the above process, drawing a second line
10mm from the cutting line, this allows a lap to
join the two lengths together at the apex later.
(This length has a joining line marked on it).
3
Measure the barge from the apex cut to the
outside edge of the fascia.
NOTE: Where your barge gutter reaches the eaves
gutter, the barge gutter is below the level of the back
of the eaves gutter. To rectify this simply follow these
steps.
▫
From the base of the barge gutter, allow a 10mm
lap then mark a second line 50mm above the first
(note: make sure to leave at least 10mm from the top
edge to join together).
To maintain a downward water flow to the gutter:
▫
Mark and cut as shown in the drawing.
▫
Fold the base up and rivet and silicone joints.
Please note that the vertical edge may need to be
trimmed to suit tiles.
▫
Repeat for remaining lengths.
4
Install the first length of barge gutter (that has
no allowance for joining at the apex) ensuring it
sits parallel to the barge.
▫
Rivet the barge gutter to the barge at
approximately 900mm centres just above the rib.
NOTE: Most gutter profiles produced by other manufacturers cannot be used in conjunction with the Stratco
suspension clip.
▫
Install the second length of barge gutter and at the
apex, where the two lengths meet, bend the laps
down to meet the first length of barge gutter, rivet
and seal.
5
In the middle of a run of gutter and fascia,
two suspension clips are installed onto the
fascia, approximately 1200mm apart.
1
NOTE: When joining gutter lengths, always
make sure that the water flow runs down
the lap.
4
Internal gutter straps are rolled into the front
bead and then bent over the back of the
fascia. These are also placed at approximately
1200mm spacing.
5
The gutter is lifted until the suspension clip
engages the back of the gutter to hold it in
position.
Falling the gutter to the water outlets is achieved
by “clicking” the gutter up to the top tooth at the
point furthest away and to the second lowest tooth
near the water outlet.
3
2


