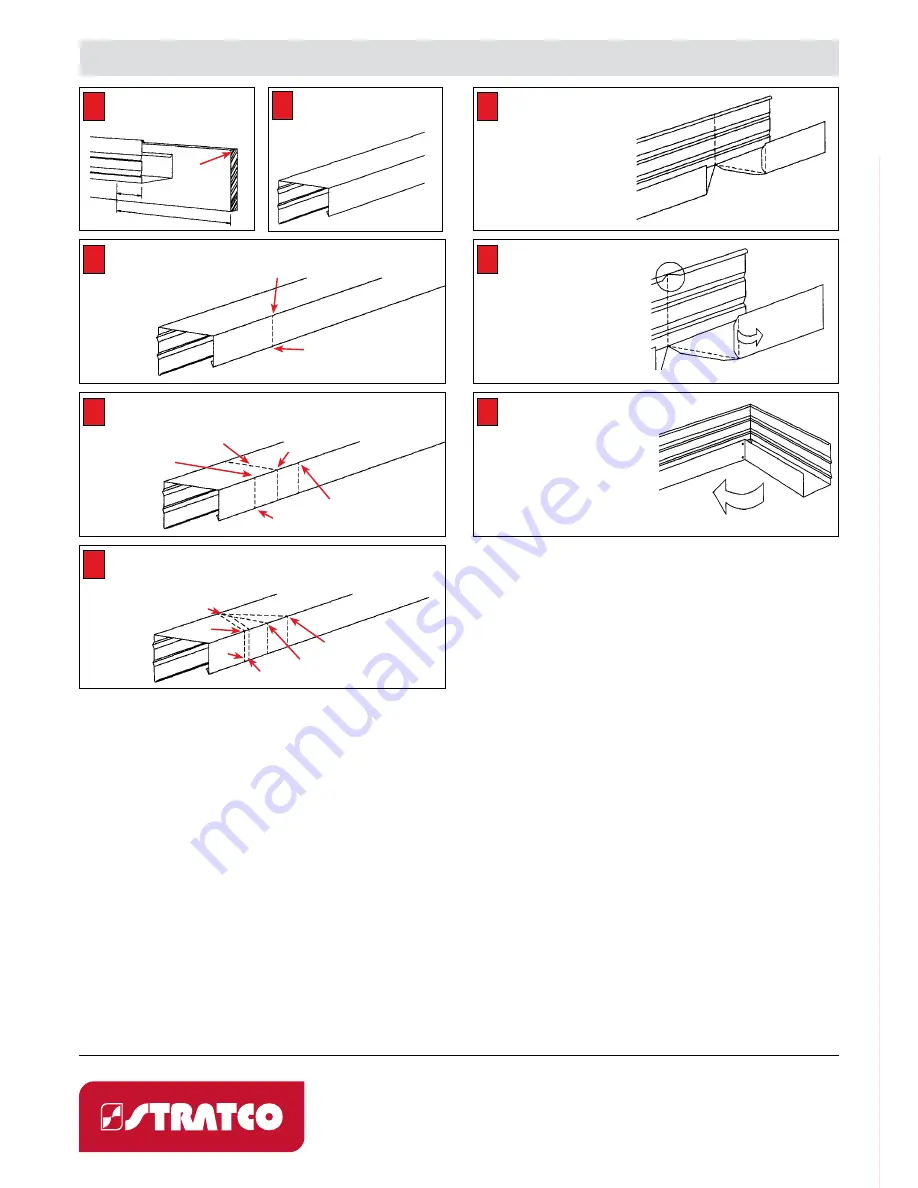
TO MAKE A GUTTER MITRE
Measure fascia from the corner
of the fascia to existing gutter
allowing 100mm for gutter lap.
1
Place length of gutter upside
down on the ground so that the
base of the gutter is facing you.
2
Mark where the fascia corner will
occur (point
A
) on the back of
gutter, and using a 90˚ square
and pencil, draw a line across the
outside of the back of gutter.
3
On the back of the gutter place a further 2 marks, each equal to the width of
the gutter (at points
B
and
C
) to extend beyond the fascia corner. The central
mark
B
should be extended completely around the outside of the gutter using
the 90
˚ square and pencil.
4
On the base of gutter, draw a line to connect the continuous line from
B1
to
both
A
and
C
. Mark a line 10mm away from, but parallel to
A-B1
, and extend
this across the back of the gutter. This will produce a “lap” when the gutter
mitre is formed. This parallel line should
also extend up the back
of the gutter to
A1
.
5
Using tinsnips, cut along the
line on one side and on the
other side, cut on the parallel
line which is 10mm in from the
original line drawn connecting
A-B1
. You will cut out the
complete V marked into the gutter.
In addition, remove excess
material at
A
and
B1
to allow the
outside of the gutter to fold easily,
and the tags to overlap.
6
For a square gutter cut a 45˚
notch into the bead of the
gutter using a hacksaw and
tin snips at
B1
directly in line with
the point of the V on the base of the
gutter. For gutters with an external
bead, such as quad (D) or OG, a
single hacksaw cut is used to cut the
bead. A mitre gusset must then be
attached to complete the bead line.
7
Fold the gutter around until the back
sections touch each other. Fold tag
inside the back gutter. Rivet and
silicone. You have produced an external
gutter mitre. To produce an internal
gutter mitre, reverse your V line marks on
the gutter so that point
B1
is exchanged
for point
B
and the face of the gutter is
cut out not the back. Then follow the
above steps. With some gutters a mitre
gusset will be required to cover any gap in
the gutter bead.
8
B1
B1
A
A
A1
A
B
B
A1
A1
A
C
10mm
C
COMPLY WITH REGULATIONS
All building work must be carried out in accordance with the Building Code of Australia (BCA).
This code refers to various Australian Standards, which provides acceptable standards of
product manufacture and building practice. These include:
• AS/NZ 3500.3 Plumbing and Drainage, Stormwater Drainage
• AS/NZS 3500.5 National Plumbing and Drainage, Domestic Installations
Prospective users of Stratco materials should first ensure that they understand these
requirements and any other state or territory specific regulations that may apply. In some
states of Australia (eg. NSW and Victoria) work involving the installation of roofing, rainwater
goods and drainage may need to be installed by a suitably qualified tradesperson, and comply
with statutory warranties. (Refer www.deus.nsw.gov.au/water/plumbing.asp)
Care should also be taken in the design and installation of roof drainage systems given the
wide range of factors such as rainfall intensity, gutter capacity and selection, number and
placement of downpipes and sumps. Care should also be taken to select the most suitable
gutter style. Gutters that have a front higher than the back are popular to hide the exposed
ends of roofing, but unless manufactured with optional slots or fixed with the bead lower
than the top of the fascia may contravene building regulations. Other fixing options can be
used to eliminate overflow from the back of a gutter into a building. These include additional
overflow weirs placed either in the gutter or stop end, rainheads with overflow weirs, custom
back flashings, leaving a gap between the fascia and gutter back, or other proprietary systems
or trade solutions.
Up to date information about Stratco products, spans, installation requirements and technical
advice can be found on our website at www.stratco.com.au and it is advisable to obtain current
information prior to ordering any materials. If additional information is required contact the
Stratco office in your state.
REMEMBER TO
• Waterproof each rivet with silicone sealant applied on the “weather” side.
• The minimum fall of guttering to the downpipe end is 1 in 500 (or 12mm every 6m).
CONTACT
1300 165 165
www.stratco.com.au
All brands and logos/images accompanied by ® or ™ are trade
marks of Stratco (Australia) Pty Limited.


