background image

ImpORTAnT:

 Ensure that the double thickness portion is at the top 

when installing all beams and rafters. 

Note: The rafters are supplied pre-cut and drilled at the ridge as 
shown in (Figure 10). Insert ridge knuckle into the pre-cut rafters 
and screw together using two 12x20 hex head self drilling screws 
through  both  sides  of  each  rafter  and  two  12x20  hex  head  self 
drilling screws through the top (double flange side) of each rafter.

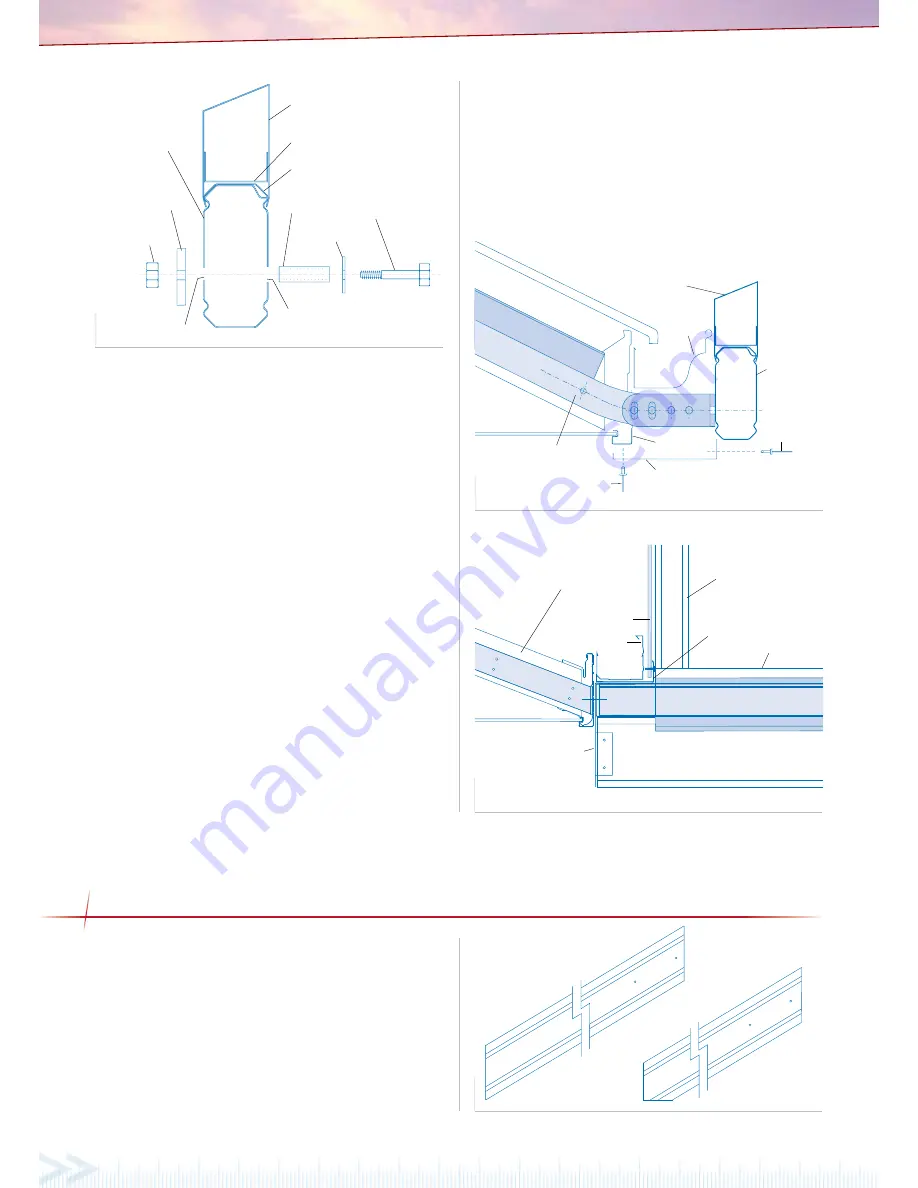
Beam Capping

Beam Channel

Double Flange

Spacer

Enlarge Hole 


(16mm This Side Only)

Washer

M12 Bolt

13mm Hole

Rafter 

Strengthening

Bracket

150 Attachment 

Beam

Nut

2.2 Attaching On End To House

If  fixing  a  Clearspan  Gable  on  its  end  to  a  wall,  two  alternatives 

are available. Ridge and valley beams are fixed directly to the wall 
using  beam  to  wall  brackets.  This  option  will  not  require  a  rear 
gable frame and back channel is fixed to the wall to accommodate 
sheets running along the wall. The other alternative requires valley 

beams be fixed to the wall and a rear gable frame installed. The rear 

gable frame will need to be slightly offset from the wall to allow the 
appropriate bracket fixing.

If fixing a Clearspan Gable on its end with suspension brackets to a 
fascia (Figure 9) typically a soaker flashing is used. In this case the 

gable rafter at the rear of the unit is to be set back sufficiently from 

the house fascia to accommodate the house gutter and infill panel 
(refer to Figures 22 and 23).

If  fixing  a  Clearspan  Gable  on  its  end  to  an  attachment  beam, 

elevated to the existing house gutter height, the attachment beam 

is to  be  as close  as  possible  (within 5mm) to the  outside face of 
the gutter (Figure 24). The 150 attachment beam is fixed to rafter 

strengthening brackets as detailed in section 2.1.1.

2.2.1 Fascia Strengthening 

It  is  recommended  extended  fascia  strengthening  brackets  are 
fastened at a spacing not exceeding 1200mm centres to fascia and 

3.0 GABLE FRAmE ASSEmBLY 

Figure 7

Beam Capping

House 


Gutter

150 

Attachment 

Beam

Fascia

Strengthening 

Bracket

Cover Flashing


(Optional)

Rivet

Rivet

Figure 8

120 Gable Rafter

Soaker

Flashing

Beam


Capping

Back Channel

Valley Beam

Gutter

In-Fill Panel

Suspension Bracket

Extended Facia Strengthening Bracket 


( Attached To Rafter & Back Channel)

Soffit Lining

Figure 9

Figure 10

Open Gable Rafter

In-Fill Gable Rafter

rafters  (Figure  9).  Brackets  and  reinforcement  channels  are  also 
recommended  to  the  first  rafter  either  side  of  the  valley  beams. 
Secure  brackets  to  rafters  with  12x25mm  timber  fixing  screws 
through pre-drilled holes and bolt through backchannel and fascia 
with M10 bolts. 

Note: It is the builder’s responsibility to ensure the existing rafters 

and fascia are adequately reinforced and tied down to accommodate 
any additional attached structure loads.

Summary of Contents for Outback Gable

Page 1: ... that retains water such as dirt or paving sand should be placed against the columns Care must be taken when determining the location of Stratco steel products so that they are not placed in close contact with sources of pollution or environmental factors that could affect the life of the steel Refer to the Selection Use and Maintenance brochure for more information lift the back of the gutter int...

Page 2: ...L Provides decoration at the apex of the gable end frame BEAm FILLER Fills gap between intersecting Beams HEADER FLASHInGS Run along header beam to neatly finish the base of in fill panels pOST CAp Fills gap between post and beam pOST BRACKET Connects post to beam BOLTS Vary depending upon the connection ensure correct fixings are used GABLE BEAm BRACKET Connects rafters to header beam on an infil...

Page 3: ...hors for column installation Other items not included in the standard kit are infill panels and accessories finials box gutters cover flashings and concrete Ridge Capping Flat Section Outback Deck Ridge Beam Ridge Knuckle Gable Rafter Valley Beam Angle Back Channel Beam Capping Gable Beam Bracket Header Beam Barge Cap Post Bracket Post Gutter Header Beam Bracket End Strut End Strut Plate 1 2 3 4 5...

Page 4: ...hannels are then bolted along the house rafters Refer to section 2 1 1 A 150mm Outback beam is bolted to the strengthening brackets at the fascia Once the 150 attachment beam is secured to the house the Gable Unit can be erected and fastened to the beam Rafter Strengthening The first step is to determine the number of rafters which need to be strengthened and their location relative to the unit Yo...

Page 5: ...r fixing all the brackets and channels the 150 attachment beam is fixed in place Prop up the 150 attachment beam in position with the double flange on top the beam will need to be located at a height on the bracket which allows clearance between the gable roof sheets and the gutter Fix to the end plates of the rafter bracket using two M12 bolts with the bolt head on the 150 attachment beam side In...

Page 6: ...r at the rear of the unit is to be set back sufficiently from the house fascia to accommodate the house gutter and infill panel refer to Figures 22 and 23 If fixing a Clearspan Gable on its end to an attachment beam elevated to the existing house gutter height the attachment beam is to be as close as possible within 5mm to the outside face of the gutter Figure 24 The 150 attachment beam is fixed t...

Page 7: ...suring the break is located in the top groove Figure 14 If attaching the valley beam to a header beam notch the capping so that it sits on top of the beam as shown in Figure 21 Pilot holes indicate screw locations as shown in Figure 11 Make sure that the two ends are flush at the connection leaving no gaps 4 0 VALLEY BEAm ASSEmBLY 4 1 Side Attached For side attached units fix the rafter to valley ...

Page 8: ...s 10 x dia 15 Figure 16 The valley beam is fastened to the wall bracket with 10x16 hex head screws in the pre drilled holes while the opposite end is supported on adjustable construction props For units attached on the end to a fascia suspension brackets are positioned at either side of the gable opening at the spacing determined in Section 3 0 Figure 12 The top tab of the suspension bracket must ...

Page 9: ...kets as explained in the Stratco Installation Guide Outback Flat Attached Verandah Patios Carports under Bracket and Filler Connections This can be done before valley beams are fixed in place Support the second valley beam on adjustable construction props but do not fix to the wall fascia or attachment beam until the front gable frame has been attached Fix the rafter to valley brackets to the beam...

Page 10: ...n 14 for details of fixing infill panels to gable frames note 1 A custom made soaker flashing will need to be ordered to the required dimensions The rafter setback will need to be adjusted to suit 2 Do not form stop ends at either end of the soaker flashing 3 Soaker flashing is not to come in contact with the base of the house gutter 5 2 2 2 Header Flashing When a gable is fixed at the rear to an ...

Page 11: ...ntres ensuring that the top of the back channel is in line with the bottom of the beam chamfer as shown in Figure 25 The back channel should run 34mm past the end of the beam at both ends of the ridge beam If there is no rear portal frame finish the back channel flush at one end Fasten 10x16 hex head self drilling screws at 500mm centres along the double flange of the ridge beam Figure 25 In the c...

Page 12: ... hole as shown in Figure 29 Measure from the underside of the beam to the top of the brick and cut posts to this length at each post location 8 1 68 Outback Column If 50x50 mm square hollow sections SHS have been supplied the fluted 68 Outback columns will need to be reinforced Cut the 50mm SHS 75mm shorter than the fluted post and slide into the column Ensure the square section is positioned insi...

Page 13: ... columns in position but do not bolt to the concrete slab at this stage Footing brackets are available when fixing posts to an existing concrete slab Establish the column lengths by measuring the distance from the underside of the fascia beam to the concrete slab less the thickness of the footing plate or 20mm for Outback footing plate 9 1 68 Outback Column Footing plate For non reinforced 68 Outb...

Page 14: ...utter straps at maximum 1000mm intervals attaching to the top of the decking with rivets Waterproof rivets with silicone Figure 32 down to beam capping Back channel fixed upside Outback Deck Outback Deck Gable Frame Front Facia Beam Header Beam Beam Capping Valley Beam Column Gable Beam Bkt 12 1 Flat Roof If Applicable Attach the decking to the flat roof verandah first as laid out under DECKING Ou...

Page 15: ...an Gable When attaching the decking to the gable start from the rear on one side of the gable Fix the deck to the angled back channel at the ridge and to the capping at the valley beam If the deck of the flat roof section runs perpendicular to the valley beams align the 14 1 Header Beam With Gutter Attach the header flashing to the rear gutter lip with rivets Infill panels are fixed through the to...

Page 16: ...apping is required at the ends of the unit attach the barge cap by screwing the lower lip to the rafter and rivet the top section to the deck as shown in Figure 39 Mitre the barge at the apex of the gable for a neat finish Run the barge cap along the gable section to where it meets the flat verandah deck and finish neatly Before securing columns in position ensure a minimum fall of 1 in 500 12mm f...

Reviews: