background image

9

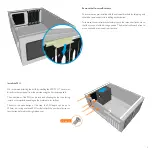
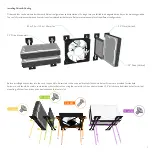
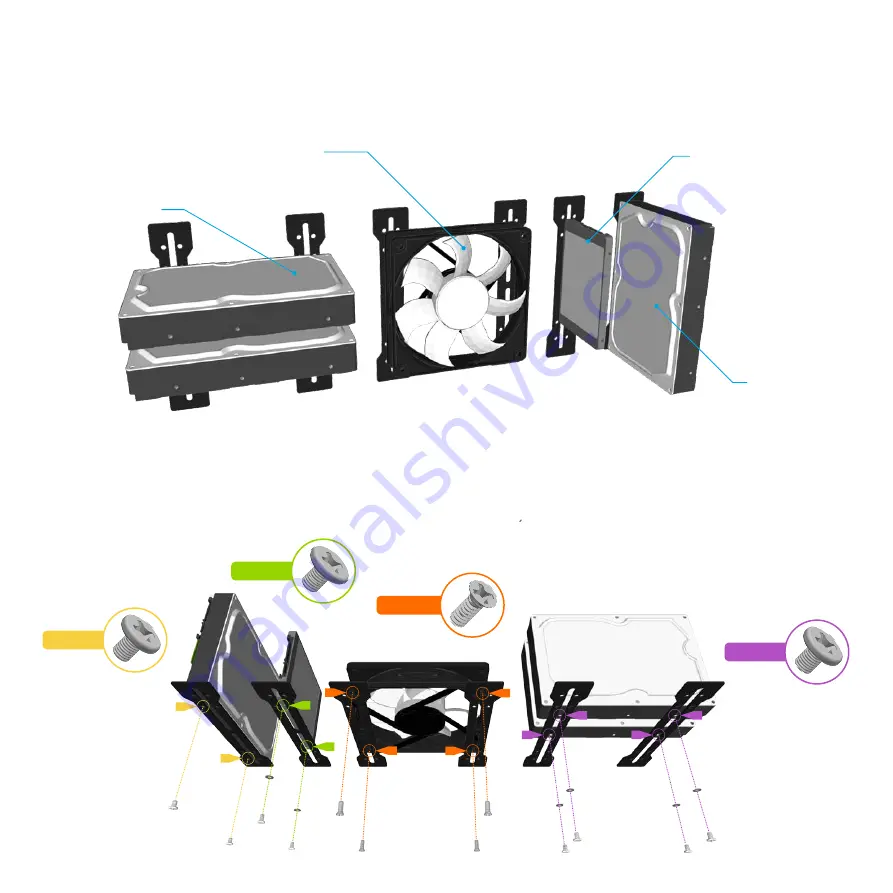
Before installing drives or fans into the case, they need to be secured to the universal bracket(s) as shown below. Screws are provided for standard 
hardware, and should be used in combination with washers when using the center slot of the universal bracket. 3.5" drives have dedicated holes for vertical 
mounting, all other fans, drives and orientations use the center slot.

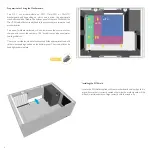
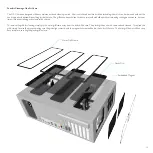
Installing Drives & Cooling

Drives and fans can be mounted with many different configurations and orientations. No longer are you limited to a designated drive bay or fan mounting position. 
You can fully customize where and how a drive or fan is placed inside the case. Below are some examples of the different configurations.

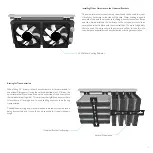
2.5" Drive (Vertical)

3.5" Drive (Vertical)

80 or 92 or 120 or 140mm Fan

3.5" Drive (Horizontal)

TC-6#32

TC-M3x4

TC-6#32

CS-7#32

Summary of Contents for F12C

Page 1: ...F12C ...

Page 2: ...using our product COPYRIGHT NOTICE Introduction to Assembling Your Case It s not rocket science but our cases can be a little challenging to assemble at first because of the non traditional design and the materials used Passive cooled cases have an added layer of complexity because of the heatpipe assembly hardware requirements so please take the time to read the user guide and become familiar wit...

Page 3: ...ardware Dependent None Variable Configuration Mounting for 80 92 120 140mm Fans None 7 x Full Height Expansion Cards Max Length 310mm 440 320 184mm W D H Including Feet Full ATX no Length Restrictions IRRC or FLIRC IR Solutions 4 4KG Not Supplied With Case 3 Top Panel Power Button IR Window Key Features DC Power Jack Hole Kensington Lock Top Panel Thumbscrew IR PCB Optional Power Button PCB Power ...

Page 4: ...rox 4 5 turns The top panel will now be slightly raised and can be lifted up and back away from the front of the case Remove the Upper Fan Brackets The upper fan brackets come pre installed in the case and should be removed prior to fitting the hardware as this will allow for easier access when installing components The brackets area held in place by 4 screws 2 per bracket located either side on t...

Page 5: ...d can be removed from the case Install the PSU We recommend starting the build by installing the ATX PSU This secures directly to the rear panel from the outside using the 4 screws supplied The orientation of the PSU can be reversed allowing the fan to be facing inward or outwards depending on the preference for airflow Thanks to the open design of the case the PSU depth can be up to 320mm but usi...

Page 6: ...pending on which one is used the appropriate stand offs should be fitted to the bottom panel of the case Note that the Mini ITX stand offs are already fitted to the case as they are common to all motherboards The size of motherboard used will also determine the choice of other components such as the number of 3 5 hard drives or side panel water cooling radiators Check your motherboard hole locatio...

Page 7: ... plate to the under side of the motherboard This MUST be done before fitting the motherboard to the case You can also install the CPU cooler before or after fitting the motherboard depending on its size and convenience when installing other components The only connection that needs to be made to the case is the power button and LED Power switch polarity is not important but the LED light must be c...

Page 8: ... for all drives fans and virtually any other hardware which is designed for mounting inside a PC The retention clip secures the bracket against the side panel and its shape and material is designed to apply a constant force against the bracket ensuring it does not move The universal bracket can be fitted anywhere along the side panel and combined with the bracket slot means hardware can be mounted...

Page 9: ...nting all other fans drives and orientations use the center slot Installing Drives Cooling Drives and fans can be mounted with many different configurations and orientations No longer are you limited to a designated drive bay or fan mounting position You can fully customize where and how a drive or fan is placed inside the case Below are some examples of the different configurations 2 5 Drive Vert...

Page 10: ...bracket remains in the lower lip straighten its orientation so that it is vertical and rests firmly against the upper silicon strip on the side panel Finally secure the bracket s in place using the retention clip by forcing it between the upper edge of the universal bracket and the upper lip of the side panel Check the final position of the retention clip is correct as shown in the diagram It is i...

Page 11: ...on especially with heavy hardware or during transportation Bracing for Transportation When fitting 3 5 drives or other heavy hardware its recommended to use at least 2 fixing point If using the vertical orientation for 3 5 drives the universal brackets can also be used on the other side of the drives to lock the individual drives together This improves the rigidify and ensures there is less chance...

Page 12: ...ove them to release the PCI cover from the case You can now access all the PCI slots and remove the blanking plates in the position of the card you plan to install With the blanking plates removed install the PCI cards and secure them in place with the screws previously used to secure the blanking plates Once finished installing all the cards replace the PCI cover using the 2 screws from the insid...

Page 13: ...ckets can also support water cooling radiators with a maximum size of 240mm As with the universal brackets simply secure the fans to the brackets using the screws supplied thought the slots in the middle If you are using water cooling hardware use the screws supplied with the kits Additional washers might be required if the screw head diameter is too small Do not fully tighten the screws as you wi...

Page 14: ...ith all the hardware installed and cables connected the top panel can be replaced To do this ensure the 2 clips on front edge of the top panel fit into the cutouts on the inside of the front panel This is best achieved by lowering the front panel onto the case at an angle as shown Once the front edge is flush lower the back end of the top panel onto the thumb screws The thumb screws should locate ...

Page 15: ...ding cooling performance but over time will require cleaning as dust naturally builds up To remove the grills for cleaning simply pry the outer grill frame away from the body of the case The plastic grill can now be removed and cleaned To replace the grills simply reverse the process making sure the grills align correctly with the magnet holes embedded in the body of the case The outer grill frame...

Page 16: ...Designed in Europe Printed in China Copyright 2015 All Rights Reserved ...

Reviews: