background image

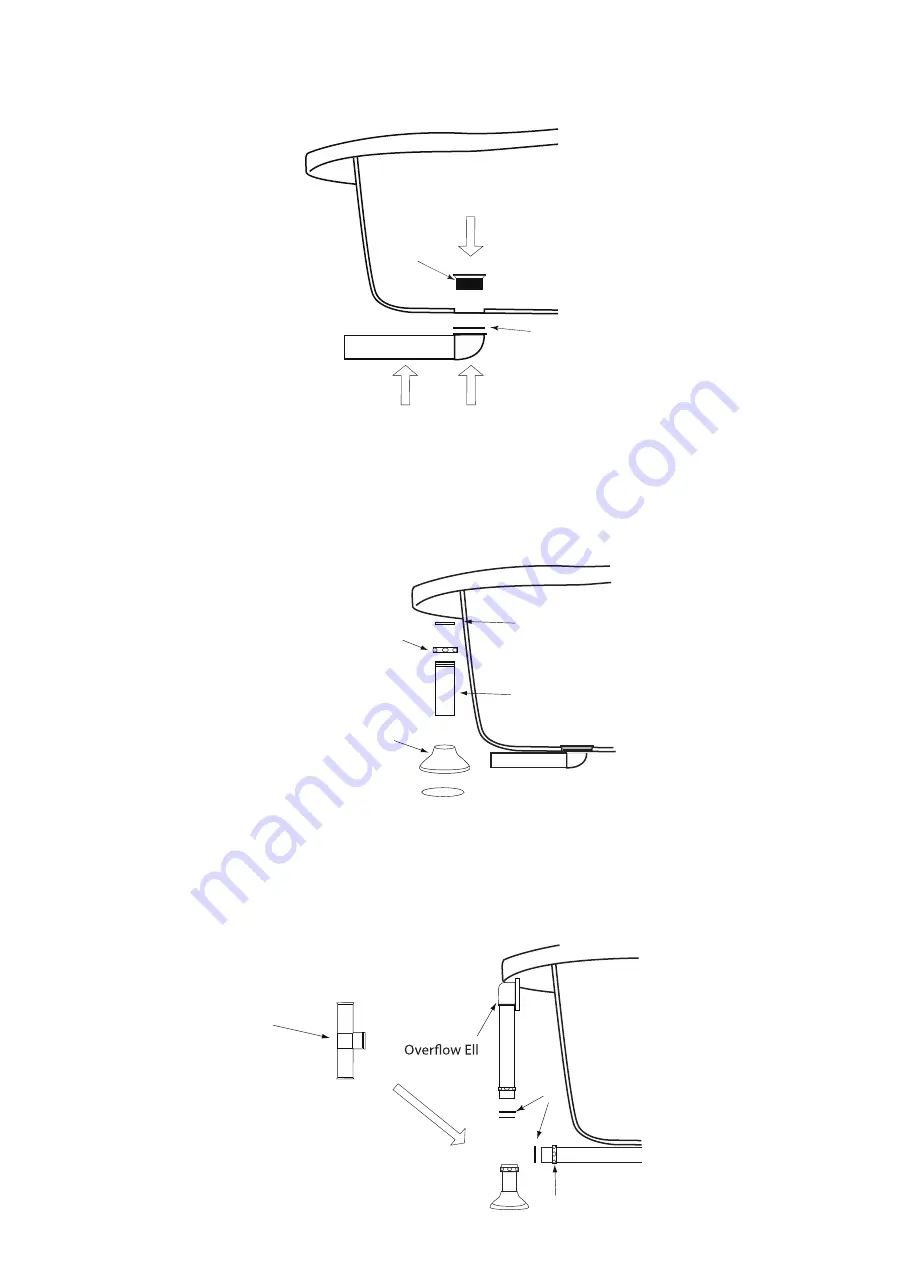
11.  

Take the strainer, place silicone sealant around it, and then place it into the drain hole ensuring 

a tight connection with the drain ell & gasket. Use silicone sealant. DO NOT use plumbers putty to seal.

Silicone

Sealant

Strainer

Gasket

Drain Ell

12. 

Insert the tailpiece into the trap inlet using the O-ring, coupling nut, & flange. The tailpiece may 

need to be cut for proper fit. 1''-2'' of the tail piece shoudl fit inside the trap. Slip the flange over the tailpiece 

and slide down to the floor.

O Ring

Coupling Nut

Flange

Trap Inlet

Tailpiece

13. 

Assemble the tee section to the tailpiece, overflow, & drain ell using the coupling nuts and O-rings 

that are provided.

O Ring

Tee

Coupling Nut

Summary of Contents for CLAWFOOT R-5500-60CICFWH-FM

Page 1: ... 1 323 612 8011 support streamlinebath com READ ENTIRE INSTALLATION GUIDE PRIOR TO INSTALLING THE BATHTUB THIS BATHTUB SHOULD ONLY BE INSTALLED BY A CERTIFIED PLUMBER CAUTION TWO PEOPLE ARE REQUIRED TO LIFT THE BATHTUB CLAWFOOT BATHTUB SERIES OWNER S MANUAL INSTALLATION GUIDE ...

Page 2: ...od caused due to use of this product Streamline shall not be held liable for any and all fees stemming from cost of installation re installation removal subsequent damage or transportation in a case of a product defect Please note Different bathtub models have different drain clawfeet models Please see the next page to determine which drain or clawfoot model applies to the bathtub model that you h...

Page 3: ...1CICFRD FM R 5162 72CICFWH FM R 5220 67CICFWH FM R 5163 61CICFWH FM R 5221 61CICFWH FM R 5240 71CICFWH FM R 5281 66CICFWH FM R 5280 66CICFRD FM R 5420 67CICFWH FM R 5440 65CICFGR FM R 5442 65CICFWH FM R 5441 65CICFRD FM R 5501 66CICFWH FM R 5460 53CICFWH FM R 5500 60CICFWH FM R 5060 67CICFPR FM R 5061 67CICFWH FM R 5100 66CICFWH FM N DWF CH N DWF GLD ...

Page 4: ... Cover gasket Cartridge Strainer Waste upper gasket Waste lower gasket Connector Coupling nut Nut Washer Tee Pipe Overflow body Tapered rubber gasket Overflow upper gasket Overflow plate Pin Bolt Taic piece Flange 1 1 1 1 1 1 1 1 1 3 3 1 1 1 1 1 1 1 1 Model N DWF CH Model N DWF GLD ...

Page 5: ... in the set is unique Inside each foot is labeled with a letter to help you find the proper location on the tub for installation Match up the letters on the clawfeet with the letters on the underside of the tub The letters on the tub will be the same as what are on the clawfeet and will match accordingly ...

Page 6: ...L03 GLD R CFL04 CH R CFL04 WH R CFL04 GLD R CFL06 CH R CFL06 WH R CFL06 GLD R CFL08 CH R CFL08 WH R CFL08 GLD R CFL10 CH R CFL10 WH R CFL10 GLD R CFL16 CH R CFL 20 CHR R CFL 20 GLD R CFL 20 WH CLAWFOOT DIAGRAM ITEM No Qty Adjustable Feet Claw Feet Nut Washer Rubber Washer Bolt 1 2 3 4 5 6 4 1 2 3 4 5 6 4 4 4 4 4 ...

Page 7: ... the drainpipe on the floor by taking measurements of the drain and waste location underneath the unit Clean the drain hole area in preparation of setting the drain The area should be dry free from any debris 4 Remove the bathtub from its box It is recommended that the bathtub is carried by a minimum of two people Ensure to carry and set down the bathtub only in the upside down position ...

Page 8: ...t with any rough surface 6 Take 1 adjustable foot 1 place it through the hole in the clawfoot 2 1 5 2 6 7 Place 1 rubber washer 5 and place it over the bolt 6 8 Take the clawfoot 2 and place it over over the rubber washer 5 and bolt 6 9 Take one washer 4 and place it over the clawfoot 2 and bolt 6 2 2 6 5 6 4 ...

Page 9: ...adjust the clawfoot so that it fits snug with the bolts on the bathtub This will help to ensure that the clawfeet are placed correctly and are functioning properly 10 Tighten the nut 3 with a wrench and adjust the clawfoot as needed Repeat for the other 3 clawfeet 4 3 ...

Page 10: ...ain Ell 12 Insert the tailpiece into the trap inlet using the O ring coupling nut flange The tailpiece may need to be cut for proper fit 1 2 of the tail piece shoudl fit inside the trap Slip the flange over the tailpiece and slide down to the floor O Ring Coupling Nut Flange Trap Inlet Tailpiece 13 Assemble the tee section to the tailpiece overflow drain ell using the coupling nuts and O rings tha...

Page 11: ...ow ell Align the overflow ell with the overflow hole secure the drain to the tub with overflow plate and screw provided 15 Make sure a watertight seal exists on all bath drain connections End home plumbing Floor Cover Drain Pipe Tapered Rubber Gasket ...

Reviews: