ASSEMBLY INSTRUCTIONS FOR:
Page 14
11/07/00
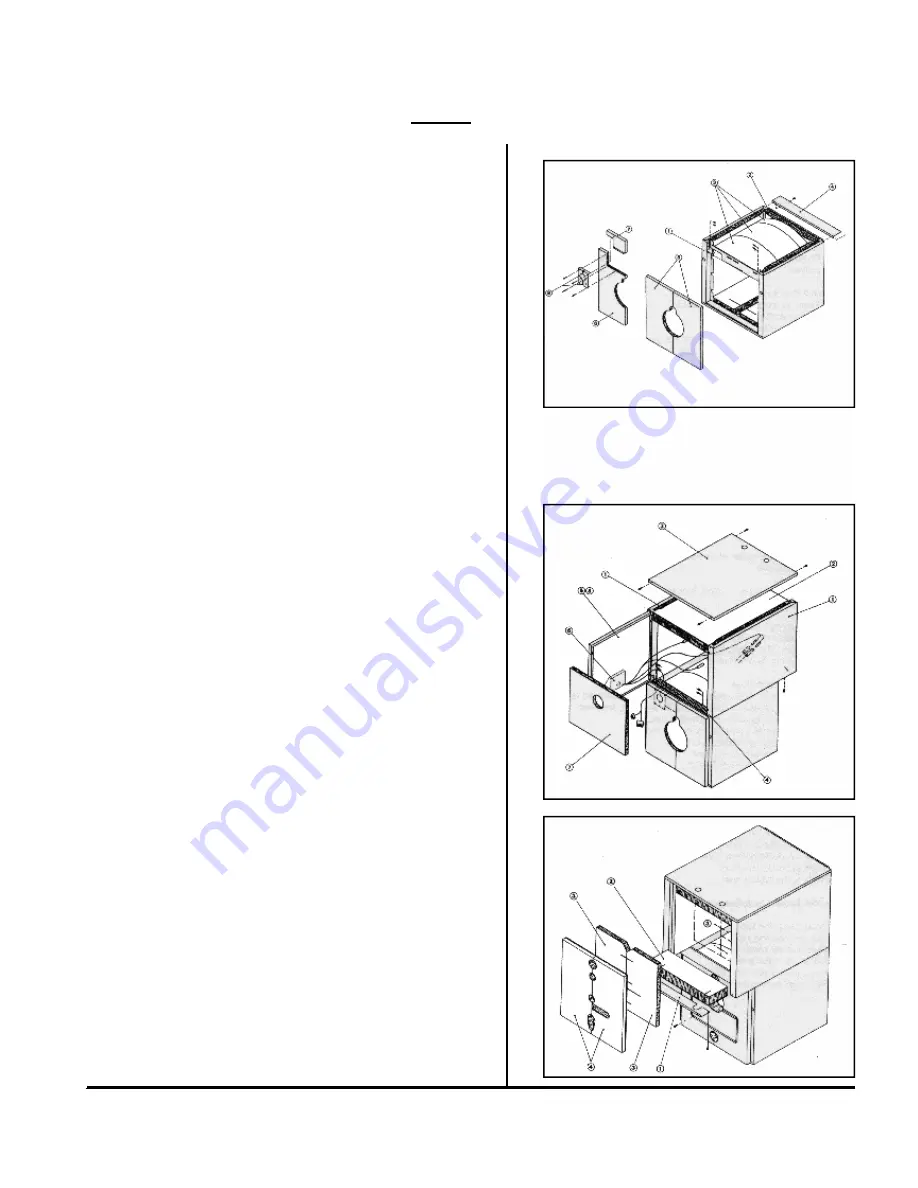
Assemble the jacket and insulation
Floor insulation and boiler side jackets.
1. Floor insulation on right and left hand side
125x440xL
2. Right and left hand side jackets
3. Insulation at the bottom front
50x90x990
4. Angle at the bottom front
5. Angle at the bottom rear
Boiler rear jacket insulation and boiler rear
1. Cross bar at the top rear
90x40x995
2. Flue gas housing insulation
50x180x2000
3. Right and left hand rear jackets
4. Protective metal sheet
5. Flue hood access door insulation
125x700x330
6. Flue hood access door jacket cover
Boiler Top insulation, front jacket and rear under jacket to the
calorifier
1. Cross bar at the top front
270x40x985
2. Insulation at the top rear
125x90x990
3. Boiler top insulation
125x1100xL
4. Rear under covering
5. Boiler front jacket right and left hand
Fit the boiler top insulation to calorifier support through slits.
Calorifier side jacket, Front and top jackets and instrument panel.
1. Calorifier side jacket right and left hand
2.
Calorifier
top
insulation
125x960xL
3. Calorifier top jacket
4. Insulation at the front
125x270x990
5. Suspend calorifier front jacket using
Straight hinge pins
6. Instrument panel on front wall
(See instrument panel assembly instructions)
7. Front insulation to calorifier
50x810x980
8. Swing front calorifier jacket to closed position
And secure with bent pins
Calorifier rear jacket
1. Rear
under
jacket
2.
Rear
under
insulation
125x500x990
3. Inner rear jacket insulation, right an left-hand 50x490x850
4. Right and left-hand rear jacket.
BRU 1s


