320597-3 - NOVEMBER 2016
2
ESR-Auto Plus Operator’s Manual
1.2 Unpacking Instructions
Retain all packaging materials for shipping, moving or
storing the instrument.
1. Open the box and remove the top foam piece, which
contains accessories such as the ESR-657 Mixer,
barcode scanner, power cords and paper.
2. Carefully lift the instrument out of the bottom foam piece
and remove the anti-static shipping bag.
3. Install the ESR-Auto Plus and ESR-657 Mixer on a level,
supported surface that is free from any vibrations or
temperature fluctuations.
Important!
Vibrations and temperature
fluctuations may adversely affect ESR results.
Refer to Section 8.4 for more information on the
impact of temperatures on ESR results.
1.3 Barcode Scanner Installation
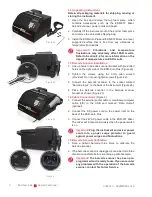
1. Line up holes in barcode scanner bracket with pre-drilled
holes on the right side of the ESR-Auto Plus (Figure 2a).
2. Tighten the screws using the 3mm allen wrench
(provided). Do not over-tighten screws (Figure 2a).
3. Connect the barcode scanner to the socket marked
“Barcode Input” on the back of the instrument (Figure 2b).
4. Place the barcode scanner in the barcode scanner
bracket as shown (Figure 2c).
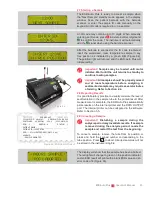
1.4 Cable Connections
(Figure 3)
1. Connect the external printer cable or mainframe computer
cable (LIS) to the USB port marked “Data Output”
(optional).
2. Connect the AC power cord to the power inlet on the
back of the ESR-Auto Plus.
3. Connect the 24V AC power cable to the ESR-657 Mixer.
The mixer will rotate continuously when the power switch
is on.
Important!
Plug the instrument and mixer power
cords into a power surge protector to guard
against power surges and fluctuations.
1.5 Barcode Scanner Calibration
1. Scan a patient barcode three times to calibrate the
barcode scanner.
2. If the barcode scanner is unplugged, scan a barcode three
times to re-calibrate before scanning a patient sample.
Important!
The barcode scanner has been pre-
programmed and is ready to use. If you encounter
any problems with the operation of the barcode
scanner, contact Technical Service.
Figure 2a
Figure 2b
Figure 2c
Figure 3
AC
Power
Summary of Contents for ESR-Auto Plus 506
Page 1: ...ESR Auto Plus Operator s Manual Model 506 v 1 0 2 0 ...
Page 2: ......
Page 6: ......
Page 7: ...1 Introduction ...
Page 8: ......
Page 12: ......
Page 13: ...2 Sample Preparation Analysis ...
Page 14: ......
Page 20: ......
Page 21: ...3 Keypad Menu Overview ...
Page 22: ......
Page 24: ......
Page 26: ......
Page 36: ......
Page 38: ......
Page 44: ......
Page 51: ...7 Background of the ESR Test ...
Page 52: ......
Page 56: ......
Page 57: ...8 Performance Technical Specifications ...
Page 58: ......
Page 65: ...9 Safety Precautions ...
Page 66: ......
Page 69: ...10 Troubleshooting ...
Page 70: ......
Page 75: ...11 Quick Reference Guide ...
Page 76: ......
Page 80: ......
Page 82: ......
Page 84: ......
Page 85: ......
Page 86: ......


