ESR-Auto Plus Operator’s Manual 3
CAUTION: Use care to avoid cutting finger on
paper cutter.
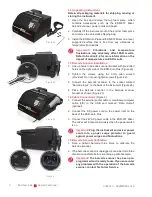
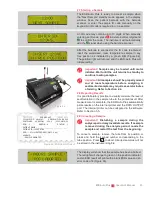
1.6 Installing Printer Paper
(Figure 4)
1. Before installing the paper, remove any residual glue or
tape sealing the new roll.
2. Pull up the lever on the printer lid to release the paper
cover lock (Figure 4a).
3. Place a roll of paper in the printer with the paper extending
out of the printer toward the front of the ESR-Auto Plus
(Figure 4b).
4. Press firmly on the paper cover to close the printer lid
(Figure 4c).
5. Press the paper feed button on the printer to advance
the paper and verify the paper roll is installed correctly. If
the paper does not feed properly, open the printer lid and
realign the paper.
Important!
Streck thermal paper is specifically
approved for use with the ESR-Auto Plus printer
and should be used to prevent damage to the
print head. Alternate paper may have different
technical specifications that cause premature
wear and tear.
1.7 Removing Paper
1. Open the printer lid.
2. Remove the paper and close the printer lid.
1.8 Instrument Set-up
This section outlines the menus to review before getting
started. A thorough review of the Operator’s Manual is
strongly advised prior to reporting patient results. Refer
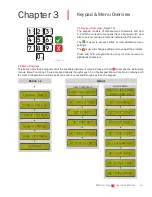
to Chapter 3 for a menu diagram and an overview of the
keypad.
1.
Date & Time:
Set the date and time in the User
Configuration Menu (see Section 5.3). The default date
format is YYYY-MM-DD. The default time format is 24-
hour. Time can be displayed in a 12-hour (AM/PM) or 24-
hour format.
2.
Print Style:
Set the print style in the User Configuration
Menu (see Section 5.6). The default print setting is
Autoprint in Ticket Style. Log or Ticket print styles are
available.
3.
Register the Test Rack:
Register the test rack in the
Service Menu (see Section 6.4).
4.
Tube Type Size:
Select an alternate tube size in the
Service Menu (see Section 6.5). The default ESR-
Vacuum Tube size is 1.2ml.
5.
Register QC Material:
Register a new lot of ESR-Chex
control in the QC Menu (see Section 4.6.3).
Figure 4b
Figure 4c
Figure 4a
Summary of Contents for ESR-Auto Plus 506
Page 1: ...ESR Auto Plus Operator s Manual Model 506 v 1 0 2 0 ...
Page 2: ......
Page 6: ......
Page 7: ...1 Introduction ...
Page 8: ......
Page 12: ......
Page 13: ...2 Sample Preparation Analysis ...
Page 14: ......
Page 20: ......
Page 21: ...3 Keypad Menu Overview ...
Page 22: ......
Page 24: ......
Page 26: ......
Page 36: ......
Page 38: ......
Page 44: ......
Page 51: ...7 Background of the ESR Test ...
Page 52: ......
Page 56: ......
Page 57: ...8 Performance Technical Specifications ...
Page 58: ......
Page 65: ...9 Safety Precautions ...
Page 66: ......
Page 69: ...10 Troubleshooting ...
Page 70: ......
Page 75: ...11 Quick Reference Guide ...
Page 76: ......
Page 80: ......
Page 82: ......
Page 84: ......
Page 85: ......
Page 86: ......


