ESR-Auto Plus Operator’s Manual 9
2.5 Secondary Patient Labels
The ESR-Auto Plus reads the sample using infrared light.
This light is very strong and can typically read through one
layer of most commonly used labels.
Caution must be taken when applying additional patient
labels to ESR-Vacuum Tubes. Excessive label thickness,
wrinkling or flagging may increase the outer diameter of the
tube enough to wedge it in the instrument. If the operator
experiences resistance when inserting a tube containing a
secondary label, they should remove the tube before it is fully
inserted and remove the additional label before proceeding.
Secondary labels must be positioned correctly and
completely adhered to the tube surface to prevent label
fragments or label adhesive build-up in the instrument well,
which could obstruct sample analysis.
Important:
Samples with a fill level outside the fill
range alarm limits will abort immediately. Refer
to section 10.1.
1.2ml Tubes
(Figure 7a)
The 1.2ml ESR-Vacuum Tube is the primary tube used in
ESR-Auto Plus.
1. The ideal fill level of the 1.2ml tube is 60mm ± 5mm from
the bottom of the tube. The ideal fill level and range are
printed on the tube label. The fill range can extend to as
much as ± 9mm from the fill line without compromising
the integrity of the sample.
2. Additional labels should be applied facing the same
direction as the original label and as close to the cap as
possible, leaving a label-free gap on the back of the tube.
3. Insert the tube in the ESR-Auto Plus with the label facing
forward.
Important:
Leave a space of
at least 5mm between
the blood level in the tube and any additional
labels to ensure accurate reading of the sample
(Figure 7b).
2.0ml Tubes
(Figure 7a)
The 2.0ml ESR-Vacuum Tube can be used in the ESR-Auto
Plus as long as the tube is inserted in the ESR-Auto Plus
correctly and additional labels are applied correctly.
1. The ideal fill level of the 2.0ml tube is 100mm ± 8mm.
2. Do not place additional labels above the fill level printed
at the top of the original label.
3. Place additional labels facing the same direction as the
original label, creating a label-free gap on one side of the tube.
Important:
This gap is critical to allow accurate
measurement of the level of blood in the tube.
4. Insert the tube in the ESR-Auto Plus with the label facing
forward, leaving the label-free side at the rear to ensure
accurate reading of the sample.
1.2ml
tube
2.0ml
tube
Leave blank
Leave blank
Ideal fill
range
Ideal fill
range
120
110
100
90
80
70
60
50
40
30
20
10
0mm
Place
additional
labels in
this area.
Leave label-
free gap on
side of tube.
Place
additional
labels in
this area
Leave
label-free
gap on side
of tube
70
65
55
108
92
87
Figure 7a: Label Placement (to scale)
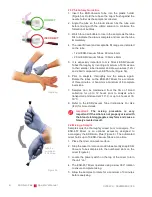
Figure 6: Correct tube placement in mixer
blood
secondary
label
blank
space
5 mm
CORRECT
blood
secondary
label
blank
space
3 mm
INCORRECT
Figure 7b: Secondary
label positioning, 1.2ml
tubes (enlarged to
show detail)
Summary of Contents for ESR-Auto Plus 506
Page 1: ...ESR Auto Plus Operator s Manual Model 506 v 1 0 2 0 ...
Page 2: ......
Page 6: ......
Page 7: ...1 Introduction ...
Page 8: ......
Page 12: ......
Page 13: ...2 Sample Preparation Analysis ...
Page 14: ......
Page 20: ......
Page 21: ...3 Keypad Menu Overview ...
Page 22: ......
Page 24: ......
Page 26: ......
Page 36: ......
Page 38: ......
Page 44: ......
Page 51: ...7 Background of the ESR Test ...
Page 52: ......
Page 56: ......
Page 57: ...8 Performance Technical Specifications ...
Page 58: ......
Page 65: ...9 Safety Precautions ...
Page 66: ......
Page 69: ...10 Troubleshooting ...
Page 70: ......
Page 75: ...11 Quick Reference Guide ...
Page 76: ......
Page 80: ......
Page 82: ......
Page 84: ......
Page 85: ......
Page 86: ......


