background image

ESR-Auto Plus     Operator’s Manual        21

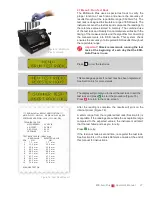
Completed Sample 

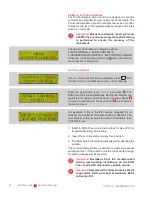
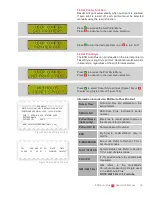
1) 12345 (1/5)

030101 09:00 ok?

If  the  sample  is  complete  and  results  are  available,  the 

display will show position, sample ID, number of samples 

that fit the search criteria and the date/time for the most 

recently analyzed sample that fits the search criteria.

1) 12345

esr:110  e00 s00

Press   to view the next matching sample or   to view 

details of the current sample. The second row will show 

the result and any error and status codes.

1) 12345

reprint? [ok]

When prompted to reprint, press   to reprint. Reprinted 

results will print in ticket or log style, depending on the 

user-defined  print  style  selected.  To  end  the  search 

sequence, press  .

4.5 Menu 3: Print Log File

The ESR-Auto Plus will store a maximum of 500 sample 

records. Storage of sample results continues on a first in, 

first out basis after 500 samples are recorded. 

The message "Log File @ Limit" will appear on the display 

as a notification that old data will be purged as new runs are 

collected.

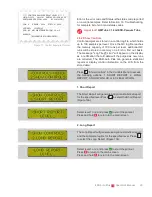
menu

3.print log file

Press 

 to print all sample results stored in memory. 

The Log File header will repeat after every 50 samples 

(Figure 11).

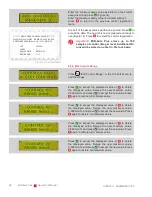
print log file

[ok] to start..

Press 

 to print log file or 

 to advance to the clear log 

menu selection.

Press   while printing to cancel print job.

–logfile–

clear log?

Press 

 to clear log file or 

 to exit the menu.

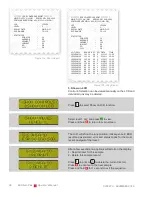
********* LOG FILE ESR-Auto Plus *********

MM-DD-YYYY   HH:MM   

  SERIAL NO. 506-0000

SOFTWARE VERSION: v0.0 (YYYY-MM-DD)

Figure 11: Log File Printout

-----ID-----

ESR ERR

ST PO

DATE

TIME

1234563456

53

0

01

1 YYMMDD

18:00

1234586754

1

0

01

3 YYMMDD

18:01

1234456734

>120

7

01

5 YYMMDD

18:01

1234567987

4

0

01

6 YYMMDD

18:05

1234567345

18

6

01

8 YYMMDD

18:05

1234567555

57

0

01 10 YYMMDD

18:25

1234532756

65

0

01

9 YYMMDD

18:25

Summary of Contents for ESR-Auto Plus 506

Page 1: ...ESR Auto Plus Operator s Manual Model 506 v 1 0 2 0 ...

Page 2: ......

Page 3: ...serve you and we are looking forward to your next call STANDARD WARRANTY Streck warrants the ESR Auto Plus ESR 657 Mixer and ESR Barcode Scanner to be free from defects in workmanship and materials during normal use for a period of one year from the date of purchase If any defects occur during the warranty period contact Streck Technical Service Department This warranty does not cover defects or m...

Page 4: ...dary Patient Labels 9 2 6 ESR Tube Labeling Sleeves 10 2 7 Starting a Sample 11 2 8 Reporting Results 11 2 9 Canceling a Sample 11 3 Keypad Menu Overview 13 3 1 Keypad Overview 15 3 2 Menu Diagram 15 4 Menu Functions 1 5 17 4 1 Standby Menu 19 4 2 Menu 1 Search Sample 19 4 3 Menu 2 Check Position 20 4 4 Sample Status 20 4 5 Menu 3 Print Log File 21 4 6 Menu 4 Control Samples 22 Run Show Register a...

Page 5: ...n 52 8 6 Preventive Maintenance 52 8 7 Cleaning Instructions 52 8 8 Barcode Scanner 53 8 9 Data Output 53 8 10 Technical Specifications ESR Auto Plus 54 8 11 Environmental Conditions 55 8 12 Transportation Environment 55 8 13 Technical Specifications ESR 657 Mixer 56 8 14 Disclaimer 56 9 Safety Precautions 57 9 1 User Precautions 59 9 2 Electrical Equipment 59 9 3 Disconnect Device 59 9 4 Sample A...

Page 6: ......

Page 7: ...1 Introduction ...

Page 8: ......

Page 9: ...Instruments 1 1 ESR Components ESR Auto Plus Figure 1a The ESR Auto Plus analyzer can process up to 20 samples per hour Samples are read by infrared light using a measuring arm which is controlled by a motor ESR 657 Mixer Figure 1b The ESR 657 Mixer is designed to mix Streck ESR Vacuum Tubes prior to evaluation Its unique motion ensures proper mixing of samples The ESR 657 Mixer can hold up to 10 ...

Page 10: ...over tighten screws Figure 2a 3 Connect the barcode scanner to the socket marked Barcode Input on the back of the instrument Figure 2b 4 Place the barcode scanner in the barcode scanner bracket as shown Figure 2c 1 4 Cable Connections Figure 3 1 Connect the external printer cable or mainframe computer cable LIS to the USB port marked Data Output optional 2 Connect the AC power cord to the power in...

Page 11: ... that cause premature wear and tear 1 7 Removing Paper 1 Open the printer lid 2 Remove the paper and close the printer lid 1 8 Instrument Set up This section outlines the menus to review before getting started A thorough review of the Operator s Manual is strongly advised prior to reporting patient results Refer to Chapter 3 for a menu diagram and an overview of the keypad 1 Date Time Set the date...

Page 12: ......

Page 13: ...2 Sample Preparation Analysis ...

Page 14: ......

Page 15: ... Vacuum Tube or transferred from an EDTA vacuum tube When using an EDTA tube transfer the well mixed patient sample into the Streck ESR Vacuum Tube Do not remove the sodium citrate in the ESR Vacuum Tube Fill the ESR Vacuum Tube to the fill line ESR Vacuum Tubes contain liquid anticoagulant and must be thoroughly mixed with the blood sample immediately after the tube has filled Failure to mix the ...

Page 16: ...mum of three minutes or hand mix a minimum of 8 complete inversions 7 Samples can be maintained from the time of blood collection for up to 72 hours prior to analysis when transported and stored at 2 10 C or up to 4 hours at 18 30 C 8 Refer to the ESR Vacuum Tube Instructions For Use IFU for more details Important The mixing procedure is very important If the citrate is not properly mixed with the...

Page 17: ...iginal label and as close to the cap as possible leaving a label free gap on the back of the tube 3 Insert the tube in the ESR Auto Plus with the label facing forward Important Leave a space of at least 5mm between the blood level in the tube and any additional labels to ensure accurate reading of the sample Figure 7b 2 0ml Tubes Figure 7a The 2 0ml ESR Vacuum Tube can be used in the ESR Auto Plus...

Page 18: ...nes between each sleeve 2 Collect or transfer a valid blood specimen into an ESR Vacuum Tube 3 Bend both sides of the labeling sleeve by creasing the tabs along the scored lines Figure 8a 4 Insert the tube through the hole in the labeling sleeve with the tabs pointing up around the rubber stopper Figure 8b 5 Apply the patient specific identification label across both tabs of the labeling sleeve Fi...

Page 19: ...everal minutes of mixing Refer to Section 2 4 2 8 Reporting Results It is good laboratory practice to visually correlate the level of sedimentation in the sample tube to the printed result After measurement is complete the ESR Auto Plus automatically prints results on the internal printer and the DATA OUTPUT port The internal printer can be configured in the software Refer to Section 5 5 2 9 Cance...

Page 20: ......

Page 21: ...3 Keypad Menu Overview ...

Page 22: ......

Page 23: ... sample 2 check pos 1 10 3 print log file 4 contr samples 5 run test rack restricted entry give code 48 set language set date style reg test rack set tube type print the setup set date time set alarm set printer set print style set access code set calibration set test mode set access code User Config Menu Service Menu MENU 6 MENUS 1 6 3 2 Menu Diagram This section provides a diagram of all the ava...

Page 24: ......

Page 25: ...4 Menu Functions 1 5 1 SEARCH SAMPLE 2 CHECK POSITION 3 PRINT LOG FILE 4 CONTROL SAMPLES 5 RUN TEST RACK MAIN MENU DIAGRAM ...

Page 26: ......

Page 27: ...tore a maximum of 500 sample records It is advised that labs print the Log File regularly and purge data to avoid exceeding storage capacity The ESR Auto Plus searches all samples currently in process for an ID match before searching the sample log internal memory The search results may be reprinted on the internal printer and or DATA OUTPUT port menu 1 search sample Press to search for a sample r...

Page 28: ... status options In Process or Completed Sample In Process 1 12345 7 minutes left If the sample is currently in process the display will show the position of the sample the sample ID and the time remaining until the sample is complete After a few seconds the second row of the display will show menu options 1 12345 1 predict result 1 PREDICT RESULT press to predict the sample result 1 12345 2 abort ...

Page 29: ...records Storage of sample results continues on a first in first out basis after 500 samples are recorded The message Log File Limit will appear on the display as a notification that old data will be purged as new runs are collected menu 3 print log file Press to print all sample results stored in memory The Log File header will repeat after every 50 samples Figure 11 print log file ok to start Pre...

Page 30: ...trol level _ Enter the appropriate level 1 or 2 and press The ESR Auto Plus will automatically identify the sample the registered lot number and a sequence number Press to return to main screen Press and hold to exit back to the main screen insert 12345a 01 in free position For example if this is the first sample analyzed for lot 12345A the automatic ID number will be 12345A 01 The next sample of ...

Page 31: ...he Controls Menu to access the following options 1 SHORT REPORT 2 LONG REPORT 3 SHOW ON LCD or 4 CLEAR QC LOG 1 Short Report show controls 1 short report The Short Report will generate and print a statistical report for the specified level Press to select the Short Report Figure 13a short report level _ Select level 1 or 2 and press to start the printout Press and hold to return to the main screen...

Page 32: ...CD and individual runs may be deleted show controls 3 show on lcd Press to select Show on LCD function show values level 1_ Select level 1 or 2 and press to view Press and hold to return to main screen 5 12345a 10 esr 36 e00 s00 The LCD will show the lane position lot sequence ESR result and associated error and status codes for the most recent analysis of that level 5 12345a 10 1 reprint 5 12345a...

Page 33: ... a new level of control lot will delete all data collected for the previous control lot of that level controls menu 3 reg new contr Press Register New Control in the Controls Menu to register a new control reg new contr level 1_ Enter the desired control level 1 or 2 and press Press and hold to return to the main screen Important This operation will delete old statistics for this control level sta...

Page 34: ...o accept the displayed value or to delete the displayed value Retype the new minimum value 0 999mm hr and press to accept the new value Press again to restore old minimum value control 1 Press to accept the displayed value or to delete the displayed value Retype the new maximum value 0 999mm hr and press to accept the new value Press again to restore old maximum value control 2 Press to accept the...

Page 35: ...er test insert rack ok The display will prompt you to insert the test rack Insert the test rack and press to start the procedure Figure 15 Press to return to the main screen After the reading is complete the results will print on the internal printer Figure 16 A 2mm range from the registered test rack Section 6 4 is acceptable If the readings are outside the acceptable range compared to the expect...

Page 36: ......

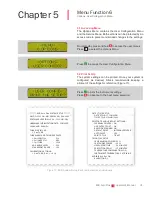
Page 37: ...5 Menu Function 6 Options User Configuration Menu PRINT THE SETUP SET DATE TIME SET AUDIBLE ALARM SET PRINTER SET PRINT STYLE USER CONFIG MENU DIAGRAM SET ACCESS CODE ...

Page 38: ......

Page 39: ...er 5 Menu Function 6 Options User Configuration Menu ESR Auto Plus SYSTEM SETUP MM DD YYYY HH MM SERIAL NO 506 0000 SOFTWARE VERSION v00 0 YYYY MM DD HARDWARE INITIALIZATION DATE YY MM DD LANGUAGE ENGLISH TUBE SIZE IN USE 1 2 ml TUBE TUBE ALARM AND TRIGGER POINTS 1 2ml LOW FILL 510 1 2ml OVER FILL 690 1 2ml TUBE 1200 NO SAMPLE LEVEL 200 MAX REPORT RANGE 120 CALIBRATION SETTINGS 1 2 ml TUBE CAL 0 F...

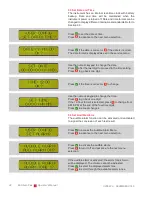
Page 40: ...ing Press to go back one digit time 12 00 ok Press if the time is correct or to change set time 00 00 hh mm Use the numeric keypad to change the time Press to go back one digit If the 12 hour format is selected press to change from AM to PM at the end of the four time digits Press to accept changes 5 4 Set Audible Alarm The audible alarm function can be activated or deactivated to signal the concl...

Page 41: ...elect Log Style printout Figure 18b Information included on ESR Auto Plus Printout Date Time Date and time are displayed in the active format SERIAL NO ESR Auto Plus instrument serial number Patient Name ticket only Blank line to record patient name on the ticket printout optional Patient ID ID Sample patient ID number ESR Erythrocyte sedimentation rate in mm hr E ERR ERROR Error code Refer to Sec...

Page 42: ...t Access Code An access code can be assigned to control access to the User Configuration Menu The access code can be any number from 1 to 9999 If the code is set to 0 the function is disabled user config set access code Press to set an access code Press to return to the main screen set user config access code _ Press 0 9 to enter access code digits Press to erase a digit Press to accept an access ...

Page 43: ...u Function 6 Options Service Menu RESTRICTED ENTRY GIVE CODE 48 SET LANGUAGE SET DATE STYLE REGISTER TEST RACK SET TUBE TYPE SERVICE MENU DIAGRAM SET CALIBRATION SET TEST MODE SET ACCESS CODE SEE TEMPERATURE ...

Page 44: ......

Page 45: ...ptions user config Press to move past the User Configuration Menu options service menu Press to select the Service Menu Press to return to the main screen restricted entry give code 48_ Enter restricted access code 48 Press to enter the Service Menu Press to return to the main screen Press to delete a digit 6 2 Set Language Multiple languages are available in the software service menu set language...

Page 46: ...Press to select the displayed date format Press to scroll through the available date formats and then press to select the desired format Date Formats Example YYMMDD 140125 YYYY MM DD 2014 01 25 YY MM DD 14 01 25 MMDDYY 012514 MM DD YYYY 01 25 2014 MM DD YY 01 25 14 time format hh mm 24 ok Press to select the displayed time format Press to scroll through the available time formats and then press to...

Page 47: ... scan the test rack twice and print the results Figure 19 Test rack results must be 1mm from first read to second read Test rack results must be 2mm from predefined values After registering a test rack a test rack verification will occur see Section 4 7 Press to verify the results ESR Auto Plus TEST RACK REGISTRATION MM DD YYYY HH MM SERIAL NO 506 0000 SOFTWARE VERSION V00 0 YYYY MM DD TECHNICAL S...

Page 48: ...to return to the 1 2ml prompt 6 6 Set Calibration QuickMode results correspond to the original 200mm Westergren Method ESR Since there are many different 200mm pipettes that produce slightly different results QuickMode results can be calibrated At the time of delivery the calibration factor will be set to 0 Please contact Streck Technical Service before adjusting the calibration factor Important T...

Page 49: ...Mode for patient testing 6 8 Set Access Code If the user configuration code is forgotten it can be displayed and reset through the Service Menu service menu set access code Press to set a user configuration access code or to advance to the next menu selection set user conf g access code 0 The code will be displayed and can be reset to any number from 1 to 9999 If the code is set to 0 the function ...

Page 50: ...RAM and reset to default settings Wait a few seconds while the RAM is being cleared Press to abort the RAM reset and start the instrument as normal ram cleared restart system Turn off the instrument and wait at least 5 seconds Turn on the instrument DO NOT HOLD THE BUTTON v0000 yymmdd Instrument will flash the software version number on the display new software ok for setup Press to continue the R...

Page 51: ...7 Background of the ESR Test ...

Page 52: ......

Page 53: ...Extended ESR provides an indication of influence from high hematocrit HCT Hematocrit is the volume of red blood cells as a percent of the total sample volume A sample with an HCT of 70 means that 70 of the sample volume is red blood cells An Extended ESR result is expressed as a fractional parameter For example 10 15 or 40 40 which means 10mm during the first hour and another 5mm during the second...

Page 54: ... sedimentation but is inaccurate in the higher range The ESR Auto Plus uses the QuickMode method to accelerate ESR measurement QuickMode is faster than the Rapid ESR method described above and has better correlation to the reference method than the standard scale QuickMode uses a special mathematical formula to convert the accelerated results 7 5 The ESR Vacuum Tube In parallel with Hjalmarsson s ...

Page 55: ...he sedimentation rate during the second phase Sedimentation Sedimentation of red blood cells occurs during the Sedimentation Phase since red blood cell aggregates are denser than plasma The sedimentation rate is often linear during the major part of this phase Packing As sedimented red blood cells reach a certain density sedimentation will decrease and come to an end This is the Packing Phase wher...

Page 56: ......

Page 57: ...8 Performance Technical Specifications ...

Page 58: ......

Page 59: ...e clinical significance of an ESR result obtained from an abnormal sample including but not limited to icteric lipemic cold agglutinins anemic conditions low hemoglobin concentrations hemolysis or any pathological condition that interferes or prevents a clear red blood cell to plasma interface should be determined by the clinician ordering the test Manual and automated ESR measurements in samples ...

Page 60: ... were filled with ESR Chex control 10 tubes with level 1 and 10 tubes with level 2 The level 1 tubes were placed in each lane of the ESR Auto Plus and all tubes were analyzed 10 times The study was repeated with the level 2 samples The mean standard deviation and coefficient were calculated both within and across the lane designations Results The ESR Auto Plus demonstrates uniform precision charac...

Page 61: ...d on the back of ESR Auto Plus Sample IDs can contain any alphanumeric character and have a maximum length of 13 characters No special start or stop characters are required Non printable or control characters are removed Accepted codes EAN UPC Codabar Code 39 Code 93 Code 128 Interleaved 2 of 5 and more 8 9 Data Output Results are asynchronously transmitted to the DATA OUTPUT port located on the b...

Page 62: ...Amps 300mA max Phase Single Groundwire resistance limit 0 1 ohm Max acceptable leakage current 3 5mA Power cords U S Streck part number 240389 European Streck part number 240390 Australian Streck part number 240391 U K Streck part number 240392 Reading method Infrared light peak wavelength 950 nm Values converted according to time consumed between bottom position and triggering point following tri...

Page 63: ...specified but one must be aware that the ESR reaction increases with higher temperature Dimensions 272mm width x 273mm depth x 171mm height Weight 10 75 pounds 4 88 kg 8 11 Environmental Conditions ESR Auto Plus is designed to be safe under the following conditions a Indoor use b Altitude up to 2 000 meters c Temperature 5 C to 40 C d Maximum relative humidity 80 for temperatures up to 31 C decrea...

Page 64: ...ck part number 240390 U K Streck part number 240392 Australian Streck part number 240391 Sound pressure level Less than 55 dB at the highest sound pressure level Current consumption Max 29VA Working environment Temperature range 5 C to 40 C Relative humidity Max 80 for temperatures up to 31 C decreasing linearly to 50 relative humidity at 40 C Storing environment Temperature range 5 C to 40 C Rela...

Page 65: ...9 Safety Precautions ...

Page 66: ......

Page 67: ...r It is not necessary to routinely disconnect the instrument when it is not in use ESR Auto Plus operators should follow local regulations regarding disposal of electronic equipment 9 4 Sample Analysis The operator should consider all biological samples as potentially infectious The operator should observe Universal Precautions and follow established laboratory safety regulations when handling all...

Page 68: ...materials Important Only package the specific pieces of equipment authorized for return If the ESR Auto Plus is being returned include the test rack and barcode scanner bracket but not the mixer or barcode scanner 1 Unplug the instrument Remove the paper test rack cables barcode scanner bracket and other accessories 2 Wipe the outer surface of the instrument and test rack with ethanol or isopropan...

Page 69: ...10 Troubleshooting ...

Page 70: ......

Page 71: ...Rerun sample 5 Test Mode Test mode is enabled Result is invalid Disable test mode in Service Menu Rerun sample 6 Temperature Compensated Internal operating temperature of the instrument is 26 C and result is temperature compensated Result is valid 7 Out of Range The ESR value is outside the instrument s reportable range of 0 120mm hr Report as 120mm hr 8 Timing Error The timing of an ESR reading w...

Page 72: ...ube result is reprinted 4 1 2ml Tube Temperature Compensated Reprint Appears when a 1 2ml tube result is temperature compensated and reprinted Internal operating temperature of the instrument is 26 C and result is temperature compensated Result is valid 5 2 0ml Tube Appears when a 2 0ml tube is detected 6 2 0ml Tube Temperature Compensated Appears when a 2 0ml tube result is temperature compensate...

Page 73: ...tion menu 3 Verify that any additional labels are placed correctly on the tube see Section 2 5 and rerun Printer malfunction 1 Printer paper empty paper jam 2 Printer port not activated in the set up 3 Paper roll is installed upside down 4 Printer paper cover not fully closed 1 Close printer cover fully 2 Power unit OFF remove jam reload paper see Section 1 6 power ON 3 Turn on printer in User Con...

Page 74: ...Log File at Limit 1 Log file is full No corrective action needed Old results are being purged on a first in first out basis Print log file to retain a copy of all results ...

Page 75: ...11 Quick Reference Guide ...

Page 76: ......

Page 77: ...r blood collection 3 Place the sample on the ESR 657 Mixer for at least 3 minutes to thoroughly mix sample 4 When thoroughly mixed load sample in the ESR Auto Plus 11 3 Run Test Rack 1 From standby press and hold 2 Select number 5 Run Test Rack 3 Insert the test rack and press 4 Instrument will scan the test rack and generate a printout 5 If the printout reads OK proceed with QC controls 6 If test...

Page 78: ...nd the light will change from green to red 4 In 30 minutes the result will automatically print if autoprint is enabled and the light will return to green 11 7 Cancel Measurement 1 To cancel a sample remove the tube from its position or press and hold the keypad number corresponding to the desired tube position Press to abort 2 The display will show that the sample has been aborted and the red ligh...

Page 79: ...reads Insert Rack OK Insert Rack Press The instrument will scan twice and print results The printout should read TEST RACK REGISTRATION OK 7 After registration a test rack verification will occur Press to verify the results The printout should read SCANNER TEST OK 8 Instrument reads Set Tube Type Press 9 Instrument reads Set Calibration Press 10 Instrument reads Set Test Mode Press 11 Instrument r...

Page 80: ......

Page 81: ...____ DAY 01 02 03 04 05 06 07 08 09 10 11 12 13 14 15 16 17 18 19 20 21 22 23 24 25 26 27 28 29 30 31 Controls 1st Shift Controls 2nd Shift Controls 3rd Shift Test Rack Passed WEEK 1 2 3 4 5 Printerhead free of dust and old paper Instrument cleaned with a soft cloth ...

Page 82: ......

Page 83: ...vo ai test anticorpali per l HIV HIV 1 HIV 2 e l epatite C HCV non reattivo all HIV 1 RNA e all HCV RNA con test NAT autorizzato e non reattivo al test sierologico per la sifilide STS eseguiti con le metodiche specificate dalla Food and Drug Administration degli Stati Uniti Poiché nessun metodo di analisi è in grado di assicurare la completa assenza di agenti patogeni umani questo prodotto deve es...

Page 84: ......

Page 85: ......

Page 86: ......

Reviews: