320597-3 - NOVEMBER 2016
60
ESR-Auto Plus Operator’s Manual
9.6 Removal of ESR-Vacuum Tubes
Operators should be able to easily remove an ESR-Vacuum
Tube from the ESR-Auto Plus at the conclusion of the test
by grasping the stopper with their fingertips. Caution must
be taken to lift the tube straight out of the instrument until the
entire tube clears the top surface of the instrument. There
is a greater risk of the stopper dislodging from a tightly fit or
wedged tube, which could make tube removal difficult.
In the event that an ESR-Vacuum Tube becomes lodged or
broken inside the instrument, the operator should not attempt
to remove the tube. The operator should seal the affected
tube channel with tape, place the instrument in a biohazard
bag and contact Streck Technical Service at 800-843-0912
for instructions on how to return the instrument to Streck for
repair and decontamination.
9.7 Repackaging Instructions
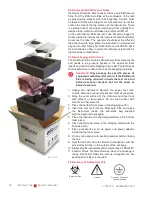
The ESR-Auto Plus contains delicate electrical components
and needs to be properly packed in the approved foam
inserts and carton before shipping (Figure 24). Contact Streck
Technical Service to obtain the correct packaging materials.
Important!
Only package the specific pieces of
equipment authorized for return. If the ESR-Auto
Plus is being returned, include the test rack and
barcode scanner bracket, but not the mixer or
barcode scanner.
1. Unplug the instrument. Remove the paper, test rack,
cables, barcode scanner bracket and other accessories.
2. Wipe the outer surface of the instrument and test rack
with ethanol or isopropanol. Do not wipe printer with
alcohol or other solvents.
3. Place the bottom foam piece in the shipping carton.
4. Insert the test rack into the ESR-Auto Plus and place
the instrument inside the anti-static bag supplied
with the approved packaging.
5. Place the instrument in the designated slot in the bottom
foam piece.
6. Place the top foam piece in the shipping carton with the
flat side down.
7. Place accessories such as paper and power adapter
inside the top foam piece.
8. Fill any extra space with packing material before closing
the box.
9. Seal the box and write the Return Authorization number
provided by Streck on the outside of the package.
10. Always ship the instruments and components as “FRAGILE”!
11. Contact Streck Technical Service when the package is
ready. Streck will make the pickup arrangements. No
packing slip or label is required.
9.8 Glossary of Safety Symbols
Figure 24
Biological Risk
Hazard
Protective Conductor
Terminal Marking
Summary of Contents for ESR-Auto Plus 506
Page 1: ...ESR Auto Plus Operator s Manual Model 506 v 1 0 2 0 ...
Page 2: ......
Page 6: ......
Page 7: ...1 Introduction ...
Page 8: ......
Page 12: ......
Page 13: ...2 Sample Preparation Analysis ...
Page 14: ......
Page 20: ......
Page 21: ...3 Keypad Menu Overview ...
Page 22: ......
Page 24: ......
Page 26: ......
Page 36: ......
Page 38: ......
Page 44: ......
Page 51: ...7 Background of the ESR Test ...
Page 52: ......
Page 56: ......
Page 57: ...8 Performance Technical Specifications ...
Page 58: ......
Page 65: ...9 Safety Precautions ...
Page 66: ......
Page 69: ...10 Troubleshooting ...
Page 70: ......
Page 75: ...11 Quick Reference Guide ...
Page 76: ......
Page 80: ......
Page 82: ......
Page 84: ......
Page 85: ......
Page 86: ......


