background image


4

11. Pidä työkaluistasi hyvää huolta. 

Pidä työkalun terät terävinä ja puhtaana paremman suorituskyvyn ja turvallisuuden 

takaamiseksi. Noudata voiteluohjeita ja lisälaitteiden vaihto-ohjeita. Tarkasta johdot säännöllisesti ja pyydä valtuutettua 
huoltohenkilöä korjaamaan ne tarvittaessa. Tarkasta jatkojohdot säännöllisesti ja vaihda, jos ne ovat vioittuneet. Pidä 
kätesi kuivina, puhtaina, öljyttöminä ja rasvattomina. 

12. Poista säätötyökalut ja avaimet. 

Varmista, että kaikki kiinto- ja säätöavaimet on poistettu laitteesta ennen sen 

käynnistämistä. 

13. Pysy tarkkaavaisena. 

Tarkkaile, mitä olet tekemässä. Käytä maalaisjärkeä. Älä käytä työkalua väsyneenä. 

14. Tarkasta vioittuneet osat. 

Tarkasta ennen työkalun käyttöä, ettei siinä ole vioittuneita osia. Jos osa on vain jonkin 

verran viallinen, mieti, voiko laite toimia kunnolla ja täyttääkö se tehtävänsä viasta huolimatta. Tarkasta liikkuvien osien 
kohdistus, niiden vapaa liike, osien asianmukainen asennus ja kaikki muut olosuhteet, jotka voivat heikentää työkalun 
toimintaa. Vioittunut osa on korjattava tai annettava valtuutetun huoltokeskuksen vaihdettavaksi, ellei tässä 
käyttöohjeessa ole toisin määrätty. 

15. Käytä ainoastaan hyväksyttyjä osia.


Käytä huoltoon vain samanlaisia varaosia. Anna valtuutetun huollon asentaa 

varaosat. 

VAROITUS. 

Minkä tahansa, tässä käyttöohjeessa mainitsemattoman ja suosittelemattoman lisävarusteen tai tarvikkeen 

käyttö voi aiheuttaa henkilökohtaisen tapaturman. 

Säilytä nämä tärkeät turvallisuusohjeet   


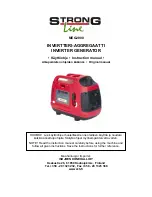
Summary of Contents for MEG2000

Page 1: ...skustie 26 61850 Kauhajoki As Finland Tel 358 20 1323 232 Fax 358 20 1323 388 www ikh fi HUOMIO Lue käyttöohjeet huolellisesti ennen laitteen käyttöä ja noudata kaikkia annettuja ohjeita Säilytä ohjeet myöhempää tarvetta varten NOTE Read the instruction manual carefully before using the machine and follow all given instructions Save the instructions for further reference ...

Page 2: ...uotteen kehittelyssä minkä ansiosta sen käyttö ja huolto on helppoa 2 Ympäristönsuojelu Kierrätä tarpeettomat materiaalit jätteenä hävittämisen sijaan Kaikki työkalut letkut ja pakkausmateriaali tulee lajitella viedä kierrätyskeskukseen ja hävitettävä ympäristöystävällisellä tavalla 3 Tuotteen käyttötarkoitus Tämä tuote sopii koti ja retkisovelluksiin Se mahdollistaa laitteiden kuten ulkovalot tie...

Page 3: ...rosnopeus 4500rpm SMART kaasun sammutuksella Jäähdytysjärjestelmä Ilmajäähdytetty Sytytysjärjestelmä Täysi transistori Öljysäiliön tilavuus 0 40L Polttoainesäiliön tilavuus 3 7L Laturi Malli EM2000i Vaihtovirtalähtö Nimellisjännite V 230 120 240 Nimellistaajuus Hz 50 60 Nimellisampeeritaso A 6 9 13 3 6 7 Nimellisulostulo KVA 1 6 Maks ulostulo KVA 1 8 Tasavirtalähtö Vain 12V ajoneuvoakkujen lataami...

Page 4: ...kaukana työalueelta Sivulliset katsojat erityisesti lapset ja vammaiset on pidettävä poissa työalueelta Älä salli kenenkään ulkopuolisen päästä käsittelemään laitteita tai jatkojohtoa 4 Varastoi generaattorit ja työkalut turvalliseen paikkaan Kun laitetta ei käytetä varastoi se lukittuun tilaan 5 Älä käytä työkalua voimakeinoin Työ sujuu paremmin ja turvallisemmin työkalulle suunnitellulla nopeude...

Page 5: ... väsyneenä 14 Tarkasta vioittuneet osat Tarkasta ennen työkalun käyttöä ettei siinä ole vioittuneita osia Jos osa on vain jonkin verran viallinen mieti voiko laite toimia kunnolla ja täyttääkö se tehtävänsä viasta huolimatta Tarkasta liikkuvien osien kohdistus niiden vapaa liike osien asianmukainen asennus ja kaikki muut olosuhteet jotka voivat heikentää työkalun toimintaa Vioittunut osa on korjat...

Page 6: ...iset pinnat niiden joutuessa kosketukseen generaattorin kanssa Aseta generaattori alhaisen johtavuuden omaavalle pinnalle kuten betonilevy Käytä generaattoria AINA vähintään 2 metrin päässä johtavista pinnoista Kuluneiden viallisten tai maadoittamattomien jatkojohtojen käyttö Koskettaminen kuluneeseen tai vialliseen jatkojohtoon voi johtaa sähköiskuun Maadoittamattoman jatkojohdon käyttö voi estää...

Page 7: ...käyntinopeuden muuttaminen Moottorin käyntinopeus on tehdasasetettu turvallisen käytön takaamiseksi Moottorin käyntinopeuden muuttaminen voi liitäntöjen ylikuumenemiseen ja tulipaloon Älä koskaan yritä trimmata moottoria suorituskyvyn parantamiseksi Generaattorin tuottoa ohjataan sähköisesti ja generaattorin nopeuden lisääminen ei vaikuta sähköntuottoon Riittämätön tuuletus Generaattoria vasten ta...

Page 8: ...tä polttoainekorkin huohotin on suljettu Jos näin ei tehdä voi se johtaa polttoainevuotoihin kuljetuksen aikana Kuljeta polttoainetta asianmukaisessa astiassa Aseta generaattori aina suoja alustan päälle kuljetuksen aikana ajoneuvon vaurioitumisen estämiseksi polttoainevuodoista Poista generaattori auton päältä välittömästi saavuttuasi määränpähän 10 Nostamisesta syntyvä vaara Huomio mitä saattaa ...

Page 9: ...ja muut henkilöt kaukana laitteessa aina sen käytön aikana Generaattorin käyttö räjähtävien tai vaarallisten kaasujen läheisyydessä Generaattorin käyttö kyseisessä ympäristössä voi johtaa tulipaloon tai räjähdykseen generaattorissa tai oheislaitteissa Älä koskaan käytä generaattoria räjähtävien kaasujen tai kemikaalien läheisyydessä Tämä koskee veneitä kuoppia ja alueita joiden tuuletus on heikko ...

Page 10: ...n autotallit kellarit varastot vajat tai ihmisten tai eläinten asuinpaikassa Pidä lapset lemmikit ja sivulliset etäällä laitteen käyttöalueelta 13 Liikkuvien osien aiheuttama vaara Huomio mitä saattaa tapahtua Miten se voidaan estää Kosketus liikkuviin osiin voi aiheuttaa vakavan henkilötapaturman Generaattori sisältää osia jotka pyörivät suurella nopeudella käytön aikana Näiden osien edessä on su...

Page 11: ...kokaasu sisältää myrkyllistä hiilimonoksidia Älä koskaan käytä moottoria suljetussa tilassa Huolehdi aina riittävästä ilmanvaihdosta Huomioi tuuletus asennuksen yhteydessä Sammuta moottori ennen polttoaineen lisäämistä Bensiini on erittäin herkästi syttyvää ja räjähdysaltista tietyissä olosuhteissa Lisää polttoainetta hyvin tuuletetussa tilassa Pidä kaukana savukkeesta savusta ja kipinöistä täytön...

Page 12: ...eneraattorissa olevat varoitustarrat Liitännät rakennuksen sähköjärjestelmään valmiusvirralle on tehtävä valtuutetun sähköhenkilön toimesta ja niiden on noudatettava voimassa olevia lakeja ja sääntöjä Virheelliset liitännät voivat päästää virtaa generaattorista takaisin verkkovirtaan Tällainen takaisinsyöttö voi aiheuttaa sähköiskun sähköalan henkilöille tai muille jotka ovat kosketuksessa verkkov...

Page 13: ...lttoainetta hyvin tuuletetussa tilassa moottorin ollessa pysäytettynä Pyyhi ylivuotanut bensiini heti pois Generaattori on mahdollinen sähköiskujen lähde väärinkäytettynä älä käytä sitä märillä käsillä Älä käytä generaattoria sateella tai lumisateella äläkä anna sen kastua KAIKKI kuormat on kytkettävä irti generaattorista ennen käynnistämistä ja pysäyttämistä laitteiden vaurioitumisen välttämiseks...

Page 14: ...odennäköistä että sähkötyökalu olisi viallinen tai sen osia puuttuisi Jos havaitset jotain vikaa älä käytä laitetta ennen osien vaihtamista tai laitteen korjaamista Tämän laiminlyöminen voi johtaa vakavaan tapaturmaan 16 TURVATARROJEN SIJAINTI MOOTTORIKYTKIN KAASUVIPU MALLI erikois ...

Page 15: ...14 TURVALLISUUSVAROITUKSET KUUMA VAROITUS TURVALLISUUSVAROITUKSET ...

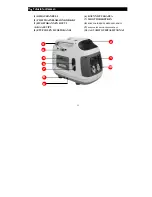
Page 16: ...TYSKAHVA 2 POLTTOAINESÄILIÖN KORKKI 5 ETUPUOLEN HUOLTOKANSI 7 MOOTTORIKYTKIN 1 OHJAUSPANEELI 3 HUOLTOKANNEN RUUVI 8 POLTTOAINEEN TYHJENNYSLETKU 1 4 KAASUVIPU 9 POLTTOAINEEN TYHJENNYSLETKU2 10 AC VAIHTOVIRTALIITÄNNÄT 6 7 10 9 3 4 1 2 5 8 ...

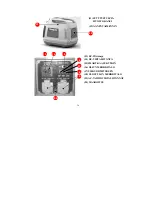
Page 17: ... HUOLTOKANSI 16 ÖLJYN MERKKIVALO 17 YLIKUORMITUKSEN 19 AC VAIHTOVIRTALIITÄNNÄT 14 DC VIRTALIITÄNTÄ 13 DC Piirisuoja 20 MAADOITUS 15 SMART KAASUKYTKIN 18 ULOSTULON MERKKIVALO 11 12 13 16 17 18 19 20 14 15 12 ÄÄNENVAIMENNIN ...

Page 18: ...AUTUS OFF Smart kaasujärjestelmä ei ole käytössä Moottorin käyntinopeus pysyy nimellistasolla Smart kaasujärjestelmä ei toimi tehokkaasti jos sähkölaite vaatii sähkövirtaa tilapäisesti Kun suuria sähkökuormia liitetään samanaikaisesti käännä smart kaasukytkin OFF asentoon jännitemuutosten vähentämiseksi Tasavirtatilassa käännä smart kaasukytkin OFF asentoon 21 POLTTOAINEEN TYHJENNYSRUUVI 22 ILMANP...

Page 19: ...ämällä sitä vastapäivään ja tarkasta öljyntaso Kuva B 3 Jos öljyntaso on öljysäiliökotelon kaulan alapuolella täytä SAE30 single viscosity 4 tahtiöljyä öljysäiliön kaulaan asti katso kohta Moottoriöljyn vaihto täyttö tässä käyttöohjeessa Kuva C HUOMAUTUS Irrota öljyntäyttökorkki kokonaan öljyntason tarkastamiseksi Öljykorkkia ei tarvita öljyntason tarkastuksessa 4 Jos öljy on likaista tai mustaa v...

Page 20: ...ntämällä moottorikytkimen 7 off asentoon Kuva D 2 Tarkasta polttoainetaso silmämääräisesti Irrota polttoainekorkki ja suodatinritilä polttoainetason näkemiseksi Kuva E 3 Jos polttoainetaso on alhainen aseta suodatinritilä paikalleen polttoainesäiliön kaulaan Kuva F D E F ...

Page 21: ...ä moottorin käydessä tai sen ollessa vielä kuuma Tarkasta että polttoaineen tyhjennysruuvi on kiristetty ja että polttoainetta ei vuoda takatyhjennysputkesta Huomaa Jos polttoaineen tyhjennysruuvia 21 ei ole kiristetty vuotaa polttoainetta tyhjennysputkesta 8 Huolehdi ettei polttoaineen sekaan pääse pölyä likaa vettä tai muita ulkopuolisia kohteita Pyyhi kaikki polttoaineroiskeet puhtaaksi ennen m...

Page 22: ...täytetty 1 Varmista ennen käynnistämistä että mitään laitteita ei ole liitetty generaattoriin 2 Käännä polttoainekorkin tuuletusvipu asentoon ON Kuva G 3 Käännä moottorikytkin asentoon ON Kuva H 4 Kylmän moottorin käynnistämiseksi käännä kaasuvipu käynnistysasentoon Jätä kaasuvipu käyntiasentoon lämpimän moottorin käynnistämiseksi Kuva I G I H ...

Page 23: ...sti Palauta käynnistyskahva hitaasti alkuperäiseen asentoon Kuva J Huomaa Kun moottori käynnistetään ensimmäisen kerran vaatii se usean käynnistysyrityksen ennen kuin polttoaine on kulkenut säiliöstä moottoriin 6 Kun moottori on lämmennyt siirrä kaasuvipu asteittain käyntiasentoon Kuva K K J ...

Page 24: ...tteita ei ole liitetty generaattoriin 2 Käännä moottorikytkin 7 asentoon off Kuva L 3 Käännä polttoaineen 2 tuuletusvipu off asentoon Kuva M Laitteiden liittäminen generaattoriin Huomaa että laitetta ei tule käyttää täydellä teholla 1800W yli 20 minuuttia kerralla L M ...

Page 25: ...ttä laitteen nimellisteho ei ylitä generaattorin nimellistehoa Älä koskaan ylitä generaattorin nimellistehoa 3 Kytke AC Smart kaasujärjestelmä 15 asentoon ON tarvittaessa Kuva N Huomaa Smart kaasu Smart kaasujärjestelmä ei toimi tehokkaasti jos sähkölaite vaatii sähkövirtaa tilapäisesti Kun suuria sähkökuormia liitetään samanaikaisesti käännä Smart kaasujärjestelmä OFF asentoon jännitemuutosten vä...

Page 26: ...käytettävän virran vuoksi Tämä ei tarkoita että generaattori olisi viallinen 22 DC laitteet Tasavirtalähtöä tulee käyttää vain 12 voltin auton lyijyakkujen lataamiseen Älä lataa akkua sen ollessa liitettynä autoon Irrota ne kokonaan ennen liittämistä generaattoriin lataamista varten Huomaa Käytä vain generaattorin mukana toimitettuja tasavirtajohtoja tasavirtaliitäntää käytettäessä Noudata seuraav...

Page 27: ... maahan tai muille pinnoille ennen kuin liittimet on irrotettu akusta 8 Liitä mukana toimitettu tasavirtapistoke tasavirtaliitäntään 14 ja liitä leukaliittimet oikeisiin napoihin akussa Käytä vain generaattorin mukana toimitettuja tasavirtajohtoja 9 Paina tasavirtapiirin suojaus nollauspainiketta 13 jos tasavirtasyöttö on ollut ylikuormitettu Kuva P Generaattorilla voidaan ladata yleisimpiä lyijya...

Page 28: ...ava 23 Generaattorin huolto Pidä generaattori aina kuivana ja puhtaana Generaattoria tulee säilyttää ja käyttää tilassa joka ei sisällä kosteutta pölyä tai syövyttäviä kaasuja Jos näitä aineita on generaattorissa puhdista se pehmeällä pyyhkeellä tai harjalla Älä käytä vesiletkua tai painepesuria generaattorin puhdistamiseen Vettä voi päästä jäähdytysilma aukkoihin ja vaurioittaa roottoria staattor...

Page 29: ...ä tyhjennä polttoaine generaattorista etukäteen Ennen laitteen pitkäaikaista varastointia 1 Tarkasta että tila ei ole kostea ja pölyinen 2 Tyhjennä polttoaine VAROITUS Bensiini on erittäin herkästi syttyvää ja räjähdysaltista tietyissä olosuhteissa Tupakointi avotuli ja kipinät ovat kiellettyjä tiloissa a Tyhjennä kaikki polttoaine polttoainesäiliöstä sopivaan säiliöön b Käännä moottorikytkin ON a...

Page 30: ...senna sytytystulpan hattu takaisin paikalleen 3 Vaihda moottoriöljy 4 Irrota sytytystulppa ja kaada ruokalusikallinen puhdasta moottoriöljyä sylinteriin Pyöritä moottoria useita kierroksia öljyn jakamiseksi tasaisesti ja asenna sytytystulppa paikalleen 5 Vedä käynnistyskahvaa hitaasti kunnes tunnet vastuksen Mäntä on tulossa puristusiskuun ja imu ja pakoventtiilit ovat suljettu Moottorin säilytys ...

Page 31: ... Puhdista säädä Kipinänvaimennin Puhdista Vedenerotin Puhdista Venttiilin välys Tarkasta säädä 3 Polttoainesäiliö siivilä Puhdista 3 Polttoaineletku Tarkasta HUOMAUTUS 1 Huolla useammin kun käytetään pölyisissä tiloissa 2 Nämä kohdat on annettava huoltopalvelun tehtäväksi ellei sinulla ole oikeita työkaluja ja osaat tehdä ne itse Katso huoltotoimenpiteet korjauskäsikirjasta 3 Kaupallisessa käytöss...

Page 32: ... Kuva T 3 Irrota sytytystulpan johto Kuva U 4 Puhdista kaikki lika sytytystulpan kannan alueelta 5 Irrota sytytystulppa mukana toimitetulla tulppa avaimella Kuva V 6 Tarkasta sytytystulppa silmämääräisesti Poista karstajäänteet teräsharjalla 7 Tarkasta sytytystulpan yläosa värimuutoksien varalta Vakioväri on vaaleanruskea S T U V ...

Page 33: ...äiliöön nostamalla moottoria öljyntäyttökaulaa kohti 5 Kallista sitten generaattori takaisin ylös ja aseta se pystysuoraan asentoon 6 Täytä suositeltua öljyä Täytä täyttökaulan ylärajaan Kuva X Huomaa Suositeltu 4 tahti moottoriöljy on SAE30 single viscosity tai 10W30 multi viscosity 4 tahtiöljy HUOMAUTUS Tarkasta että vieraita esineitä roskia tai pölyä ei pääse kampikammioon 7 Asenna öljyntäyttöt...

Page 34: ...aa ja roskia huonosta asennuksesta ja moottorin kulumisesta johtuen PIDÄ AINA suodatin puhtaana 1 Irrota sivuhuoltokansi 5 Kuva Y 2 Löysää ilmanpuhdistimen suodatinkotelon ruuvia ja irrota ilmanpuhdistimen suodatinkotelo Kuva Z 3 Irrota sitten ilmansuodatin vetämällä sitä itseesi päin ILMANPUHDISTIMEN RUNKO ILMANPUHDISTIMEN SUOJUS ILMANPUHDISTIMEN SUOJUKSEN RUUVI Z Y ...

Page 35: ...tinta 29 KIPINÄNVAIMENTIMEN HUOLTO Jos varustettu Suosittelemme kipinävaimentimen käyttämistä kuivilla alueilla Joillakin alueilla sen käyttö on pakollista Ota selvää paikallisista säännöistä ja määrityksistä ennen laitteen käyttöä Kipinänvaimennin on puhdistettava säännöllisesti sen toiminnan varmistamiseksi Tukkeutunut kipinänvaimennin Estää pakokaasun virtauksen Rajoittaa moottorin tehoa Lisää ...

Page 36: ... irrota kipinänvaimennin äänenvaimentimesta Puhista kipinänvaimentimen ritilä Kuva e Poista karstajäänteet kipinänvaimentimen ritilästä harjalla Varo vahingoittamasta ritilää Kuva f Kipinänvaimentimessa ei saa olla halkeamia tai reikiä Vaihda kipinänvaimennin jos se on viallinen Asenna kipinänvaimennin ja äänenvaimentimen suoja päinvastaisessa järjestyksessä b d e f ...

Page 37: ...eeniä kloriinia ja ammoniakkia 3 imuroi ilman imu ja poistoaukot 4 Poista ilmanvaihdon imu poistoaukot roskista puhdista pehmeällä harjalla ja puhalla lopuksi paineilmalla 5 Käytä suojalaseja puhdistuksen aikana 31 Korjaukset Korjaukset tulee suorittaa vain valtuutetun huoltoliikkeen toimesta VAROITUS Älä puhdista muoviosia puhdistusaineella Käytä mietoa pesuainetta ja kosteaa pyyhettä 32 Yleistar...

Page 38: ...ttorin olla 5 10 minuuttia ja yritä uudelleen noudattamalla käynnistysohjeita Jos kaasuvipu on täysin auki käynnistys aseta se käyntiasentoon ja yritä uudestaan 8 Polttoaine on vanhaa 8 Tyhjennä säiliö ja vaihda polttoaine uuteen AC virransyöttö Ei virransyöttöä 1 Viallinen liitin 1 Pyydä huoltokeskusta vaihtamaan liitin 2 Palaako vihreä merkkivalo moottorin käydessä ja virtaa ei tule 2 KYLLÄ Koke...

Page 39: ...netsintä jatkuu DC katkaisin laukeaa jatkuvasti 1 Ylikuormitus 1 Alenna kuormaa 2 Vialliset johdot tai laite 2 Tarkasta onko laitteessa paljaita tai kuluneita johtoja Vaihda 3 Vääriä kaapeleita käytetään 3 Varmista että käytät generaattorin mukana toimitettuja DC kaapeleita Väärien johtojen käyttö voi johtaa napaisuuden vaihtumiseen Käytä vain generaattorin mukana toimitettuja DC kaapeleita 4 Napa...

Page 40: ...sijoitettu kohtaan jonka ilmanvaihto on riittävä Jos ei siirrä se hyvin tuuletettuun kohtaan 5 Generaattorin polttoainekorkin huohotin on kiinni 5 Tarkasta että generaattorin polttoainekorkin huohotinkytkin on asennossa on jolloin ilma sekoittuu polttoaineeseen Jos huohotinkytkin on off asennossa kierrä kytkin on asentoon 6 Generaattorin ilmansuodatin on ehkä puhdistettava 6 Irrota ilmansuodatin T...

Page 41: ...of product making it easy to maintain and operate 2 Environmental protection Recycle unwanted materials instead of disposing of them as waste All tools hoses and packaging should be sorted taken to the local recycling center and disposed of in an environmentally safe way 3 Scope of product This product is suited for home and camping applications It will allow you to run equipment like outdoor ligh...

Page 42: ...ssion ratio 8 5 1 Engine speed 4500rpm With SMART throttle switch OFF Cooling system Forced air Ignition system Full transistor Oil capacity 0 40L Fuel tank capacity 3 7L Generator Model EM2000i AC output Rated voltage V 230 120 240 Rated Frequency Hz 50 60 Rated ampere A 6 9 13 3 6 7 Rated output KVA 1 6 Max output KVA 1 8 DC output Only for charging 12V automotive batteries Maximum charging outp...

Page 43: ... which you are working Do not use power tools and generators in damp or wet locations Keep the work area well lit Do not expose power tools or generators to rain Do not use power tools in the presence of flammable liquids or gases 3 Keep visitors away from the work area All visitors and onlookers especially children and infirm persons should be kept well away from where you are working Do not let ...

Page 44: ...tay alert Watch what you are doing Use common sense Do not operate a tool when you are tired 14 Check for damaged parts Before using a tool check that there are no damaged parts If a part is slightly damaged carefully determine if it will operate properly and perform its intended function Check for alignment of moving parts binding of moving parts breakage of parts proper mounting and any other co...

Page 45: ...ould charge conductive surfaces in contact with the generator Place generator on low conductivity surface such as a concrete slab ALWAYS operate generator a minimum of 2 meters from any conductive surface Use of worn damaged or ungrounded extension cords Contact with worn or damaged extension cords could result in electrocution Use of ungrounded corsets could prevent operation of circuit breakers ...

Page 46: ...eed has been factory set to provide safe operation Tampering with the engine speed adjustment could result in overheating of attachments and could cause a fire Never attempt to speed up the engine to obtain more performance The output of this generator is electronically controlled and speeding up the generator will have no effect on the electrical output Inadequate ventilation for generator Materi...

Page 47: ...l leakage during transporting Transport spare fuel only in an approved fuel container Always place generator on a protective mat when transporting to protect against damage to vehicle from leaks Remove generator from vehicle immediately upon arrival at your destination 10 Risk from lifting Hazard What could happen How to prevent it Lifting a very heavy object Serious injury can result from attempt...

Page 48: ...l fires Keep children or others away from the generator at all times Operation of the generator in the presence of explosive or dangerous gasses Operation on the generator in such an environment may result in causing a fire or explosion from the generator or connected appliances Never operate the generator in conditions where explosive gases or chemicals may be present This includes boats pits and...

Page 49: ...ts storage sheds or in any location occupied by humans or animals Keep children pets and others away from area of operating unit 13 Risk of moving parts Hazard What could happen How to prevent it Contact with moving parts can result in serious injury The generator contains parts which rotate at high speed during operation Guarding to prevent injury covers these parts Never operate generator with g...

Page 50: ... equipment damage Exhaust gas contains poisonous carbon monoxide Never run the generator in an enclosed area Be sure to provide adequate ventilation When installed in ventilated protections are to be observed Stop the engine before refueling Gasoline is extremely flammable and explosive under certain Conditions Refuel in a ventilated area Keep away from cigarette smoke and sparks when refueling Al...

Page 51: ...tention to the warning marks attached to the generator Connections for standby power to a building s electrical system must be made by a qualified electrician and must comply with all applicable laws and electrical codes Improper connections can allow electrical current from the generator to back feed into the utility lines Such back feed may electrocute utility company workers or others who conta...

Page 52: ...gine stopped Wipe up spilled gasoline at once The generator is a potential source of electrical shocks when misused do not operate with wet hands Do not operate the generator in rain or snow and do not let it get wet You MUST unplug any load from the generator before starting and stopping to prevent permanent damage to any appliances The installation and major repair work shall be carried out only...

Page 53: ...ine Power Tool is faulty or that a part is missing If you find anything wrong do not operate the tool until the parts have been replaced or the fault has been rectified Failure to do so could result in serious personal injury 16 SAFETY LABEL LOCATIONS CHOKE LEVER MODEL special ENGINE SWITCH ...

Page 54: ...14 SAFETY CAUTION HOT CAUTION SAFETY CAUTION ...

Page 55: ...r product 6 STARTER GRIP 2 FUEL TANK CAP 5 FRONT SIDE MAINTENANCE COVER 7 ENGINE SWITCH 1 CONTROL PANEL 3 MAINTENANCE COVER SCREW 8 FUEL DRAIN HOSE1 4 CHOKE LEVER 9 FUEL DRAIN HOSE2 10 AC SOCKET 6 7 10 9 3 4 1 2 5 8 ...

Page 56: ...NTENANCE COVER 16 OILALERT INDICATOR LIGHT 17 OVERLOAD INDICATOR LIGHT 19 AC SOCKET 14 DC SOCKET 13 DC Circuit protector 20 EARTH 15 SMART THROTTLE SWITCH 18 OUTPUT INDICATOR LIGHT 13 16 17 18 19 20 14 15 12 MUFFLER 11 12 ...

Page 57: ... NOTE OFF Smart throttle system does not operate Engine speed is kept over rated speed Smart throttle system does not operate effectively if the electrical appliance requires the momentary electric power When high electrical loads are connected simultaneously turn the smart throttle switch to the OFF position to reduce voltage change In DC operation turn the smart throttle switch to the OFF positi...

Page 58: ... level Fig B 3 If the oil level is below the top of the oil tank housing neck refill with either SAE30 single viscosity 4stroke all the way to the top of the oil tank neck refer to the Engine oil filling replacement section of this instruction manual Fig C NOTE Completely remove the oil filler cap when checking oil level The oil cap is not required for checking oil level 4 If the oil is contaminat...

Page 59: ...rned off by rotating the engine switch 7 to the off position Fig D 2 Check the fuel by a visual check Remove the fuel cap and fuel filter screen reviewing the fuel level Fig E 3 If fuel is low replace the filter screen inside the fuel tank neck Fig F D E F ...

Page 60: ... is running or is hot Check to ensure that the fuel drain screw has been tightened and that fuel is not leaking from the rear outlet tube Note If the fuel drain screw 21 is not tight fuel will be visibly leaking from the fuel drain hose 8 Be careful not to admit dust dirt water or other foreign objects into the fuel Wipe off spilt fuel thoroughly before starting engine Ensure you DO NOT fuel the g...

Page 61: ...om the factory 1 Before starting ensure that no electrical apparatus has been connected to the generator 2 Turn the fuel cap vent lever to the on position Fig G 3 Turn the engine switch to the on position Fig H 4 To start a cold engine move the choke lever to the start position In order to restart a warm engine leave the choke lever in the run position Fig I G I H ...

Page 62: ...nd slowly to the original position by hand Fig J Note When the motor is started for the very first time it will require a number of attempts to start until the fuel has traveled from the tank to the motor 6 If the choke lever was on the start position gradually move it to the run position as the engine warms up Fig K K J ...

Page 63: ... to the generator 2 Turn the engine switch 7 to the off position Fig L 3 Turn the fuel 2 vent lever to the off position Fig M Connecting apparatus to the generator Please note that it is not recommended to run the unit over its max output of 1800W for more than a maximum of 20 minutes L M ...

Page 64: ...Check to make sure that the apparatus appliance does not exceed that of the generator Never exceed the maximum power rating of the generator 3 Switch the AC Smart Throttle System 15 if required to the ON position Fig N Note Smart Throttle The Smart Throttle System does not operate effectively if the electrical appliance requires the momentary electric power When operating high electrical loads sim...

Page 65: ...ult of the generator 22 DC Applications The DC output should only be used for recharging 12 volt automotive lead acid type batteries and do not charge batteries while they are connected to a vehicle Make sure they have been totally disconnected prior to connecting to the generator for recharging Note Only use the DC leads provided with this generator when using the DC output When charging a batter...

Page 66: ... the generator DO NOT place the plug on the ground or on any other surface until the clips are removed from the battery 8 Connect the supplied DC plug lead into the DC socket 14 and connect the alligator clips to the correct polarity Only use the DC cable provided with this generator 9 Press the DC Circuit protector reset button 13 to reset in case the DC supply had previously been overloaded Fig ...

Page 67: ...r disconnected 23 Generator maintenance Your generator should be kept clean and dry at all times The generator should not be stored or operated in an environment that includes excessive moisture dust or any corrosive vapors If these substances are on the generator clean with a cloth or soft bristle brush Do not use a garden hose or anything with water pressure to clean the generator Water may ente...

Page 68: ... If you must transport the generator on a rough road drain the fuel from the generator beforehand Before storing the unit for an extended period 1 Be sure the storage area is free of excessive humidity and dust 2 Drain the fuel WARNING Gasoline is extremely flammable and explosive under certain conditions Do not smoke or allow flames or sparks in the area a Drain all gasoline from the fuel tank in...

Page 69: ...p on the spark plug securely 3 Change the engine oil 4 Remove the spark plug and pour about a tablespoon of clean engine oil into thecylinder Crank the engine several revolutions to distribute the oil then reinstall the spark plug 5 Slowly pull the starter grip until resistance is felt At this point the piston is coming up on its compression stroke and both the intake and exhaust valves are closed...

Page 70: ...arrester Clean Fuel sediment cup Clean Valve clearance Check adjust 3 Fuel tank strainer Clean 3 Fuel line Check NOTE 1 Service more frequently when used in dusty areas 2 These items should be serviced by your servicing dealer unless you have the proper tools and are mechanically proficient Refer to shop manual for service procedures 3 For commercial use log hours of operation to determine proper ...

Page 71: ...igT 3 Remove the spark plug lead Fig U 4 Remove any dirt from around the spark plug base 5 With the spark plug wrench provided remove the spark plug Fig V 6 Visually inspect the spark plug Remove carbon deposits using a wire brush 7 Check for discoloration on the top of the spark plug The standard colour should be a tan colour S T U V ...

Page 72: ... 24 4 Drain dirty oil into a container thoroughly by tilting the engine toward the oil filler neck 5 Once emptied tilt the generator back up and place into the generator up right position 6 Refill with recommended oil Fill to the upper limit of the filler neck Fig X Note The recommended 4 stroke engine oils are either SAE30 single viscosity or 10W30 multi viscosity 4 stroke oil CAUTION Check that ...

Page 73: ...s adhering to the filter due to improper installation and engine wear ALWAYS keep the filter clean at all times 1 Remove the side maintenance cover 5 Fig Y 2 Loosen the air cleaner filter cover screw and remove the air cleaner filter cover Fig Z 3 Proceed to remove the air filter by pulling it out towards you AIR CLEANER BODY AIR CLEANER COVER AIR CLEANER COVER SCREW AIR CLEANER ELEMENTS Y Z ...

Page 74: ...in place 29 SPARK ARRESTER MAINTENANCE Equipped type only In a dry or wooded area it is recommendable to use the product with a spark arrester Some areas require the use of a spark arrester Please check your local laws and regulations before operating your product The spark arrester must be cleaned regularly to keep it functioning as designed A clogged spark arrester Prevents the flow of exhaust g...

Page 75: ...e the spark arrester from the muffler Clean the spark arrester screen Fig e Use a brush to remove carbon deposits from the spark arrester screen Be careful to avoid damaging the screen Fig f The spark arrester must be free of breaks and holes Replace the spark arrester if it is damaged Install the spark arrester and muffler protector in the reverse order of disassembly b d e f ...

Page 76: ...nlet and outlet louvers of the alternator 4 Take special care to keep the ventilation inlets outlets free from obstruction cleaning with a soft brush followed by a compressed air jet will usually be sufficient to ensure acceptable internal cleanliness 5 Wear eye protection when carrying out cleaning 31 Repairs Only an authorised service centre should repair the generator CAUTION Do not use cleanin...

Page 77: ... the instructions when doing so Alternatively if the choke lever is in full choke position start switch the choke to the run position and try to restart 8 Old Fuel 8 Remove the existing fuel and replace with new AC power supply No electrical output 1 Faulty receptacle 1 Have service center replace receptacle 2 Is the green LED on with motor running and no output 2 YES Try another appliance that is...

Page 78: ... operation owners manual Troubleshooting cont DC circuit breaker continually tripping 1 Overload 1 Reduce load 2 Faulty cords or equipment 2 Check for damaged bare or frayed wires on equipment Replace 3 Incorrect cables used 3 Check to make sure you are using the DC cables supplied with the actual generator Using the incorrect cables could result in the crossing over of polarity Only use the suppl...

Page 79: ...heck and make sure that the generator is located in a appropriately ventilated environment If not relocate the generator to a well ventilated location 5 Generator fuel cap breather set on the closed position 5 Check that the generator fuel cap has the breather located switch located on the on position allowing air to mix with the fuel If the breather cap is located in the off position rotate switc...

Page 80: ...itus ____________________ Harri Altis Ostopäällikkö valtuutettu kokoamaan teknisen tiedoston EC DECLARATION OF CONFORMITY Isojoen Konehalli Oy Keskustie 26 61850 Kauhajoki As Finland herewith declares that GENERATOR model no MEG2000 EM2000i fulfils the requirements of the Directive 2000 14 EC the Directive 2005 88 EC the Low Voltage Directive 2006 95 EC as well as the standards EN 12601 2001 ISO 8...

Reviews: