20.
sub
No function
21.
4
No function
22.
TxT
No function
23.
AuDiO
No function
24.
7
Jumps to the previous file during playback.
25.
12
Starts/resumes playback
26.
3
Stops playback of multimedia files
27.
8
Jumps to the next file during playback.
28.
standard QweRTY keyboard
2.6 installing the batteries
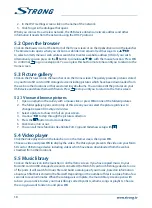
Fig. 5
Open the cover on the remote control and insert 2x AAA batteries into the compartment.
The correct position of batteries polar diagram is shown inside the batteries compartment.
1. Open the cover.
2. Insert the batteries.
3. Close the lid.
warning:
The batteries should not be recharged, disassembled, electrically short-
circuited, be mixed or used with other types of batteries.
2.7 using the remote control and usb adapter
Fig. 6
Please first insert the USB adapter of the remote control in a free USB port. This USB adapter receives
the RF (radio controlled) signals from remote control. Without this adapter only the Standby button
will work via the IR sensor (infrared). The remote control has an in-built “G-sensor” which is used as
pointer on your screen in the Android mode. This is called as “Air mouse” function and allows you to
move the pointer by moving the remote control through the air.
note:
As this function uses more power as normal pressing of buttons we
recommend using Alkaline batteries to ensure longer operation time
of your remote control. When the batteries are almost empty the LED
indication on the remote control will start blinking for 15 seconds after you
press any button.
Under normal conditions your remote control has been paired with the USB adapter in the factory
and therefore the “Air mouse” function of your remote control will directly work for your IP box. In
case you can only use the
q
button on the remote control and none of the other buttons have a
function, or in case the red LED on the remote control keeps blinking, it could be that the pairing
between the remote control and the USB adapter is not correct.
In that case you need to pair the USB adapter to the remote control manually:
1. Remove the USB adapter from the USB slot on the IP box.
2. Make sure the IP box is switched ON.
6


