background image

2.5 Installing the batteries

Fig. 5

Place 2x AAA batteries in the battery compartment of the remote control. Make sure to match the 
polarity markings inside the compartment.

NOTE:


 Pictures are only for reference. Actual items may differ.

1.  Slide the cover horizontally.
2.  Put 2x AAA batteries in the compartment and make sure the polarity is correct.
3.  Slide horizontally to close the cover.

Precautions for using the battery

Improper using of the battery will cause leakage. Carefully follow these instructions.

4.  Please note the batteries' polarity to avoid short circuit.
5.  When the battery's voltage is insufficient which affect the use range, you should replace it with 

a new battery. Remove the batteries from the remote control unit if you do not intend to use it 
for a long time.

6.  Do not use different types of batteries (for example Manganese and Alkaline batteries) together.
7.  Do not put the battery into fire, and charge or decompose the battery.
8.  Please dispose batteries abide by relevant environmental protection regulation.

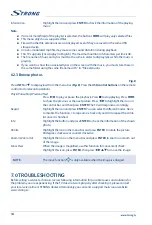
2.6 Using the remote control

„

„

Use the remote control by pointing it towards the remote sensor. Items between the remote 
control and the remote sensor could block normal operation.

„

„

Do not cause the remote control to vibrate violently. Also, do not splash liquid on the remote 
control, also do not put the remote control in a high humidity place.

„

„

Do not place the remote control under direct sunlight which will cause deformation of the unit 
by heat.

„

„

When the remote sensor is under direct sunlight or strong lighting, the remote control will not 
work. If so, please change the lighting or TV's position, or operate the remote control closer to 
the remote sensor.

3.0 FIRST TIME INSTALLATION

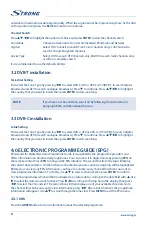
After all connections have been made properly, switch on your TV. The language selection will appear 
on screen. Use 

pqt


u

 to select the 

OSD Language

 of your preference. Confirm with 

ENTER

 on your 

remote control.
Then the next screen appears with the tuner selection. Choose the one you like to use.

Scan type


 Select which input source you want to use: 

DVB-S

 to receive satellite 

broadcasts (and if you are equipped with a satellite dish), 

DVB-T

 to receive 

terrestrial broadcasts or 

DVB-C

 to receive cable broadcasts.

3.1 DVB-S installation

Satellite Setting

Press 

pq

 to highlight the satellite your dish is aimed at. The signal quality bar on the bottom of the 

screen allows you to fine tune the alignment of your antenna for optimum reception. Adjust your 

7

English

Summary of Contents for SRT 32HY4003

Page 1: ...ale utente Manual del Usuario Manual do Utilizador Gebruiksaanwijzing Instrukcja obs ugi U ivatelsk p ru ka Pou vate sk pr ru ka Korisni ki priru nik Uputsvo za rukovanje Haszn lati tmutat Instruc iun...

Page 2: ......

Page 3: ......

Page 4: ...www strong tv 12 May 2017 15 42 Supplied by STRONG Co Japan Represented by STRONG Ges m b H Franz Josefs Kai 1 1010 Vienna Austria Email support_at strong tv...

Page 5: ...one or more programs protected under international and U S copyright laws as unpublished works They are confidential and proprietary to Dolby Laboratories Their reproduction or disclosure in whole or...

Page 6: ...es Dolby and the double D symbol are trademarks of Dolby Laboratories HDMI the HDMI logo and High Definition Multimedia Interface are trademarks or registered trademarks of HDMI Licensing LLC in the U...

Page 7: ...ons can damage one s hearing In order to reduce the risk of damage to hearing one should lower the volume to a safe comfortable level and reduce the amount of time listening at high levels The mains p...

Page 8: ...ing away from children We recommend that you keep the carton during the warranty period to keep your device perfectly protected in the event of repair or warranty 1 3 Accessories 1x Installation instr...

Page 9: ...Service port 5 CI Connect a Conditional Access Module CAM 6 USB1 USB port 7 Headphone or Earphone audio output speakers will be muted when earphone is plugged in and headphone selected 8 S PDIF OUT Us...

Page 10: ...PVR LIST No function 35 QUICK No function 36 AD Press to turn on audio description a narrator will describe what is happening on the screen for blind or visually impaired viewers Press again to turn...

Page 11: ...een the remote control and the remote sensor could block normal operation Do not cause the remote control to vibrate violently Also do not splash liquid on the remote control also do not put the remot...

Page 12: ...tal broadcasts and ATV to search analogue broadcasts Press q to continue Press pq t u to highlight the country that you want to install then press ENTER to start searching 4 0 ELECTRONIC PROGRAMME GUI...

Page 13: ...reen and Blue AspectRatio Select the aspect ratio display proportions according to your video signal type or preference Available choices are 16 9 4 3 JustScan Zoom1 and Zoom2 Note Some options may no...

Page 14: ...the satellite list and select one Highlight LNBType and press ENTER to select the LNB type Make sure the 22KHz DISEqC1 0 1 1 switch is corresponding to the selected satellite After the above steps ar...

Page 15: ...ine Tune Press t u to fine tune until the best possible picture and sound are obtained 5 4 7 Channel settings ProgrammeEdit Edit the programmes You can press the COLOUR BUTTONS on the remote control t...

Page 16: ...on each device 5 When connecting or disconnecting the USB storage device make sure the TV is not in USB mode otherwise the USB storage device or the files stored in it may be damaged 6 Please use only...

Page 17: ...ing icon and press ENTER to switch to another play mode Information Highlight the corresponding icon and press ENTER to view the information of the playing video Gototime Skip to specific point by inp...

Page 18: ...top playing Press 7 8 to show the previous or the next picture Press t u to highlight the icon on the control bar and then press ENTER The TV will response accordingly Repeat Highlight the icon and pr...

Page 19: ...and interference If the antenna is located in the fringe area of a television signal where the signal is weak the picture may be marred by dots show blocking or break ups When the signal is extremely...

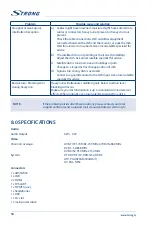
Page 20: ...s oversized Connect a signal attenuator to the LNB input Ask a local satellite specialist for advice Bad picture blocking error during heavy rain Heavy rain will attenuate satellite signals below a ce...

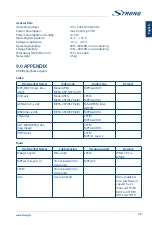
Page 21: ...rnov m4v Motion JPEG MPEG 4 SP ASP XviD MPEG AUDIO AVI avi MotionJPEG MPEG 4 SPIASP XviD LPCM MPEG AUDIO ASFI wmv3 xvid MPEG 4 SPIASP XviD MS ADPCM Intel ADPCM MKVI mkv xvid MPEG 4 SPIASP XviD MPEG A...

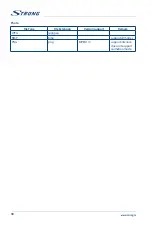
Page 22: ...Photo FileType File Extension Version support Remark JPEG jpg jpeg BMP bmp support all modes PNG png MPEG1 2 support interlace does not support animation mode 18...

Reviews: