background image

PART 1 • English

8

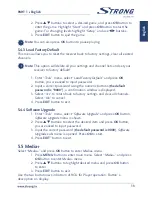
2.  Use the 

tu

 buttons to change channel group (assumed you have 

already set up Favourite groups).

3.  With the 

pq

 buttons select the channel you want to watch. With 

OK


you can watch the selected channel in full screen mode.

5.1.1.1 Edit

Use this menu to favour, lock, skip, delete and rename channel list. Press numeric 
button 

[1]

 to enter edit menu.

With the 

pq

 buttons highlight a channel and press 

OK

 to select or press numeric 

button 

[0]

 to select all channels. Selected channels will get marked. This way of 

selection can be executed for each of the edit functions.

Favor:

 To add selected channel or all channels to a favourite group, 

press the 

[1

] button. Use the 

pq

 to select a desired group and press 

OK

. With 

tu

 select Yes in the confirmation window and press 

OK

 to 

save. Selected channels will get marked with folder symbol.

Lock:


To Lock channel or all channels press button 

[2]

, with 

tu


select 

Yes

 in the confirmation window and press 

OK

 to save. Selected 

channel/s will get marked with the 

œ

 symbol. 

Skip:


To Skip channel or all channels press button 

[3]

, with 

tu


select 

Yes

 in the confirmation window and press 

OK

 to save. Selected 

channel/s will get marked with the 

 and will be skipped during 

channel zapping in full screen mode.

Delete: 

To Delete channel or all channels press button 

[4]

, with 

tu


select 

Yes

 in the confirmation window and press 

OK

 to save. 

If you have done all modifications concerning channel editing, press 

EXIT

 to cancel.

5.1.1.2 Find

Press the 

[2]

 button in to enter 

Find menu.

Use the 

pqtu

 buttons to highlight desired letters or numbers and press 

OK

 to 

insert. After each character, the channel list will search the channel according your 
input and list the matched channel.
Press 

EXIT

 to quit Find mode.

5.1.1.3 Sort

Press the 

[3]

 button in to enter 

Sort menu.

Use the 

pq

 buttons to highlight desired sort way and press 

OK

 to confirm.

Default:


Sorting by searched Order (from lowest to highest frequency).

Name (A-Z):  

Sorting in Alphabetical Order.

Summary of Contents for SRT 5001

Page 1: ...User manual Picture similar Digital Terrestrial Receiver SRT 5001 ...

Page 2: ......

Page 3: ......

Page 4: ...TV and VCR 6 2 3 Connecting to a Digital Audio Amplifier 6 3 0 YOUR RECEIVER 6 3 1 Front Panel 6 3 2 Rear Panel 6 3 3 Remote Control 6 4 0 FIRST TIME INSTALLATION 7 5 0 MAIN MENU 7 5 1 Channel 7 5 2 Installation 9 5 3 Setup 10 5 4 Tools 12 5 5 Media 13 6 0 OPERATION 14 6 1 Changing Channels 14 6 2 Accessing the Electronic Program Guide EPG 14 6 3 Accessing the favourite channels 15 A 1 TROUBLESHOOT...

Page 5: ... damp cloth for cleaning Never use any type of liquid or aerosol cleaner or any type of organic solvent to clean this product Attachments For your safety and to avoid damaging the product use only accessories recommended by STRONG Water and Moisture Never use this product around water near a bathtub kitchen sink laundry tub wet basement swimming pool or in the rain Location To avoid damage to the ...

Page 6: ...pliance that generates heat including stereo amplifiers Servicing Refer all servicing to qualified personnel Attempting to remove the covers or disassemble the product could expose you to dangerous high voltage points Damage Requiring Service If you notice any of the conditions described below while using a specified AC adapter unplug it from the wall outlet and refer servicing to qualified service pe...

Page 7: ... void your warranty 1 3 Equipment Set up We recommend you consult a professional installer to set up your equipment Otherwise please follow these instructions carefully n Refer to the user manual of your TV and your antenna n Make sure that the SCART cable and outdoor components of the antenna are in a good condition and the SCART connections are well shielded This manual provides complete instruc...

Page 8: ...nual channel scan options n Many channel handling options locking editing moving sorting skipping deleting and searching n Power on with last viewed channel n User friendly Remote Control n NTSC PAL converting automatically and manually n 3 Games Tetris Snake Othello n Digital sound through coaxial output S PDIF by connecting to digital amplifier n DVB T compliant UHF VHF Tuner with Loop through fu...

Page 9: ...f broadcasting signal 2 TO TV To connect a TV set or to connect an extra receiver 3 S PDIF Coax To connect your receiver to digital audio amplifier 4 USB Connects to USB device 5 TV SCART To connect your receiver with your TV set using a SCART cable 6 Power Cord Your receiver requires a voltage of 220 240 V AC Auto selectable 50 60 Hz 5 Make sure to check the power specification before connecting yo...

Page 10: ... Shows Teletext on OSD On Screen Display if applicable 20 COLOURED BUTTONS for Teletext functions 4 0 FIRST TIME INSTALLATION If you use the receiver for the first time the Easy Install menu appears Use the tu buttons to change settings for setup of Region OSD Language and Antenna Power and the pq to select Then use the pq buttons to move focus to Search and press OK to proceed with the automatic c...

Page 11: ...button 2 with tu select Yes in the confirmation window and press OK to save Selected channel s will get marked with the œ symbol n Skip To Skip channel or all channels press button 3 with tu select Yes in the confirmation window and press OK to save Selected channel s will get marked with the and will be skipped during channel zapping in full screen mode n Delete To Delete channel or all channels pr...

Page 12: ...this menu to delete all favourite channels Select Delete All Favourites with the pq and press OK with tu select Yes in the confirmation window and press OK to delete or select No to cancel 5 1 4 Delete all Use this menu to delete all channels Select Delete All with the pq and press OK then enter the Password default 0000 In the confirmation window select Yes with tu and press OK to delete or select ...

Page 13: ...Setting 1 Press MENU to enter main menu 2 Use the pq buttons to select Installation press OK to enter the menu 3 With the pq buttons select Antenna setting and press OK to enter 4 Press the tu buttons to change setting If On is selected the receiver will provide 5 V antenna power for active antennas 5 Press EXIT button to exit 5 2 4 LCN Mode If LCN Logical Channel Number is activated and LCN signa...

Page 14: ...12 00 increasing by half hours progressively Date Time Date and Time menus are valid only when selected Off in GMT Usage menu Press OK then numeric button to change the date and time Time Display This menu allow to control whether the time is displayed on screen or not The options are Off On 5 3 4 Timer Setting In this menu you can set a programme timer or sleep timer Programme timer Timer Number ...

Page 15: ...ocks the installation menu You can set menu lock to ON OFF Channel Lock Off Manual Age 4 Age 18 New Password To change the password Confirm Password To confirm the new password 5 4 Tools Select Tools submenu and press OK to enter the menu Press MENU button to enter main menu Select Tools and press OK button to enter tools menu 1 Press pq buttons to highlight the desired menu and press OK button to e...

Page 16: ...the default password is 0000 a confirmation window is displayed 3 Select Yes to return back to factory settings and clear all channels Select No to cancel 4 Press EXIT button to exit 5 4 4 Software Upgrade 1 Enter Tools menu select Software Upgrade and press OK button Software Upgrade menu is shown 2 Press pq buttons to select the desired item and press OK button you are asked to input password 3 I...

Page 17: ...h the channel list To move through the channel list press the pq buttons on the remote control 2 Selected by number Enter the channel number directly by pressing numeric buttons and press the OK button to select desired channel 3 Selected by on screen channels list You can also select the required channel directly from on screen channel list This is displayed using the receiver s main menu See cha...

Page 18: ... Possible cause What to do Standby light not lit Mains lead unplugged Mains fuse blown Check mains lead Check fuse No signal found Aerial is disconnected Aerial is damaged misaligned Out of digital signal area Check aerial lead Check aerial Check with dealer No picture or sound Scart AV is not selected on your TV Reduce to another channel Scrambled channel message Channel is scrambled Select alter...

Page 19: ...ded mpg Audio playback MP3 and WMA Picture view JPEG format Memory and System Flash memory 1 MByte SDRAM 8 MBytes Connectors ANT IN IEC Female TO TV IEC Male TV SCART RGB CVBS S PDIF coaxial output USB 1 1 port General Data Supply Voltage 220 240 V AC SMPS 50 60 Hz Power Consumption 4 5 W typical 8 W max Power consumption in Standby 3 4 W Operating Temperature 0 40 C Storage Temperature 30 80 C Op...

Reviews: