background image

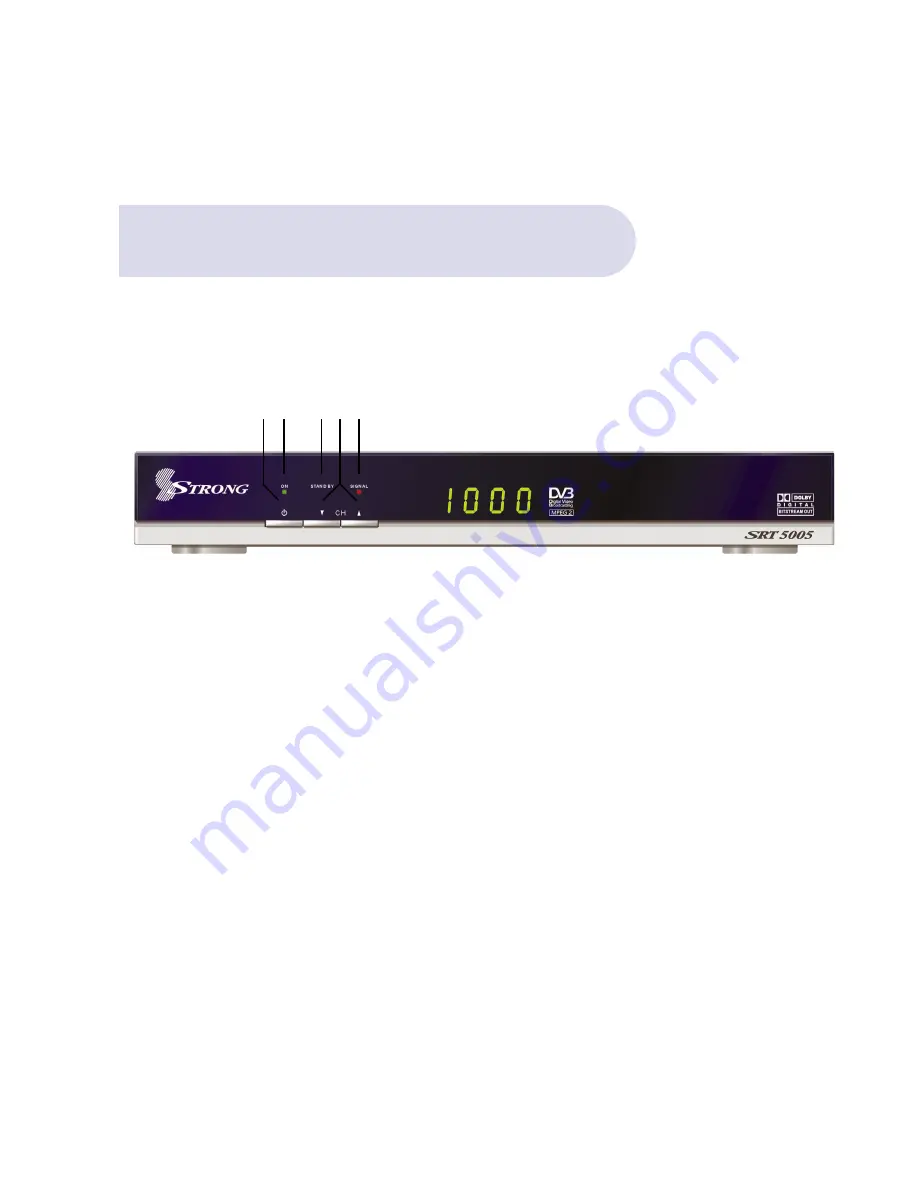
Front Panel

5

Control Functions

1.  Power and Standby Mode Button 

To switch the Receiver On/OFF and to switch to 
‘Standby’ Mode.

2.  ON Indicator

3.  Signal Received indicator

4.  Standby indicator

5. Channel UP/DOWN selector buttons

1

2

4 5 3

Summary of Contents for SRT 5005

Page 1: ...SRT 5005 Digital Terrestrial Television Receiver INSTRUCTION MANUAL ...

Page 2: ...instructions should be read before the product is operated All warnings on the product and in the operating instructions should be adhered to Earthing The antenna cable must be earthed Do not use attachments not recommended by the product manufacturer as they may cause hazards or damage to the equipment Do not overload adaptors wall sockets extension cables as these can result in fore or electrica...

Page 3: ...oop Out 23 Selecting and Changing Channels 23 Quick Return to Last Channel Watched RCL Button 23 Volume Control 23 Volume Mute 23 Picture Pause 23 TV or Radio Selection 24 EPG Button 25 Setting Aspect Ratio Menu Hot Key Selection 26 Captions 26 Teletext 27 Favourite Channel Listing 28 Deleting Channels from Favourites 28 Renaming the 4 Default Favourite Headings 29 30 Service Set Up Delete channel...

Page 4: ... 4 Overview Component YPbPr Dolby Digital SPDIF Coaxial Super Video Output 4 Pin Mini Din RCA Cinch CVBS L R Audio 16 9 Full screen 4 3 Letterbox Full screen Auto Manual Search Mode Favourite Channel List Editing Fully Adjustable MENU Interface Picture In Menu 6 Timer Event Settings Sleep Timer EPG Electronic Program Guide Closed Captions Teletext Parental Guidance Full Function Infra Red Remote C...

Page 5: ...ontrol Functions 1 Power and Standby Mode Button To switch the Receiver On OFF and to switch to Standby Mode 2 ON Indicator 3 Signal Received indicator 4 Standby indicator 5 Channel UP DOWN selector buttons 1 2 4 5 3 ...

Page 6: ...rom Antenna to Receiver 4 Coaxial SPDIF RCA cinch Digital Audio Output 5 Component RCA Video Video Output 6 Audio R L Red White RCA cinch R L Audio Output 7 Video Yellow RCA cinch CVBS Composite Output 8 Audio R L Red White RCA cinch R L Audio Output 9 S Video Video Y C S Video Ouput 10 Main Power Input Mains Power 6 Connections Back Panel 1 2 3 4 5 6 7 8 9 10 ...

Page 7: ...arious menus These important Buttons are 1 MENU To Access the Main Menu 2 EXIT To move back to previous Menu and Exit Menu 3 SCROLL LEFT Button SCROLL RIGHT Button SCROLL UP Button SCROLL DOWN Button To access highlight and select each topic and mode within each menu The colour buttons provide quick access through the menu system 2 3 3 3 3 1 ...

Page 8: ...t or for adjusting the volume 11 MENU The main menu for setting up the receiver 12 EXIT Exits the current On Screen Display page 13 I INFORMATION Shows program information 14 AV Selects TV or Digital TV by changing the status of Pin 8 in the Scart connector 15 EPG Program Information Display the EPG Electronic Program Guide 16 PAGE PAGE for Aspect Ratio Change the aspect ratio to your preference 4...

Page 9: ... If Remote control is not going to be used for long periods remove the batteries Range of operation The remote control can be detected by the receiver within an angle of 30 degrees to the left or right The transmission distance of the remote control is 7m in direct line of sight If remote control is not operating correctly replace batteries Disturbances from peripheral devises might occur Ensure t...

Page 10: ...upplied RCA Lead 10 Connection Examples RF IN Video R Audio L Audio B Separate S Video Y C Connector TV Antenna TV RF IN R Audio L Audio S Video TV Antenna Yellow Red White Red White Optional Refer to PG 22 Optional Refer to PG 22 ...

Page 11: ...ion Examples C Component Connection TV RF IN Component R Audio L Audio SPDIF Coaxial Connection for Dolby Digital TV Antenna Audio Decoder Amplifier SPDIF COAXIAL Red Blue Green Red White Optional Refer to PG 22 ...

Page 12: ...te S Video Y C for your Video connection you will need to make connections for Audio For Audio this can be done by using the supplied RCA cable by connecting to Connector 8 for Right and Left Audio RCA Red White and then connect to appropriate RCA audio connectors of your TV These Left white Right Red RCA Audio connections will provide MPEGA 2 Stereo If you require Dolby Digital Audio Output throu...

Page 13: ...ional Video Mode of your TV Having made the above connections to suit your requirements The next step is to make certain you have selected a Video Mode on your Television from your TV Remote Control Your Receiver is now ready to be operational You can connect to your TV with the supplied RCA component cable to give you video For audio connect with the supplied RCA audio cables this will give you M...

Page 14: ...the remote control and a Welcome Banner will appear listing 4 topics Power On Auto Scan On the remote control push the Green button for Scan All Channels Scan All Channels banner will appear prompting Yes NO Using R L Scroll buttons select YES which will then be highlighted Push OK button on the Remote Control and Unit will now begin to scan and lock in all available frequencies in your area This ...

Page 15: ...ce Scan has been completed Tuning Banner will state OK Power On Auto Scan Push OK and Welcome Banner will be viewed overlaying the broadcast picture Push EXIT button and full broadcast picture will be viewed ...

Page 16: ... Banner will appear Push the BLUE Button for Main Menu Banner at the top of the TV screen will be viewed listing Installation Set Up Information The Correct A V Mode Scroll to select Set Up by pushing OK Button and 4 topics will appear Scroll down to Setting push OK and 6 topics will be viewed ...

Page 17: ... to Video Type and using either Left or Right scroll button select your preferred Video Mode I e YUV Component YPbPr or Composite CVBS Push OK and banner will indicated Success Push EXIT 3 times to return to normal TV broadcast The Correct A V Mode ...

Page 18: ...U Button and Welcome Banner will appear Push the BLUE Button for Main Menu Banner at the top of the TV screen will be viewed listing Installation Set Up Information Scroll to select Set Up by pushing OK Button and 4 topics will appear Scroll down to Setting push OK and 6 topics will be viewed Scroll down to TV Set Up Push OK TV Set up banner will appear listing 10 topics Scroll down toAudio and se...

Page 19: ...Banner will appear Push the BLUE Button for Main Menu Banner at the top of the TV screen will be viewed listing Installation Set Up Information Scroll to select Set Up by pushing OK Button and 4 topics will appear Scroll down to Setting push OK and 6 topics will be viewed Scroll down to Timer Set Up Push OK Timer Set Up banner will appear with setting in the default Auto mode Using either Left or ...

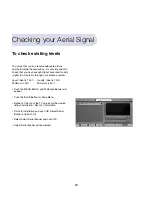
Page 20: ...nna system Level Ideal is 100 Quality Ideal is 100 Minimum is 50 Minimum is 50 Push the MENU Button and Welcome Banner will appear Push the BLUE Button for Main Menu Banner at the top of the TV screen will be viewed listing Installation Set Up Information Scroll to Installation and push OK Select Aerial Banner and Push Ok Select Adjust Aerial banner and push OK Adjust Aerial banner will be viewed ...

Page 21: ...4 times to return to normal TV broadcast Checking your Aerial Signal Adjusting aerial for optimum signal There may be circumstances where signal strength may not be adequate to receive consistent Digital Reception In this circumstance re adjusting your antenna may assist As you alter the position of your antenna you will be able to view the resultant signal strength change All of these connections...

Page 22: ...logue mode by pressing the TV Mode button on your TV Remote Control B You can choose to connect RF from this connector to your VCR separately purchased Lead which will enable you to watch a normal Digital Broadcast Channel through the SRT 5005 and at the same time you can record a different broadcast channel into the VCR Therefore as you are watching your digital channel through the SRT 5005 you w...

Page 23: ...ne Network Affiliates Select and change channels by using the Up Down channel buttons Volume Control To adjust Volume UP and DOWN press the following buttons on the remote control Volume Increase VOL Button Volume Decrease VOL Button Important The Volume Level is dependant on the volume level that you firstly set within your TV I e via your TV remote control volume setting Volume Mute Press Mute b...

Page 24: ...mation Push INFO Button White Button in Middle of Remote Control and Extended Program Information will be viewed Note Extended program Information can be viewed any time When watching normal TV broadcast Push INFO button to view With the Channel Guide Banner Open you can also choose to input Event Time to allow the event number program time date and duration for VCR Recording to be set Push the Re...

Page 25: ...on and 4 topics will appear Scroll down to Setting push OK and 6 topics will be viewed Scroll down to TV Set up Push OK TV Set Up banner will appear listing 10 topics Scroll down to Aspect Ratio and using either Left or Right scroll button select your preferred mode i e 4 3 4 3 Letterbox 16 9 Wide Screen Push OK and banner will indicate Success Push EXIT 3 times to return to normal TV broadcast Ho...

Page 26: ...ress SUB Button To turn Captions OFF push Exit To view teletext select a Channel 7 broadcast station Press TEXT Button To select your preferred Teletext topics enter the topic number via the numeric buttons the remote control To turn Teletext OFF and return to normal viewing push EXIT button Teletext ...

Page 27: ...t Channels push OK Select Favourite Set Up push OK Favourite Banner will appear listing the 4 default headings as above Using the coloured buttons to coincide with each Heading you can lock in your selected favourite chan nel s i e Orange Button Music Green Button Movie Yellow Button News Blue Button Sport Select your channel on the left of the banner and push the appropriate colour button As you ...

Page 28: ... Channels from Favourites Renaming the 4 Default Favourites Headings You can choose to change the name of the default headings Have the Favourite Banner open Push the Information Button White button near the centre of the Remote Control Rename Banner will now be viewed With the Channel Favourite selected verified by the ICON input your new heading via the numeric buttons on the remote control Push...

Page 29: ...ar Push the BLUE Button for Main Menu To Delete a Channel Push Yellow Arrange Channel button on the remote control and Service Set Up banner will appear With channel highlighted Push Red Delete button and an x Icon will appear beside the selected channel Push OK and channel will be deleted ...

Page 30: ...o confirm Once you have placed a channel in Lock mode as you are watching normal TV broadcasts when you select that channel you will be prompted to input password Once password has been entered channel broadcast will be viewed To Rename a Channel With channel selected Push Blue Rename button and Key Pad Banner will be viewed Enter your preferred channel name via the remote control numeric buttons ...

Page 31: ...either A Z or Z A Program List List Order Language Setting The default setting is English however you can choose to change to another language for Menu language description Push the MENU Button and Welcome Banner will appear Push the BLUE Button for Main Menu Banner at the top of the TV screen will be viewed listing Installation Set Up Information Scroll to select Installation by pushing OK Button...

Page 32: ...ormation Scroll to select Set Up by pushing OK Button and 4 topics will appear Scroll down to Setting push OK and 6 topics will be viewed Scroll down to Event Time Push OK Event Timer banner will appear Event Timer Time ID Select your Event Number i e 1 to 6 Service Select the Channel Number Time Mode Select your recording option Off Once Daily Weekly Date Enter the date of the recording Event Ent...

Page 33: ...ll be viewed listing Installation Set Up Information Scroll to select Set Up by pushing OK Button and 4 topics will appear Scroll down to Setting push OK and 6 topics will be viewed Scroll down to Sleep Timer Push OK Sleep Timer banner will appear Using Left and Right Scroll buttons press to select desired Time Off Up to maximum of 120 minutes Push Ok to confirm Push Exit 3 times to return to norm...

Page 34: ...roll to select Set Up by pushing OK Button and 4 topics will appear Scroll down to Setting push OK and 6 topics will be viewed Scroll down to Password Change Push OK New Password banner will appear Enter the Current Password Factory Default is 0000 Enter new password Input by your selection by numeric buttons on the remote control Enter password again to confirm Banner will confirm Success Push EX...

Page 35: ...ar Scroll down to Setting push OK and 6 topics will be viewed Scroll down to Parental Guidance Push OK PG Banner will appear There are 9 ratings available One of the ratings is Disable Factory Default To change to your preffered Parental Guidance rating press either the Left Vol Right Vol buttons on your remote control Once your rating has been selected push the OK button On each selection of the ...

Page 36: ...anner will appear Push the BLUE Button for Main Menu Banner at the top of the TV screen will be viewed listing Installation Set Up Information Scroll to select Set Up by pushing OK Button and 4 topics will appear Scroll down to Advanced push OK and 4 topics will be viewed Scroll down to Colour Set Up Push OK Colour Set Up banner will be viewed Select the heading required for adjustment Using Up Do...

Page 37: ...t Up Information Scroll to select Set Up by pushing OK Button and 4 topics will appear Scroll down to Scan banner push OK and 3 menus will be viewed Select Scan Channel and push OK Scan Channel Banner will now be viewed At the bottom of the banner you will see a Green Icon for Frequency Freq Push Green Freq button and frequency sector in the banner will be highlighted Enter the Frequency number yo...

Page 38: ...en will be viewed listing Installation Set Up Information Scroll to select Set Up by pushing OK Button and 4 topics will appear Scroll down to Advanced push OK and 4 topics will be viewed Scroll down to BOX RESET Push OK Password Banner will be viewed enter 4 digit password Warning banner will be view prompting Yes No Select YES push OK and Reset will be actioned 38 Factory Reset ...

Page 39: ...lcome Banner will appear Push the BLUE Button for Main Menu Banner at the top of the TV screen will be viewed listing Installation Set Up Information Scroll to select Information by pushing OK Button and then select sub menu Information Information banner will now be viewed Push Exit 3 times to view normal TV broadcast 39 ...

Page 40: ...TV Set your desired TV volume level via TV remote control Insert batteries Change batteries Aim at the receiver Troubleshooting There may be various reasons for abnormal operation of the unit Occasionally receivers can hang up just like a PC In this circumstance it is recommended to reset the receiver by disconnecting if from mains power Wait 30 seconds and connect to mains power again and check i...

Page 41: ... 0Mhz Bandwidth 8 7 MHz Exceeds DTV targets RF Loop through 1000 Channel Video Decoder MPEG 2 Data rates up to 15Mbits S Video format 4 3 16 9 Audio Decoder MPEG 2 Layer I II MONO STEREO dual channel Data rates up to 384Kbits S AV Outputs Component YUV YPbPr Coaxial S PDIF S VHS Composite Video Stereo audio by RCA Software Update 9 pin RS 232 connector Dimension W 280mm X H 40mm X D 195mm Case 206...

Page 42: ...AST LTD P O Box 85 YOKOHAMA KANAGAWA KEN JAPAN 231 91 FAX 81 45 662 4957 60 WEDGEWOOD ROAD HALLAM VIC 3803 PH 61 3 8795 7990 FAX 61 3 8795 7991 Website www strong technologies com E mail asales strong technologies com ...

Reviews: