background image

21


Selecting a favourite to watch or listen to 

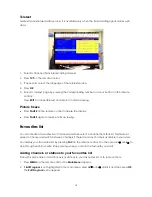
1. Press 

FAV

 on the remote control. The first channel or station or channel in your favourites list 

appears. Note that the information panel reads 

FAV channel


2.  If necessary, press 

FAV

 again until the channel you want to view appears. The 

FAV

 information 

banner disapears after a few seconds. 

Organising channels and stations 

The 

Edit


Program

 option on the 

Main Menu 

enables you to delete and sort channels and stations. 

Deleting channels and stations 

You can delete channels and stations that you are never likely to watch or listen to. If you want to 
re-instate a channel or station that you have deleted, you will need to rescan for it. See 
“Rescanning for channels and stations” on page 25 for instructions. 

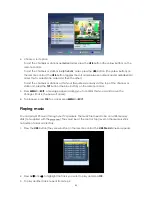
1. Press 

MENU

 on the remote control. The 

Main Menu

 appears. 

2. If 

Edit Program

 is not highlighted on the main menu, press 

CH

d


or 

CH

c


until it is and then press 

OK

. The 

Edit Program

 menu appears. 


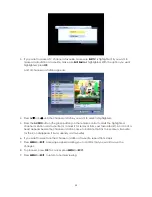
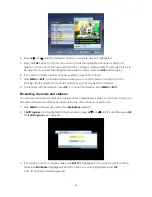
3.  If you want to delete a channel, make sure 

Edit TV

 is highlighted; or if you want to delete a 

station, make sure 

Edit Radio

 is highlighted. With the option you want highlighted, press 

OK

A list of channels or stations appears. 

Summary of Contents for SRT 5406

Page 1: ...High Definition Digital Terrestrial Receiver USER S MANUAL ...

Page 2: ...he product and in this user s manual should be adhered to The antenna cable must be earthed Do not use attachments not recommended by the product manufacturer as they may cause hazards or damage the equipment Do not overload adaptors wall sockets or extension cables as this can result in unit failure or electric shock For cleaning use only a dry or lightly dampened cloth Do not use liquid cleaners...

Page 3: ...ease call our Technical Support Help Line on 1 800 820 030 Main Features High Definition Multimedia Interface HDMI output Decodes high definition and standard definition broadcasts Component output Y Pb Pr Dolby Digital audio output S PDIF optical S Video and Composite output Plays MP3 music from a USB memory stick Multi video definitions 576i 576p 720p 1080i Auto and manual channel searching Mult...

Page 4: ...6 Basic operations 16 Selecting a channel 16 Adjusting the volume 17 Getting channel Information 17 TV Radio switching 17 Closed captions 18 Teletext 19 Picture freeze 19 Favourites list 19 Adding channels or stations to your favourites list 19 Selecting a favourite to watch or listen to 21 Organising channels and stations 21 Deleting channels and stations 21 Re sorting channels and stations 22 Pl...

Page 5: ...ve been supplied with your If any were not supplied contact the retailer from whom you purchased the unit User s manual 1 Remote control 1 Batteries AAA type 2 CVBS Composite video and audio cable yellow white red 1 Y Pb Pr Component cable blue red green 1 ...

Page 6: ...and Indicators Front panel 1 To switch the receiver between stand by mode and power on mode 2 To select the next channel or next option in a menu 3 To select the previous channel or previous option in a menu 1 2 3 ...

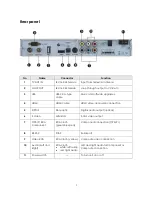
Page 7: ... video and audio connection 5 S PDIF Fibre optic Digital audio output optical 6 S Video MINI DIN S VHS video output 7 Y Pb Pr RCA Component RCA cinch green blue red Component connection Y Pb Pr 8 RS 232 DB 9 Serial port 9 Video RCA RCA cinch yellow Composite video connection 10 Audio Left and Right RCA cinch white left audio red right audio Left and right audio for Component or Composite connectio...

Page 8: ...V RAD To switch between TV and radio and vice versa 4 EPG Electronic Program Guide To show the TV and radio program guide 5 MENU To display the main menu or return to a previous menu 6 CH To change the channel or to move the cursor up or down in a menu 7 VOL e f To change the volume in viewing mode or to change an option or setting in a menu 8 OK To show the channel list in viewing mode and to sel...

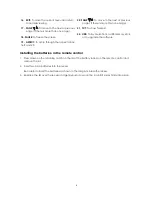
Page 9: ...ore than one page 21 TXT To show Teletext 22 USB To lay music from a USB memory stick or to upgrade the software Installing the batteries in the remote control 1 Press down on the retaining catch on the lid of the battery recess on the remote control and remove the lid 2 Insert two AAA batteries into the recess Be careful to insert the batteries as shown in the diagram inside the recess 3 Replace ...

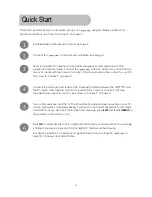
Page 10: ...eads of the Composite cable between the and the TV again matching the colour of a lead with the colour of a socket This step provides audio output to your TV See How to Connect on page 11 Turn on the and the TV The Strong Technologies banner appears on your TV screen followed by a message asking if you want to automatically search for channels and stations If you don t see the banner and message p...

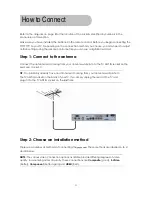
Page 11: ...enna lead coming from your antenna wall plate to the TV ANT IN socket on the socket 1 TIP You probably already have an antnna lead coming from your antenna wall plate to the TV ANT IN socket on the back of your TV If so simply unplug the lead at the TV and plug it into the TV ANT IN socket on the Step 2 Choose an installation method There are a number of methods of connecting the These methods are...

Page 12: ... with the colour of the socket and the corresponding Component sockets on your TV The Component sockets on the TV have the same colour coding You will need to make separate connections for left and right audio via the audio sockets in socket group 9 This can be done using the supplied RCA cable Match the colour of the plugs with the colour of the sockets C S Video Y C connection If your TV has a 4...

Page 13: ...G 2 stereo audio For video connect the yellow RCA lead between the yellow video socket socket 8 on the and the corresponding socket on your TV For audio connect the same RCA cable between the white and red sockets in socket group 9 and the corresponding sockets on your TV Match the colour of the leads white and red with the colour of the sockets All three leads of the cable yellow white and red sh...

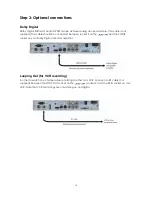
Page 14: ...ould be connected between socket 5 on the and the S PDIF socket on your Dolby Digital decoder amplifier Looping Out for VCR recording In order to watch one channel while recording another on a VCR connect an RF cable not supplied between the LOOP OUT socket on the socket 2 and the RF IN socket on your VCR Note that VCR recordings are only analogue not digital ...

Page 15: ...ssage press EXIT and then FORMAT on the remote control until you do 5 To search for available channels and stations press OK on the remote control The Auto window appears and the searching begins If you want to search for channels and stations yourself s ee Rescanning for channels and stations on page 25 for instructions and ignore the rest of this procedure As channels and stations are found they...

Page 16: ...e Logical Channel Numbering system LCN by default Some samples of primary LCN channel numbers are 1 Ten network and affiliates 2 ABC 3 SBS 7 Seven network and affiliates 9 Nine network and affiliates Secondary channels can be selected by pressing the primary number followed by another number For example pressing 2 gives you ABC1 and pressing 22 gives you ABC2 Channel list Press OK on the remote co...

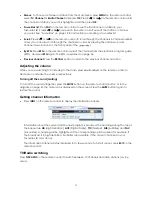
Page 17: ...to the previous channel or station Adjusting the volume While you are watching TV or listening to the radio press VOLe or VOLf on the remote control to decrease or increase the volume respectively Turning off the sound muting To turn off the sound altogether press the MUTE button on the remote control button 12 in the diagram on page 8 The mute icon is displayed on the screen Press the MUTE button...

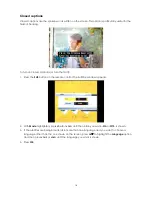
Page 18: ...utton on the remote control The Subtitle window appears 2 With Mode highlighted press VOLe or VOLf until the option you want On or Off is shown 3 If the subtitles are being broadcast in more than one language and you want to choose a language other than the one shown on the screen press CHd to highlight the Language option and then press VOLe or VOLf until the language you want is shown 3 Press OK...

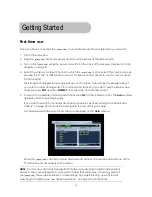
Page 19: ...mal viewing Favourites list You can create a favourites list of channels and then select a channel from that list This makes it easier to choose and switch between channels if there are many channels available in your area You display your favourites lists by pressing FAV on the remote control You then press CHd or CHc to step through each favourite Stop pressing when you reach the favourite you w...

Page 20: ...ton on the remote control to mark the highlighted channel or station as a favourite or to mark it for removal from your favourites list An icon of a heart appears beside the channel or station name to indicate that it is to become a favourite or the icon disappears if it was already a a favourite 6 If you want to select another channel or station a favourite repeat from step 4 7 Press MENU or EXIT...

Page 21: ...s and stations You can delete channels and stations that you are never likely to watch or listen to If you want to re instate a channel or station that you have deleted you will need to rescan for it See Rescanning for channels and stations on page 25 for instructions 1 Press MENU on the remote control The Main Menu appears 2 If Edit Program is not highlighted on the main menu press CHd or CHc unt...

Page 22: ...s or stations you have marked for deletion 8 To proceed with the deletion press OK To cancel the deletion press MENU or EXIT Re sorting channels and stations You can sort channels and stations in number order or alphabetical order or sort them so that your favourite channels and stations are listed at the top of the channel or station list 1 Press MENU on the remote control The Main Menu appears 2...

Page 23: ...tion list press the TXT button the blue button on the remote control 5 Press MENU or EXIT A message appears asking you to confirm that you want to save the changes that is the new sort order 6 To proceed press OK To cancel press MENU or EXIT Playing music You can play MP3 music through your TV speakers The music files need to be on a USB memory stick not supplied with the They must be at the root ...

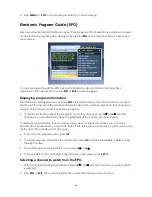
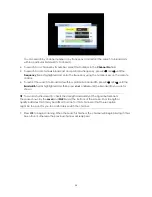
Page 24: ...t of upcoming programs To display information about the programs on another channel press CHd or CHc until the channel you want information about is highlighted at the bottom left of the screen To display more information than is currently shown about a selected channel you can move between the channel name pane at the bottom left of the window and the program name pane at the right of the window ...

Page 25: ...hlighted on the main menu press CHd or CHc until it is and then press OK The Install sub menu appears 3 If Auto Search is not highlighted on the sub menu press CHd or CHc until it is and then press OK The Auto window appears and the search begins automatically When the search is finished a channel that has been found will begin playing Manual Searching NOTE Automatic searching described above is s...

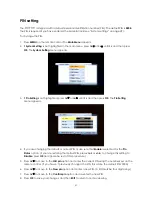
Page 26: ...dcasts within a particular bandwidth press CHd or CHc until the Bandwidth field is highlighted and then press VOLe or VOLf until the bandwidth you want is shown TIP To avoid a fruitless search check the strength and quality of the signal beforehand These are shown by the Level and SNR bars at the bottom of the screen Poor strength or quality indicates that it may be difficult to scan for that chan...

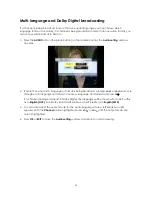
Page 27: ...age or format is being broadcast pressing VOLe or VOLf will cycle through each language and format Choose a language and format and press CHd If a channel is being broadcast in Dolby Digital the language will be shown with an AC3 suffix as in English AC3 Non Dolby broadcasts will have an MP2 suffix as in English MP2 3 You can also select the output mode for the audio language stereo left speaker o...

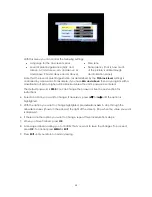
Page 28: ...nd then press OK The System Setting menu appears 3 If AV Setting is not highlighted on the menu press CHd or CHc until it is and then press OK The AV Setting menu appears With this menu you can control the following settings Aspect ratio 4 3 or 16 9 Aspect mode Full screen Letterbox or Pan Scan Video definition 576i 576p 720p and 1080i Video output YPbPr or YC S PDIF output PCM or AC3 ...

Page 29: ...he option you want to change highlighted press VOLe or VOLf to step through the allowable values shown in the panel at the right of the screen Stop when the value you want is displayed 6 If there is another option you want to change repeat this procedure from step 4 7 When you have finished press OK 8 A message appears asking you to confirm that you want to save the changes To proceed press OK To ...

Page 30: ...unless the unit s password is entered The default password is 0000 You can change the password See the next section for instructions 4 Select an option you want to change If necessary press CHd or CHc until the option is highlighted 5 With the option you want to change highlighted press VOLe or VOLf to step through the allowable values shown in the panel at the right of the screen Stop when the va...

Page 31: ...in Setting menu appears 4 If you are changing the default or current PIN make sure that Enable is selected for the Pin Status option If you are restoring the default PIN press VOLe or VOLf to change this setting to Disable press OK and ignore he rest of this procedure 5 Press CHd to move to the Old pin option and enter the current PIN using the number keys on the remote control If you haven t prev...

Page 32: ...ntrol The Main Menu appears 2 If System Setting is not highlighted in the main menu press CHd or CHc until it is and then press OK The System Setting menu appears 3 If Timer Setting is not highlighted press CHd or CHc until it is and then press OK The Timer List window appears 4 If necessary press CHd or CHc until the timer you want to select is highlighted and then press OK The Timer Edit screen ...

Page 33: ...Up or turn off Sleep Press VOLe or VOLf until the timer service option you want is displayed 10 Press CHd If you chose One Time or Every Week for the Cycle option the Date option will now be selected Use the number keys on the remote control to enter the date this timer will activate or first activate and then press CHd 11 Depending on what option you chose for Timer Service at step 9 the option n...

Page 34: ...34 want to see at wake up time is displayed 13 Press the SUB button on the remote control Your timer settings are saved 14 Repeatedly press EXIT until you return to normal viewing ...

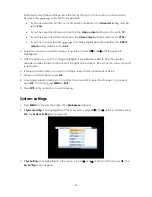
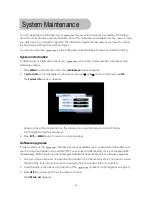
Page 35: ...ss CHd or CHc until it is and then press OK The System Info window appears Make a note of the information on this window if you are intending to contact Strong Technologies for technical support 3 Press EXIT or MENU twice to return to normal viewing Software upgrades If a new version of the software becomes available you can download the software to your PC and then transfer it to your You will ne...

Page 36: ... appears 2 If System Setting is not highlighted on the menu press CHd or CHc until it is and then press OK The System Setting menu appears 3 If Factory Default is not highlighted on the menu press CHd or CHc until it is and then press OK 4 A warning message appears asking if you are sure you want to clear all services and restore factory settings To continue press OK To cancel press MENU or EXIT a...

Page 37: ...V No picture and sound Incorrect video definition If you have a Composite or S Video connection to your TV video definition must be set to 576i Press EXIT and then FORMAT on the remote control until you see a picture Insufficient signal strength Check that the antenna cable is securely plugged in and that the signal is adequate Picture and or audio glitch Electrical interference Check that all ant...

Page 38: ...0 For General Enquiries Please email us at techau strong technologies com Product Return Tracking If you need to send your receiver to Strong Technologies for repair or evaluation please keep a record of the unit s serial number This will ensure ease of tracking and identification on your behalf ...

Page 39: ... 720p 576p 576i Standard MPEG Layer 1 2 3 Dolby AC 3 12S S PDIF Audio Decoding Channels Single Dual Mono Stereo Joint Stereo Dolby Digital bit streams Main Processor ARM926 Main System Memory 4Mb Flash 64Mb SDRAM HDMI HDMI 1 2 connector with HDCP copy protection Video Component Y Pb Pr Component YUV Video SVHS 4 pin Din Connector Video Composite RCA Cinch Video Output CVBS S PDIF Optical Digital A...

Page 40: ...IA 3803 PH 61 3 8795 7990 FAX 61 3 8795 7991 TECHNICAL SUPPORT 1800 820 030 STRONG CO FAR EAST LTD P O BOX 85 YOKOHAMA KANAGAWA KEN JAPAN 231 91 FAX 81 45 651 1842 www strong technologies com Email techau strong technologies com Strong Technologies Pty Ltd 2009 ...

Reviews: