background image

(QJOLVK

- 12 -

buttons,  the  selected  window  is  activated.

 sign is displayed in the activated window.

The sound of the picture at the selected win-

dow  is  heard  and  all  menu  functions  are

only valid for this window. All the buttons (ex-
cept stand-by and 

"

 +" / "- 


"

) on the

remote control and the TV are only active for

this  window.
Press the “

M

” button to exit layout menu.

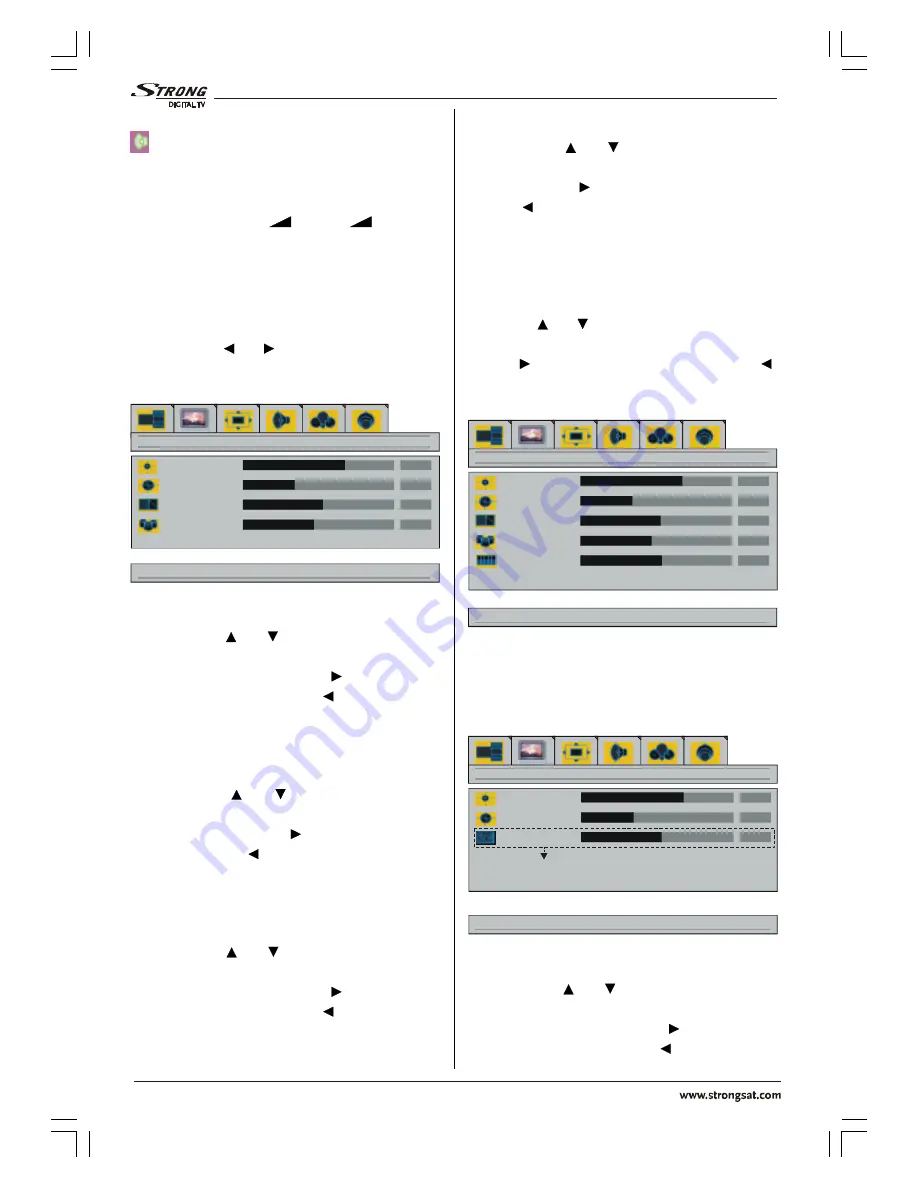
picture menu

By pressing “ ” / “ ” button, select the sec-

ond  icon.  Picture  menu  appears  on  the

screen.

GRZQIRUSLFWXUHVHWWLQJVIRUFXUUHQWZLQGRZ

EULJKWQHVV

FRQWUDVW

VKDUSQHVV

FRORU

SLFWXUH

brightness

By pressing “ ” / “ ” button, select 

bright-

ness

.  “

right/left  to  adjust  brightness

”  is

seen on the screen. Press “ ” button to in-

crease  brightness.  Press  “ ”  button  to  de-

crease  brightness.  Brightness  level  can  be

adjusted between 0 and 100.

contrast

By  pressing  “ ”  /  “ ”  button,  select 

con-

trast

. “

right/left to adjust contrast

” is seen

on the screen. Press “ ” button to increase

contrast. Press “ ” button to decrease con-

trast.  Contrast  level  can  be  adjusted  be-

tween 0 and 100.

sharpness

By pressing “ ” / “ ” button, select 

sharp-

ness

.  “

right/left  to  change  sharpness

”  is

seen on the screen. Press “ ” button to in-

crease  sharpness.  Press  “ ”  button  to  de-

crease  sharpness.  Sharpness  level  can  be

adjusted between 0 and 8.

color

By  pressing  “ ”  /  “ ”  button,  select 

color

.

“

right/left  to  adjust  color

”  is  seen  on  the

screen.  Press  “ ”  button  to  increase  color.

Press  “ ”  button  to  decrease  color.  Color

level can be adjusted between 0 and 100.

tint

This item is displayed in picture menu when

the TV is in AV mode and at NTSC signal. By
pressing “ ” / “ ” button, select 

tint

"right/

left  to  adjust  tint"

  is  seen  on  the  screen.

Press “ ” button to increase tint. Press “ ”

button to decrease tint. Tint level can be ad-

justed between 0 and 100.

GRZQIRUSLFWXUHVHWWLQJVIRUFXUUHQWZLQGRZ

EULJKWQHVV

FRQWUDVW

VKDUSQHVV

FRORU

WLQW

SLFWXUH

When  the  TV  is  in  AV  mode;  picture  menu

items  (brightness,  contrast,  sharpness  and

color) may require re-adjustment.

When VGA Or DVI Is Connected To TV:

GRZQIRUSLFWXUHVHWWLQJVIRUFXUUHQWZLQGRZ

EULJKWQHVV

FRQWUDVW

SKDVH

SLFWXUH

RSWLRQDO

brightness

By pressing “ ” / “ ” button, select 

bright-

ness.  "right/left  to  adjust  brightness"

  is

seen on the screen. Press “ ” button to in-

crease  brightness.  Press  “ ”  button  to  de-

01-ENG-4205-1546UK-PLASMA BýnT-(3D PANORAMA)(10 PAGE)(SAMV3)-50061377.p65

28.01.2005, 16:04

12

Summary of Contents for SRT P 4205

Page 1: ...s 19 Active window switch 20 Programme Swap SWAP 20 Freeze Picture 20 Sound Indicator 20 Mute Indicator 20 AV Modes 20 Teletext 21 To Operate Teletext 21 To Select A Page Of Teletext 21 To Select Index Page 21 To Select Teletext With ATV Programme 21 To Select Double Height Text 21 To Reveal Concealed Information 21 To Stop Automatic Page Change 21 To Select A Subcode Page 22 Split Screen 22 To Ex...

Page 2: ...CE Source select PIP size YELLOW Split screen BLUE Hold Update Index Page Reveal Expand Mix Zoom Pan Teletext Time Subpage PIP RED PIP position GREEN Mute I II Mono Stereo Dual A B Volume Down P CH Programme Down Previous Programme Info Program Table M Menu Cursor Down Cursor Left 79 2 6285 01 ENG 4205 1546UK PLASMA BýnT 3D PANORAMA 10 PAGE SAMV3 50061377 p65 28 01 2005 16 04 2 ...

Page 3: ... QJOLVK 3 PLASMATV FRONT VIEW REAR VIEW 21 2 6 7 01 ENG 4205 1546UK PLASMA BýnT 3D PANORAMA 10 PAGE SAMV3 50061377 p65 28 01 2005 16 04 3 ...

Page 4: ...wn buttons MENU button TV AV button S VHS Input Video Input Audio Input Left Right Headphone Power cord input Antenna Audio Line Out L R Scart 1 Scart 2 Audio In for VGA and DVI source DVI Input VGA Input Full Scart 01 ENG 4205 1546UK PLASMA BýnT 3D PANORAMA 10 PAGE SAMV3 50061377 p65 28 01 2005 16 04 4 ...

Page 5: ...s for the plastic anchors and then fix the wall hanger with 4 screws M7 x 60 3 Raise the plasma panel and hang it to the holes on the wall hanger from the 2 hanging screws at the rear of the plasma panel Assembling The Speakers Optional Turn the rear side of the plasma panel and place it on a solid surface such as a table or a desk Put the speakers to the left and right sides of the panel Place th...

Page 6: ... QJOLVK 6 85 1 5 1 5 PP 3 67 1 25 0 3 60 3 1 6 5 0 02817 1 2 6 1 1 6 5 6 PP Optional 01 ENG 4205 1546UK PLASMA BýnT 3D PANORAMA 10 PAGE SAMV3 50061377 p65 28 01 2005 16 04 6 ...

Page 7: ...hen no valid signal is detected after 5 minutes the TV switches itself automatically to stand by mode PLL Channel Search PC Input Support up to WXGA 1280 x 768 1 SVHS Input and 1 RCAAV Input are avail able Headphone output Stereo PC Audio Input Plug Play for Windows 9X ME 2000 XP 4H Comb Filter Audio Line Out Panel Features High resolution 42 inch PLASMA display WVGA resolution 852 x 480 Contrast ...

Page 8: ...d in anyway 6 Lightning In case of storm and lightning or when go ing on holiday disconnect the power cord from the wall outlet 7 Replacement Part When replacement parts are required be sure the service technician has used replacement parts which are specified by the manufacturer or have the same specifications as the origi nal one Unauthorised substitutions may re sult in fire electrical shock or...

Page 9: ...ted part Insert two MN2400 AAA or equivalent type batteries inside Replace the battery cover NOTE Remove the batteries from remote control handset when it is not to be used for a long period Otherwise it can be damaged due to any leakage of batteries SwitchingTheTVON OFF To switch the TV on Your TV will switch on in two steps 1 Connect the power supply cord to the sys tem Press On Off switch at th...

Page 10: ...nge them in aps submenu in the settings menu See page 17 for Program table explanation Operating with the buttons on the TV set Volume setting and programme selection can be made by using the buttons on the control panel at the bottom of the TV Volume Setting Press the button to decrease vol ume or the button to increase vol ume so a volume level scale slider will be displayed at the bottom of the...

Page 11: ...to enter the menu item To exit a menu press the M button layout menu By pressing button select the first icon Layout menu appears on the screen GRZQ IRU FXUUHQW VFUHHQ OD RXW RSWLRQV IXOO VFUHHQ SLS VSOLW VFUHHQ OD RXW full screen By pressing button select full screen ok activates one window lay out is seen on the screen Press or OK button One programme is displayed on the whole screen at this opt...

Page 12: ... right left to change sharpness is seen on the screen Press button to in crease sharpness Press button to de crease sharpness Sharpness level can be adjusted between 0 and 8 color By pressing button select color right left to adjust color is seen on the screen Press button to increase color Press button to decrease color Color level can be adjusted between 0 and 100 tint This item is displayed in ...

Page 13: ... to fill all zoom letterbox subtitles normal 14 9 and auto You can enter image size directly by press ing the button If pip option was selected the window menu is seen as below GRZQ IRU VL H VHWWLQJ LPDJH VL H SLS VL H SLS SRVLWLRQ ZLQGRZ DXWR image size By pressing button select image size right left to change image size is seen on the screen By pressing button you can change image size to fill a...

Page 14: ...s used to identify sound mode of the headphone hp sound mode can be set to stereo dual a or dual b according to the transmission balance By pressing button select balance right left to adjust balance is seen on the screen Press button to increase bal ance rightward Press button to de crease balance leftward Balance level can be adjusted between 50 and 50 3D Panorama This function creates a 3 dimen...

Page 15: ...guage right left to change language is seen on the screen By pressing button you can select the language vcr This item is displayed only when the TV is in AV mode By pressing button se lect vcr right left to change vcr status is seen on the screen By pressing button set vcr to on or off GRZQ IRU YDULRXV V VWHP RSWLRQV ODQJXDJH RVG WLPHRXW PHQX EDFNJURXQG VFDUW RXW VOHHS WLPHU VOHHS WLPH UHPDLQLQJ ...

Page 16: ...ppears on the screen If full screen option was selected at the lay out menu the settings menu is seen as be low GRZQ IRU YDULRXV V VWHP VHWWLQJV WY WXQHU VRXUFH VHOHFW VHWWLQJV If pip or split screen option was selected at the layout menu or in AV mode the settings menu is seen as below GRZQ IRU YDULRXV V VWHP VHWWLQJV VRXUFH VHOHFW VHWWLQJV tv tuner By pressing button select tv tuner ok to activa...

Page 17: ...rt section is for inserting programmes into another programme space Name allows changing the programme name Delete To delete press the RED button The follow ing warning menu comes to screen Press ing the M button cancels the activated De lete process Pressing the OK button erases the selected programme from the programme list and the programmes below shift one up UH RX VXUH RX ZDQW WR GHOHWH DQFHO...

Page 18: ...a digit buttons on the remote control There are 100 program storage between 0 and 99 fine tune By pressing button select fine tune right left to adjust fine tuning is seen on the screen By pressing button you can adjust the tuning The adjust values are between 50 and 50 channel By pressing button select channel right left to change channel is seen on the screen By pressing button you can change th...

Page 19: ... it by pressing button The source types are tuner Scart 1 Scart 1 RGB Scart 2 Scart 2 RGB PC DVI FAV and S Video OtherFeatures TV Status Programme Number Programme Name and Sound Indicator are displayed on the upper right side of the screen Source is also displayed with them on the right bottom side of the screen They are displayed after programme change during 3 seconds 3 Programme Number 35 Prog...

Page 20: ... and also can be selected after Dual B by Remote Control 8 If Dual B selected by Remote Control Mute Indicator It is placed in the upper left side of the screen when enabled To cancel mute there are two alternatives the first one is pressing the button thus the volume is set to the preceding value and the second one is increasing decreasing the volume level thus it starts from the previ ous level ...

Page 21: ...ele text screen backward one page at a time To Select Index Page To select the page number of the index gen erally page 100 press the button To Select Teletext With A TV Programme Press the button The text is now su perimposed over the programme on the screen Press the button again to return to the Teletext page To Select Double Height Text Press the button for the top half of the information page...

Page 22: ... watched does not have Teletext transmission no information will be displayed Fastext Your TV supports the 10 page Teletext sys tem When the page number of any of the 10 pages in memory is entered the system will not search for the requested page instead it will display the page automatically If the re quested page is not in memory the system will search for the requested page number and save the ...

Page 23: ...or further information ask your dealer See also the booklet supplied with your decoder Connect a decoder with an aerial socket to the TV Connect the aerial cable Connect a decoder without an aerial socket to the TV Connect the decoder to the TV with a eurocable to SCART 1 TV And Video Recorder Connect the aerial cables Better picture quality can be obtained if you also connect a eurocable to SCART...

Page 24: ...LLITE RECEIVER VIDEO HEADPHONE AUDIO AntennaConnections 9 8 9 8 9 8 DQWHQQD 9 DQWHQQD 5RXQG RKP FRD LDO FDEOH 5RXQG RKP FRD LDO FDEOH ODW RKP WZLQ OHDG FDEOH 5HDU RI 79 5HDU RI 79 2XWGRRU QWHQQD RQQHFWLRQV 01 ENG 4205 1546UK PLASMA BýnT 3D PANORAMA 10 PAGE SAMV3 50061377 p65 28 01 2005 16 05 24 ...

Page 25: ...untains or high buildings can cause double pictures or ghost images Some times you can improve the picture quality by changing the direction of the aerial Is the picture or Teletext unrecognisable Check if you have entered the correct fre quency The picture quality may degrade when two peripherals are connected to the TV at the same time In such a case disconnect one of the peripherals No Picture ...

Page 26: ...ELINDICATOR On Screen Display RFAERIALINPUT 75 Ohm unbalanced OPERATINGVOLTAGE 220 240V AC 50 Hz AUDIO 3D Panorama AUDIO OUTPUT POWER WRMS 10 THD 2 x 10 POWER CONSUMPTION W max 335 W 3 W Stand by PANEL 16 9 display 42 Screen Size DIMENSIONS mm HLJKW NJ ZLWKRXW IRRW DQG VSHDNHUV 0 16 216 PP 01 ENG 4205 1546UK PLASMA BýnT 3D PANORAMA 10 PAGE SAMV3 50061377 p65 28 01 2005 16 05 26 ...

Reviews: