background image

43

Version


1

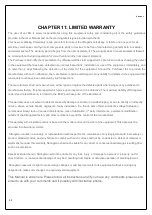
CHAPTER


11:


LIMITED


WARRANTY

The


user


of


car


lifts


is


solely


responsible


for


using


this


equipment


safely


and


considering


all


of


the


safety


guidelines


provided


in


the


User


Manual


and


on


the


warning


labels/signs


provided


with


the


lift.

Your


new


car


parking


lift


warranty


is


two


years


for


structure


of


the


lift


against


breakage


or


failure


and


one


year


for


all


electrical,


mechanical,


and


hydraulic


components,


parts


or


devices


to


be


free


of


manufacturing


defects


both


in


material


and


workmanship.


The


warranty


period


begins


from


the


date


of


shipment.


The


warranty


doesn’t


cover


equipment


that


will


be


stored


without


being


in


operation


for


more


than


6


months


from


date


of


shipment.

The


Purchaser


shall


notify


the


manufacturer


by


official


email


the


claim


supported


by


photos


and


videos


showing


the


defect


in


the


equipment


that


has


been


detected


upon


arrival


inspections,


installation


or


use


of


the


equipment,


immediately,


and


no


later


than


2


days


following


the


detection


of


the


defect


of


the


equipment.


Should


the


Purchaser


fail


to


provide


the


manufacturer


with


such


notification,


the


manufacturer


shall


be


discharged


of


any


liability


for


defects


in


the


equipment


that


reasonably


could


have


been


detected


by


such


inspections.

The


manufacturer


shall,


at


its


own


choice,


either


repair


or


replace


the


defected


parts


after


being


sent


by


purchaser


to


manufacturer


factory,


freight


prepaid,


which


prove


upon


inspection


to


be


defective.


The


maximum


liability


of


Strongman


under


this


Limited


Warranty


is


limited


to


the


EXW


purchase


price


of


the


Equipment.

This


warranty


does


not


extend


to


defects


caused


by


damage


or


broken


in


transit/shipping,


or


due


to


directly


or


indirectly


misuse,


abuse,


vehicle


impact,


negligence,


faulty


installation,


fire,


floods,


acts


of


God,


accidents,


voltage


fluctuation,


normal


wear


&


tear,


lack


of


required


maintenance,


lack


of


lubrication,


3

rd


party


interference,


equipment


modification


outside


of

 the


Strongman


factory


and


other


conditions


beyond


the


control


of


the


manufacturer.

This


warranty


with


all


stated


policies


is


based


on


the


model


and


serial


number


of


the


equipment.


This


data


must


be


provided


for


all


warranty


claims.


Strongman


makes


no


warranty


or


representation


with


respect


to


the


compliance


of


any


Equipment


with


local


safety


or


product


standard


codes,


and


any


failure


to


comply


with


such


codes


shall


not


be


considered


a


defect


of


material


or


workmanship


under


this


warranty.


Strongman


shall


not


be


liable


for


any


direct


or


consequential


damages


resulting


from


such


noncompliance.

Except


as


stated


herein,


Strongman


will


not


be


liable


for


any


loss,


injury,


or


damage


to


persons


or


property,


nor


for


direct,


indirect,


or


consequential


damage


of


any


kind,


resulting


from


failure


or


defective


operation


of


said


Equipment.


Strongman


reserves


its


right


to


make


design


changes


or


add


improvements


to


its


equipment


without


incurring


any


obligation


to


make


such


changes


on


previously


sold


equipment.

This


Manual


is


ends


here.


Please


follow


all


instructions


and


if


you


have


any


comments,


please


send


email


to


us


with


your


comments


and


if


possibly


with


illustrative


photos.

Summary of Contents for Telford

Page 1: ...Version 1 1 INSTALLATION MANUAL OPERATION INSTRUCTIONS SINGLE POST CAR PARKING LIFT ...

Page 2: ...SAFETY INSTRUCTIONS 5 CHAPTER 4 DESCRIPTION AND TECHNICAL DATA 9 CHAPTER 5 INSTALLATION INSTRUCTIONS 12 CHAPTER 6 INSTALLATION STEPS 17 CHAPTER 7 OPERATION INSTRUCTIONS 30 CHAPTER 8 MAINTENANCE 34 CHAPTER 9 ELECTRIC HYDRAULIC DIAGRAMS 36 CHAPTER 10 TROUBLE SHOOTING 41 CHAPTER 11 LIMITED WARRANTY 43 NOTES 44 ...

Page 3: ... DATE OF INSTALLATION _________________ WE HEREBY DECLARED THAT THE ABOVE MENTIONED MACHINE HAS BEEN INSTALLED CORRECTLY ALL FUNCTIONS HAVE BEEN CHECKED AS WELL AS CORRECT OPERATING OF ALL SAFETY DEVICES WE CONSIDER THEREFORE THE MACHINE WORK IN GOOD CONDITION Date of Installation The authorized technician The customer READ THIS MANUAL COMPLETELY AND PAY MORE ATTENTION TO THE INSTRUCTIONS BEFORE I...

Page 4: ...he higher level car down It is hydraulic driven Type that lifted directly by cylinder with chain connected to carriage This is electro hydraulic lift used ONLY for motor vehicle parking The product designed according to the EN 1493 2010 and EN 14010 2003 A1 2009 Reference of Directive Machine 2006 42 EC Working Principle 1 When operating the unit and pushing UP Button the hydraulic power unit will...

Page 5: ...esn t bear any responsibility for any accidents or damage might happen to the cars or and persons due to misuse of the lift 8 Keep hands and feet away from any moving parts Keep feet clear of parking lift when lowering 9 The parking lift MUST only be used by qualified staff properly trained for such work 10 During installation do not wear unfit clothes large cloves ties etc which could get caught ...

Page 6: ...en approval 18 If the parking lift will not be used for a long period proceed as follows a Disconnect the energy source b Empty the oil from the Hydraulic unit tank c Grease the moving parts which might be damaged by dust or drying out 19 Only Authorized personnel are allowed to operate the control box Only person with qualification for repairing electrical appliances could open control box 20 Con...

Page 7: ...Version 1 7 WARNING SIGNS ...

Page 8: ...Version 1 8 Fig 2 Fig 3 ...

Page 9: ...AL DATA 4 1 OVERALL DESCRIPTION 1 Unit Base 2 Cover of base 3 Carriage 4 Post 5 Support beam 6 Platform 3 pcs 7 Ramp 8 Wave plate 9 Stopper 10 Hydraulic power unit motor 11 Oil Tank 12 Stand of control box 13 Control box could be fixed on the post ...

Page 10: ...00 Kg Max Lifting Height 1820mm Max dimension of vehicle 5000 1850 1550mm Max weight of vehicle 2000 Kg Lock Release Type Electric lock release Outline Dimension 3945x 2631x 2479 mm Unit Weight 1300 Kg Parking Width 2000mm Rise Drop Time 60 S 50 S Power Supply Motor Capacity 220V 1Ph 50Hz 2 2 KW Run Way Ramps Diamond Steel Plates Noise Level 85dB Platform Middle Diamond Steel Plates and removable ...

Page 11: ...Version 1 11 4 4 Lift Dimensions ...

Page 12: ...on andtraining Prepare for a successful installation by making sure your floor meets specific requirements Installation technicians should be healthy well trained and qualified to carry on the installation with experience for both mechanical electrical work Use hoist crane with suitable steel chain or woven belt to lift he package to the place you need to install The lifting capacity of the hoist ...

Page 13: ...nd off load the contents near the installation place Fig 7 The hydraulic power unit box and standard parts chains box are light could be carried by hand Then take out steel parts one by one using suitable lifting hoist Fig 9 is an example of hoist Fig 8 Fig 9 ...

Page 14: ...ift check the following Lift Location Always use architect s plans when available Check layout dimension against floor plan requirements making sure adequate space is available Your lift requires a 220v 30amp single phase grounded electrical source There should be room enough to operate the lift in a safe manner and without restrictions Space Required Please refer to the drawing for detailed insta...

Page 15: ...fications Minimum 200 mm thickness Old unleveled or damaged Concrete slab Specifications In this case you can cut out a 1m x 1m square form the old slab and pour new concrete to a depth of about 300mm You can then tie this new section of slab back into the existing slab with Rotary Hammer Drill drilled in Do it under all car lift posts Specifications of concrete must be adhered to Failure to do so...

Page 16: ...rts List Item Size Qty Item Size Qty Hex bolt flat washer spring washer M8 30 4 Nut M12 1 Hex bolt flat washer spring washer M18 45 18 Chain wheel Φ110 1 Bolt M5 15 4 Roller on carriage 4 Bolt M6 20 1 Oil bearing 42 38 50 5 Hex bolt flat washer spring washer M12 35 4 Limit switch 1 Bolt M6 25 1 Limit switch cable 2 0 5 1 5 m Countersunk bolt M6 15 1 Flat washer 16 2 Countersunk bolt M10 10 1 Split...

Page 17: ...t be relatively smooth leveled in all directions 5 After unloading the package place it near the intended installation location 6 Dismantle the steel parts of the lift from the package 7 Remove the packing materials steel brackets cartoons etc from the installation site CHAPTER 6 INSTALLATION STEPS 6 1 DETERMINE LOCATION AND MARK WITH CHALK ON THE FLOOR 1 Determine the location for installing the ...

Page 18: ...er drilling remove dust thoroughly from each hole and make certain that the base remains aligned with the chalk line during this process 4 If shimming is required insert the shims with selected thickness as necessary under the base plate anchor bolts so that when the anchor bolts are tightened the base will be horizontal Fig12 5 With the shims and anchor bolts in place tighten by securing the nut ...

Page 19: ...ulley hole to the head of the cylinder 3 Put the cylinder on the cylinder base seat at the bottom of the post Fig 15 4 Insert the chain inside the chain pulley and fix one side of the chain on the clamp behind the cylinder base at the bottom of the post Fig 16 5 Fix the other side of the chain to the carriage using threaded connection rod M20 Fig 17 Fig 18 6 Fix the cover on the top of the post us...

Page 20: ...Version 1 20 Fig 13 Fig 14 Fig15 Fig16 ...

Page 21: ...Version 1 21 Fig 17 Fig 18 Fig 19 ...

Page 22: ...r 6 4 INSTALLATION OF THE COLUMN POST ON THE BASE 1 Place the column in its position over the base using proper lifting hoist 2 Use fixing bolts M18 x 45 to connect the post base to lift base Fig 20 3 Fix the cover of the basement with bolts M10 x 15 Fig 21 Fig 20 ...

Page 23: ...o the carriage using bolts M18 x 45 2 Lift up the left right platforms separately and fix them with middle one with fixing bolts M20 x 120 Fig 22 Fig 23 Fig 24 and Fig 25 3 Fix the lock and limit switch to the column with Hex bolts M14 x30 Fig 26 Fig 27 4 Fix wave plates on the platforms one by one Fig 28 Fig 22 Fig 23 ...

Page 24: ...Version 1 24 Fig 24 Fig 25 ...

Page 25: ...Version 1 25 Lock device in the post Fig 26 Fig 27 ...

Page 26: ...Version 1 26 Fig 28 ...

Page 27: ...POWER UNIT TANK WITH OIL 1 Connect the oil hose between hydraulic cylinder and hydraulic power unit using integrated fitting Fig 30 Fig 31 Fig 32 2 Pay attention to keep the hoses clean and free of cracks 3 Use the oil type Rando HD 46 or other good quality garage hydraulic oil to fill the hydraulic tank up to max mark line on the tank Fig 33 Fig 30 ...

Page 28: ...the stand and place the stand far away from any moving parts to avoid injuries Make sure that the location of the control panel and its stand is suitable to have clear view to the whole lift during lifting up down 2 Connect the electric cables according to attached wiring diagram in this manual ...

Page 29: ...far away from movable parts of lift Fig 34 6 9 LUBRICATION OF MOVING PARTS 1 Before operation use proper grease to lubricate the post from inner parts where the sliding blocks are moving to ensure smooth lifting of carriage 2 Use lithium lubricating grease to lubricate chain and pulley Fig 35 ...

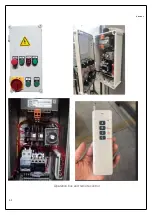
Page 30: ...all be in a safe position during parking retrieving the car 6 Check the electrical control panel and follow the wiring diagram for electric connections 7 2 FUNCTION OF EACH BUTTONS Operation panel buttons UP button Press it to lift up the platform from ground level Down Button Press it to lower the platform to ground level Emergency Stop Button Press it to stop the whole unit immediately in case o...

Page 31: ...Version 1 31 Operation box and remote control ...

Page 32: ...Version 1 32 OPERATION STEPS OF OPERATION PANEL CONTROL PANEL ...

Page 33: ... pull hand brake before leaving the car 3 Press A button Up 4 The car will be lifted on the determined height 5 Drive the other car and park it on ground floor Retrieving cars 1 Drive away the car on the ground 2 Press B button Down 3 The car will be lifted a little bit and then go down to the floor 4 Drive the car on the plat away ...

Page 34: ...r to normal operating conditions They can be changed according to the kind of service environment frequency of use etc 1 DAILY PRE OPERATION CHECK The user should perform daily check of safety lock device The discovery of device failure before using the left will save you from expensive property damage lost time and serious personal injury Check safety lock audibly and visually while in operation ...

Page 35: ...floor and turn off the main electric switch Empty the oil tank and check the condition of the hydraulic fluid Clean the oil filter from impurities and change oil if needed Check the electric control box components and make sure all wiring is connected tighten Check all electric cables to ensure neither burns nor bare wires Clean by blower and dry brush the electric motor to remove accumulated dust...

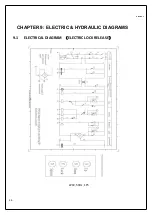
Page 36: ...Version 1 36 CHAPTER 9 ELECTRIC HYDRAULIC DIAGRAMS 9 1 ELECTRICAL DIAGRAM ELECTRIC LOCK RELEASE 220V 50Hz 1Ph ...

Page 37: ...E NO CODE NAME 1 KM RELAY 8 M MOTOR 2 SB PUSH BUTTOM 9 N NEUTRAL 3 KT TIME RELAY 10 U RECTIFIER 4 KA AC RELAY 11 SQ LIMIT SWITCH 5 YV SOLENOID VALVE 12 TC TRANSFORMER 6 HL INDICATING LAMP 13 QF CIRCUIT BREAKER 7 QS MAIN SWITCH ...

Page 38: ...Version 1 38 9 2 HYDRAULIC DIAGRAM ...

Page 39: ...Version 1 39 1 Oil Tank 2 Oil Suction Pipe 3 Oil Filter 4 Oil Return Pipe 5 Gear Pump 6 Valve Block 7 7 One Way Valve 8 Solenoid Valve 9 Hydraulic Motor 10 Throttle Valve ...

Page 40: ...Version 1 40 1 Filter 2 Motor 3 Gear pump 4 Relief valve 5 One way valve 6 Cylinder 7 Solenoid valve 8 Throttle valve 9 Oil tank ...

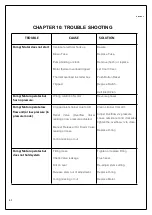
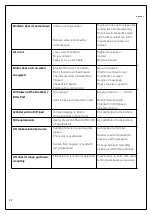
Page 41: ...hases Pump Motor operate low flow and or low pressure in pressure mode Clogged inlet strainer due to dirt Relief Valve Overflow Valve leaking or low pressure adjusted Manual Release Oil Drain Valve leaking or loose O ring missing or cut Clean strainer from dirt Adjust Overflow v v pressure Loose outside nut and clockwise tighten the overflow v v to close Replace O ring Pump Motor operates but does...

Page 42: ...essary Check the start capacitor Oil blows out the Breather Filter Port Oil overload Vehicle has been lowered too fast Empty oil tank to 2 3 full Restrict lowering with Throttle V V Oil Speed Adjusting Screw Cylinder will not lift load Oil Seal damage to Piston Oil leaking from cylinder front Call distributor for instructions Oil requirements Use Hydraulic Oil Rando HD 46 or equivalent Call distri...

Page 43: ...mum liability of Strongman under this Limited Warranty is limited to the EXW purchase price of the Equipment This warranty does not extend to defects caused by damage or broken in transit shipping or due to directly or indirectly misuse abuse vehicle impact negligence faulty installation fire floods acts of God accidents voltage fluctuation normal wear tear lack of required maintenance lack of lub...

Page 44: ...Version 1 44 NOTES ...

Reviews: