background image

Page 10 of 16 


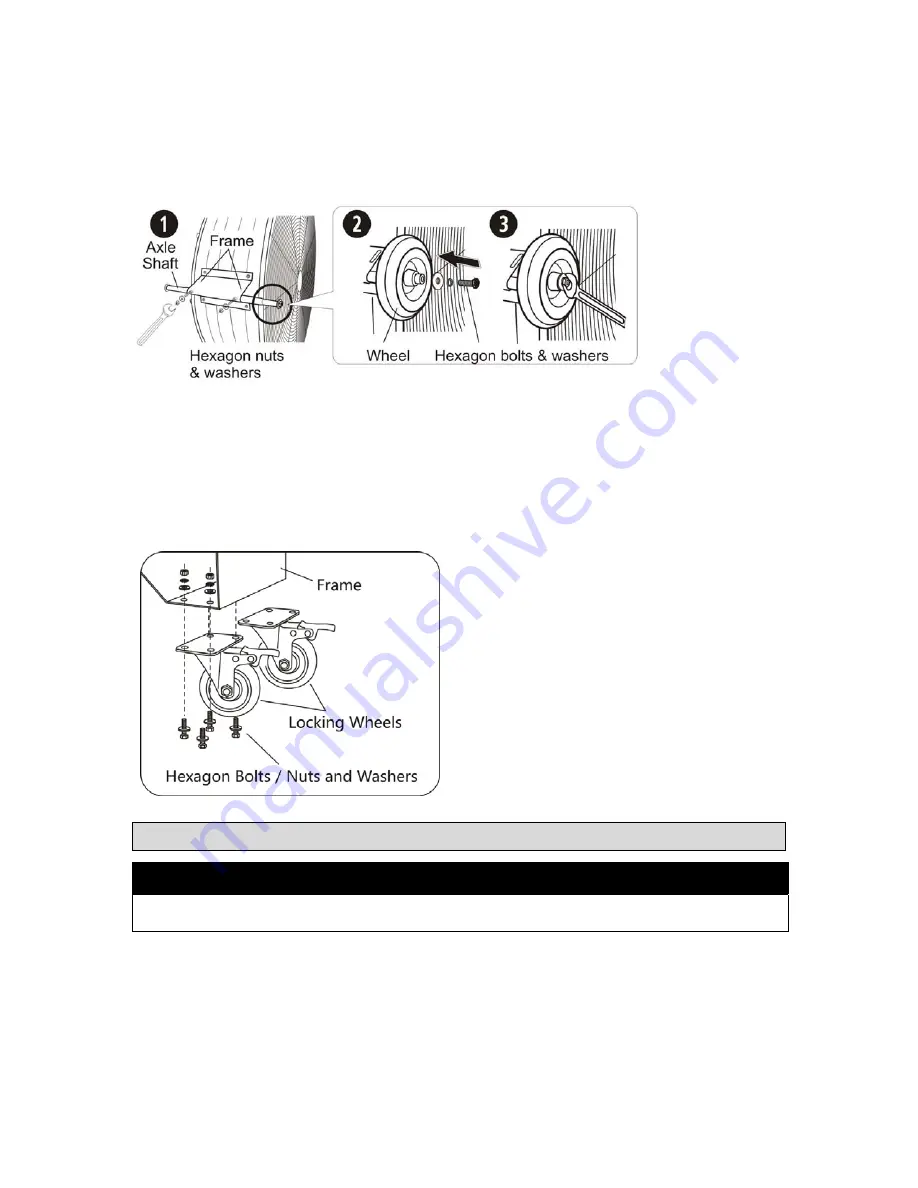
1. 

Insert the axle shaft through the hole in the frame. Align the holes in the axle and frame. Secure 
the screws and washers, as shown below. 

2. 

Slide in each wheel over the end of each axle shaft and secure with hex bolts and washers. 

3. 

Tighten all connections securely. 


Locking Wheel Installation for Model 79031 


Locking Wheel Installation for Model #79031 

1. 

Attachthe locking wheel component (2) to the frame. 

2. 

Place the washer on the hexbolt. 

3. 

Insert the bolt through the opening on the locking wheel component. 

4. 

Tighten the nuts firmly to secure the wheel component. 


Before Each Use 

WARNING


Before using, be sure the fan does not have any damaged parts. 

Place fan on a flat, stable surface. 


Summary of Contents for 49934

Page 1: ... Manual WARNING Read carefully and understand all ASSEMBLY AND OPERATION INSTRUCTIONS before operating Failure to follow the safety rules and other basic safety precautions may result in serious personal injury Items 49938 49934 49935 79031 ...

Page 2: ...portant that you read the entire manual to become familiar with this product before you begin using it This fanis designed for certain applications only Northern Tool and Equipment is not responsible for issues arising from modification or improper use of this product such as an application for which it was not designed We strongly recommend that this product not be modified and or used for any ap...

Page 3: ...rtant Safety Information 4 Specific Operation Warnings 6 Grounding 6 Extension Cords 7 Main Parts of Fan 9 Assembly Instructions 9 Before Each Use 10 Operating Instructions 11 After Each Use 11 Maintenance 11 Troubleshooting 12 Parts Diagram 13 Parts List 13 Replacement Parts 14 Limited Warranty 15 ...

Page 4: ...ge The warnings cautions and instructions in this manual cannot cover all possible conditions or situations that could occur Exercise common sense and caution when using this tool Always be aware of the environment and ensure that the tool is used in a safe and responsible manner Do not allow persons to operate or assemble the product until they have read this manual and have developed a thorough ...

Page 5: ... medication A moment of inattention while operating the tool may result in serious personal injury Dress properly Do not wear loose clothing dangling objects or jewelry Keep your hair clothing and gloves away from moving parts Loose clothes jewelry or long hair can be caught in moving parts Air vents on the tool often cover moving parts and should be avoided Wear the proper personal protective equ...

Page 6: ...ngs WARNING Ensure the power switch is OFFbefore plugging in the fan Electric shock hazard Do not expose to water or rain Be sure equipment is properly grounded Use only outdoor rated extension cords of proper size Do not use this product with any solid state speed control device Rotating blade hazard Can cause serious injury or cut Keep hands clear DO NOT operate without guards in place Turn powe...

Page 7: ...the Canadian Standard Association and the National Electrical Code See Figure B Double insulated tools may be used in either of the 120 volt outlets shown in the following illustration Extension Cords WARNING USE A PROPER EXTENSION CORD Make sure your extension cord is in good condition When using an extension cord be sure to use one heavy enough to carry the current your product will draw An unde...

Page 8: ...red If you are using one extension cord for more than one tool add the nameplate amperes and use the sum to determine the required minimum cord size If you are using an extension cord outdoors make sure it is marked with the suffix W A W in Canada to indicate it is acceptable for outdoor use Make sure your extension cord is properly wired and in good electrical condition Always replace a damaged e...

Page 9: ...Page 9 of 16 Main Parts of Fan Assembly Instructions WARNING Be sure the fan does not have any damage ...

Page 10: ...ighten all connections securely Locking Wheel Installation for Model 79031 Locking Wheel Installation for Model 79031 1 Attachthe locking wheel component 2 to the frame 2 Place the washer on the hexbolt 3 Insert the bolt through the opening on the locking wheel component 4 Tighten the nuts firmly to secure the wheel component Before Each Use WARNING Before using be sure the fan does not have any d...

Page 11: ...is expected that the motor will feel warm to the touch after continuous operation This fan features a thermostat that will automatically shut offif it overheats for any reason If this happens immediately unplug the fan from the outlet Wait approximately 15 minutes before plugging the fan back in Locking Wheel Instruction for Model 79031 1 When the wheels are unlocked the fan can roll in any direct...

Page 12: ...e secured Be sure there are no damages to any part of the fan Be sure the fan is on a level surface After the first 20 operating hours Be sure all parts of the fan are secured Be sure there aren t any damages to any part of fan Be sure the fan is on a level surface After the first 50 operating hours or every week Be sure all parts of fan are secured Be sure there aren t any damages to any part of ...

Page 13: ...Page 13 of 16 Parts Diagram Parts List Reference Part Description Quantity 1 Drum Fan Body 1 2 Wheels 2 3 Hex Bolts and Washers 2 of each 4 Axle 1 5 Lock Nutsand Washers 2 of each 6 Locking Wheels 2 ...

Page 14: ...ns provided are a convenient reference to the location and position of parts in the assembly sequence When ordering parts the following information will be required item description item model number item serial number item lot date code and the replacement part reference number The distributor reserves the rights to make design changes and improvements to product lines and manuals without notice ...

Page 15: ... claim contact Us at 1 800 222 5381 identify the product by make and model number and follow the claim instructions that will be provided The product and the purchase receipt must be provided to Us in order to process Your warranty claim Any returned product that is replaced or refunded by Us becomes our property You will be responsible for return shipping costs or costs related to Your return vis...

Page 16: ...Page 16 of 16 Distributed by Northern Tool Equipment Company Inc Burnsville Minnesota 55306 www northerntool com Made in China ...

Reviews: